06 API TESTING: MENAUL AND AUTOMATION
API TESTING: MENAUL AND AUTOMATION
API Testing Document Example:
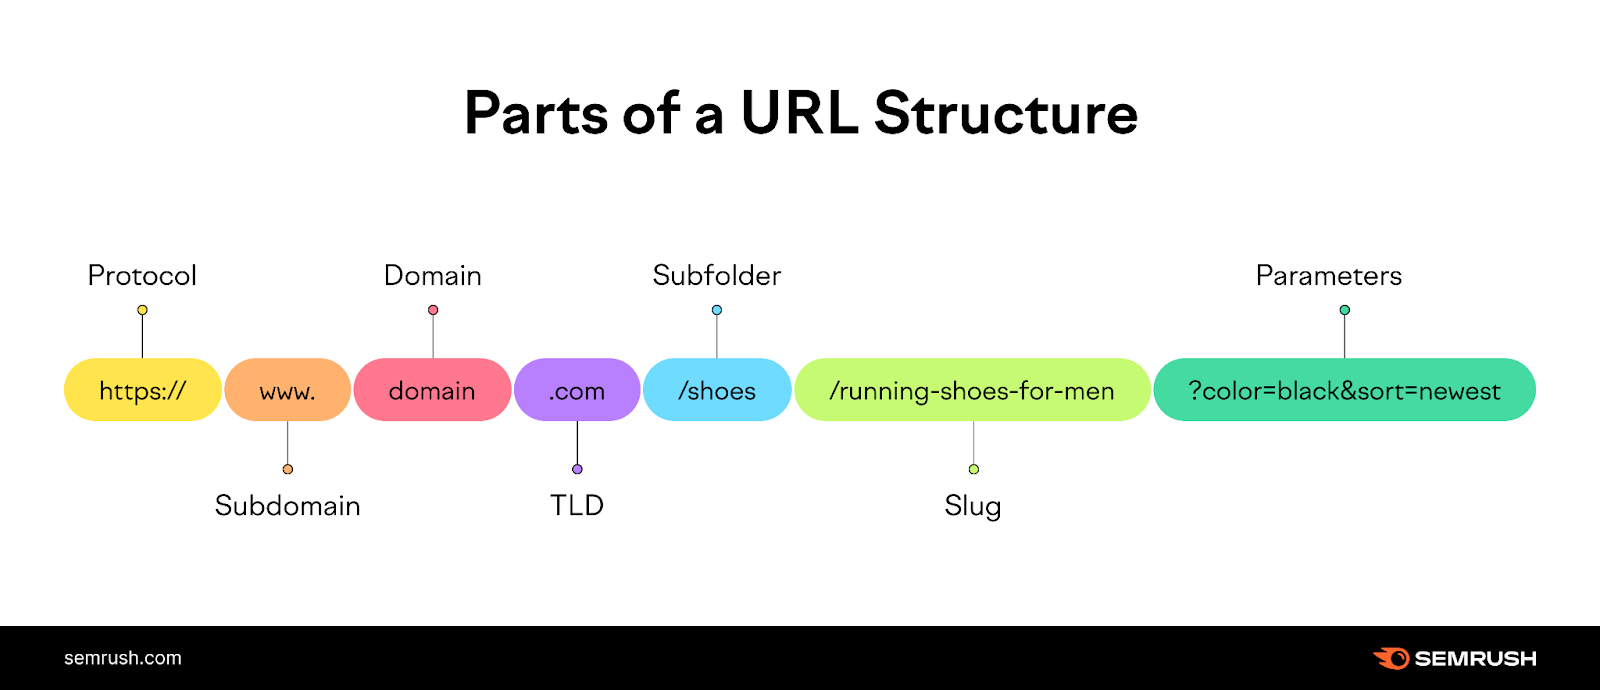
API Documentation API Base_URL:
1. API for Authentication :
API Post data Definition
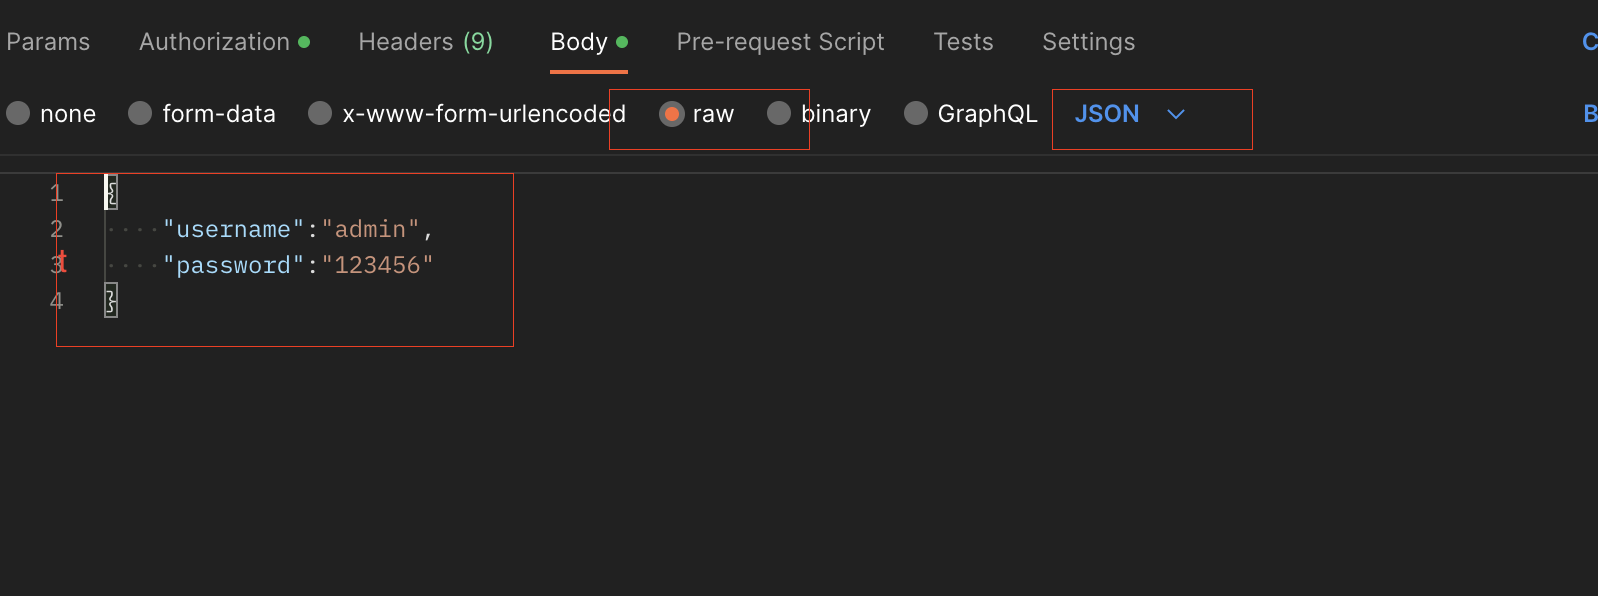
Request Payload (Json):
{
"username": "admin",
"password": "123456"
}
Response example:
STATUS CODE: 201 Created
{
"access_token": "eyJ0eXAiOiJKV1QiLCJhbGciOiJIUzI1NiJ9.eyJ1aWQiOiIyIiwidXNlcm5hbWUiOiJhZG1pbiIsI kFQSV9USU1FIjoxNjk3OTA5ODAyfQ.9wu_-4iEr1JG8Z9r2EdlqV3BZWaLpVtqE8mS-zZJJWo",
"status": true,
"message": "Login success!", "token_expire_time": 86400
}
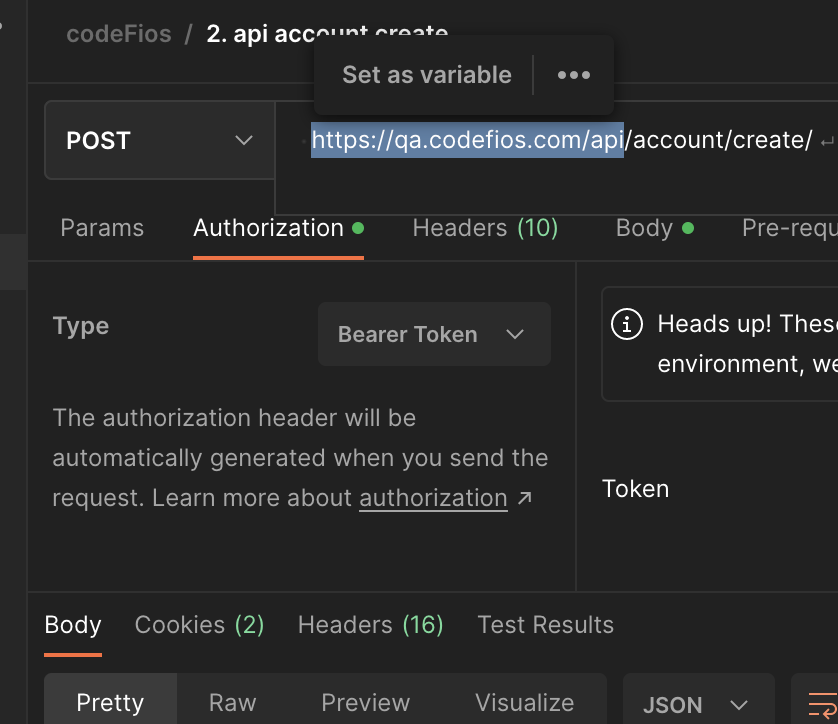
2. API for Create New Accounts:
API Post data Definition
Request JSON example:
{
"account_name": "MD Techfios account 111", "description": "Test description 1", "balance": 100.22,
"account_number": 123456789, "contact_person": "MD Islam"
}
Response example:
STATUS CODE: 200 OK
{
"message": "Account created successfully."
}
3. API for Update Existing Record
API Post data Definition
Request JSON example:
{
"account_id": "47",
"account_name": "MD Techfios account 111", "account_number": "123456789", "description": "Test description 1", "balance": "1000.22",
"contact_person": "MD Islam"
}
Response example:
STATUS CODE: 200 OK
{
"message": "Account updated successfully."
}
4. API for Get All Accounts Info
API Post data Definition
Request JSON example:
Not Required
Response example:
STATUS CODE: 200 OK
{
"records": [
{
"account_id": "47",
"account_name": "MD Techfios account 111", "account_number": "123456789", "description": "Test description 1", "balance": "100.22",
"contact_person": "MD Islam"
},
{
"account_id": "46",
"account_name": "account 3",
"account_number": "134548", "description": "",
"balance": "100.00", "contact_person": ""
},
{
"account_id": "45",
"account_name": "Test account Rashed2", "account_number": "58555525255", "description": "Test desc",
"balance": "500.00", "contact_person": "abc"
}
]
}
5. API for Get single Accounts Info
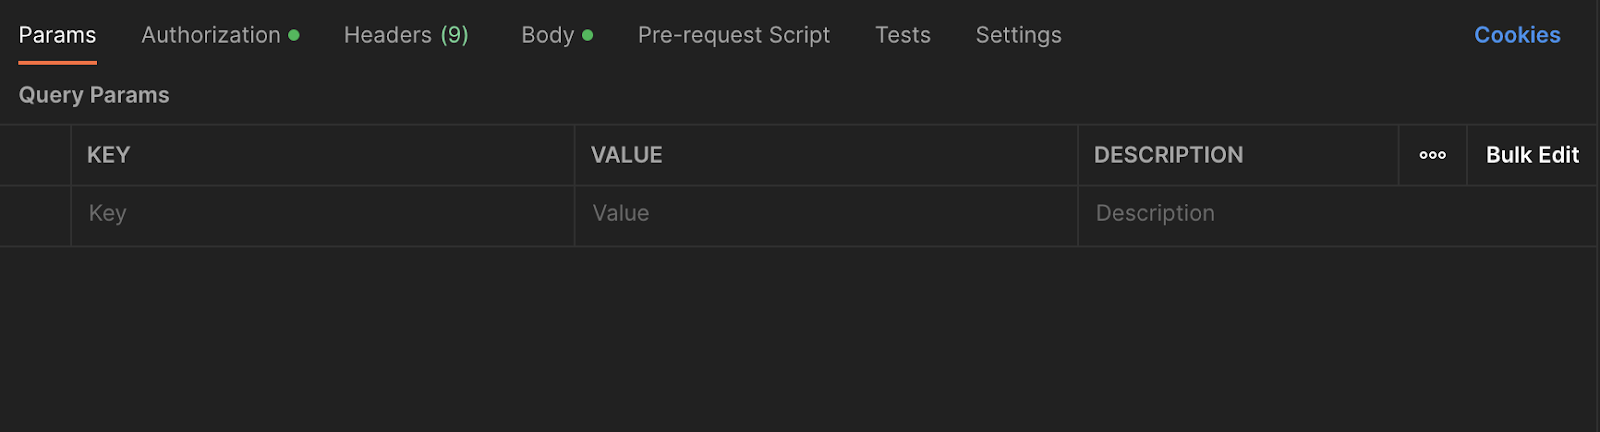
API query prams Definition
Request JSON example:
Not Required
Response example:
STATUS CODE: 200 OK
{
"account_id": "2",
"account_name": "Test account 365", "description": "Test desc", "balance": "500.00",
"permission": null, "account_number": "58555525255", "contact_person": "abc"
}
6. API for Delete Accounts Info
API query prams Definition
Response example:
STATUS CODE: 200 OK
{
"message": "Account deleted successfully."
}
Response Table:
Web Service
For soap-UI
Download : https://www.soapui.org/downloads/soapui/
And install
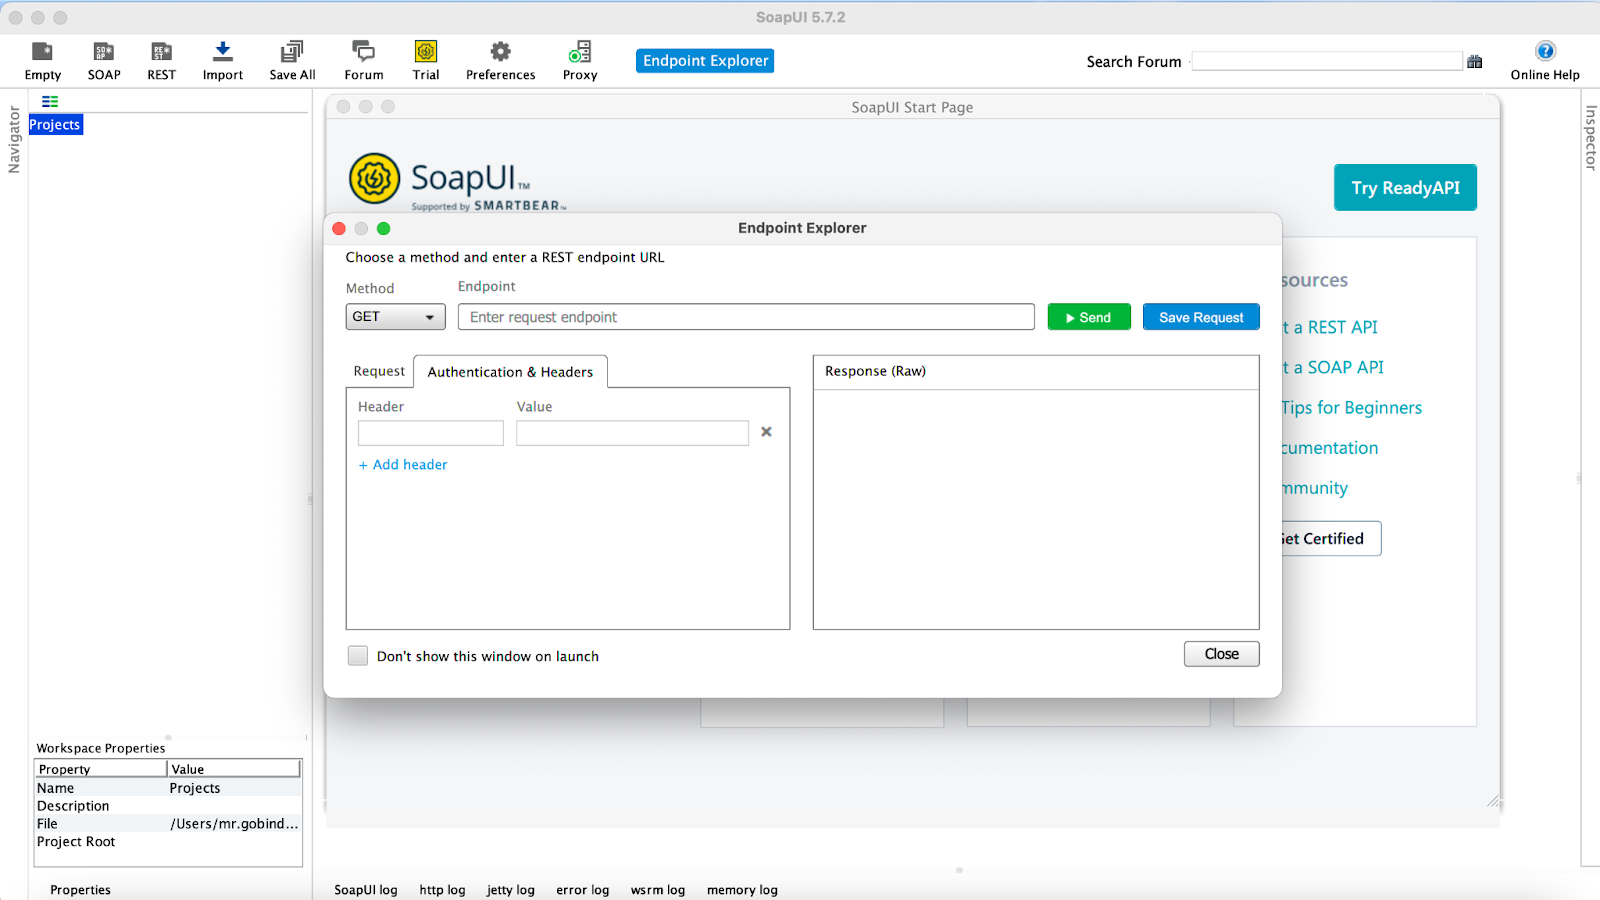
Create project
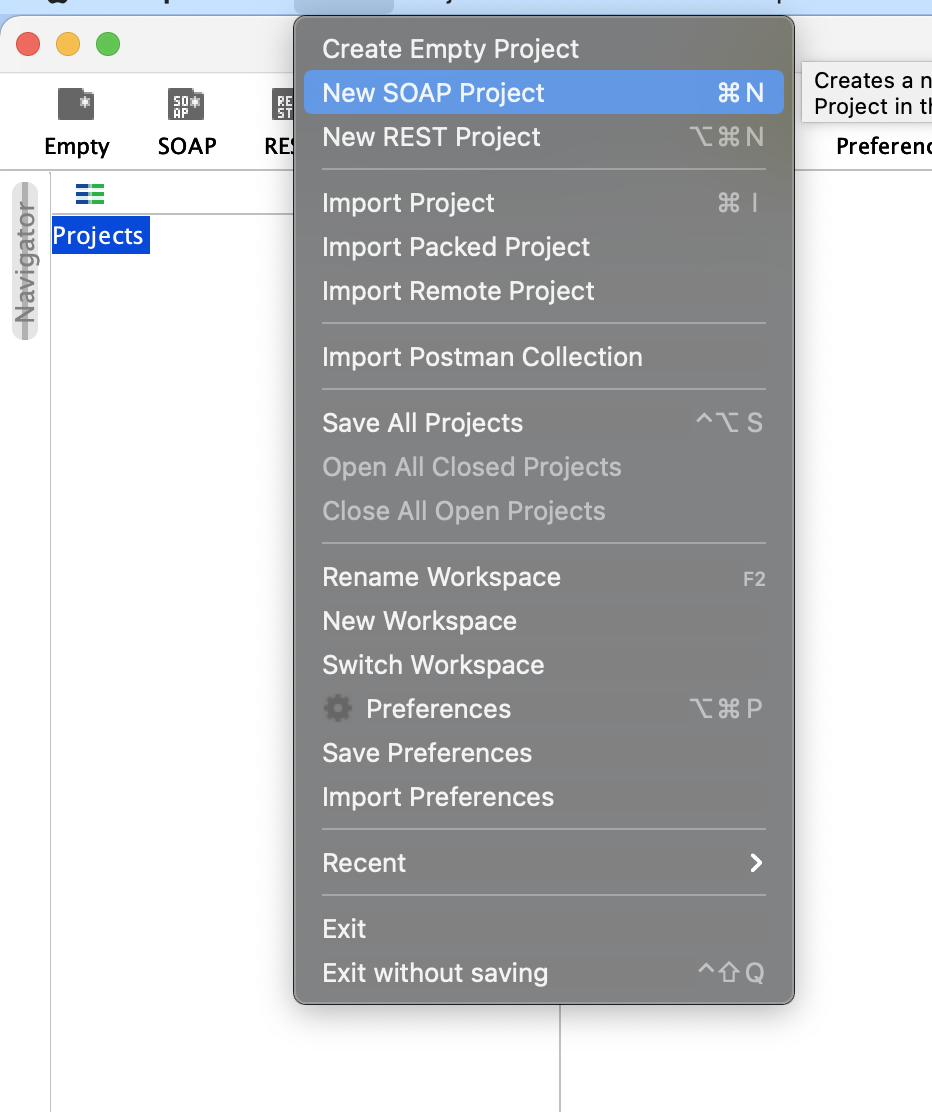
Give the project name and
Enter http://www.dneonline.com/calculator.asmx?wsdl
Add new request add button
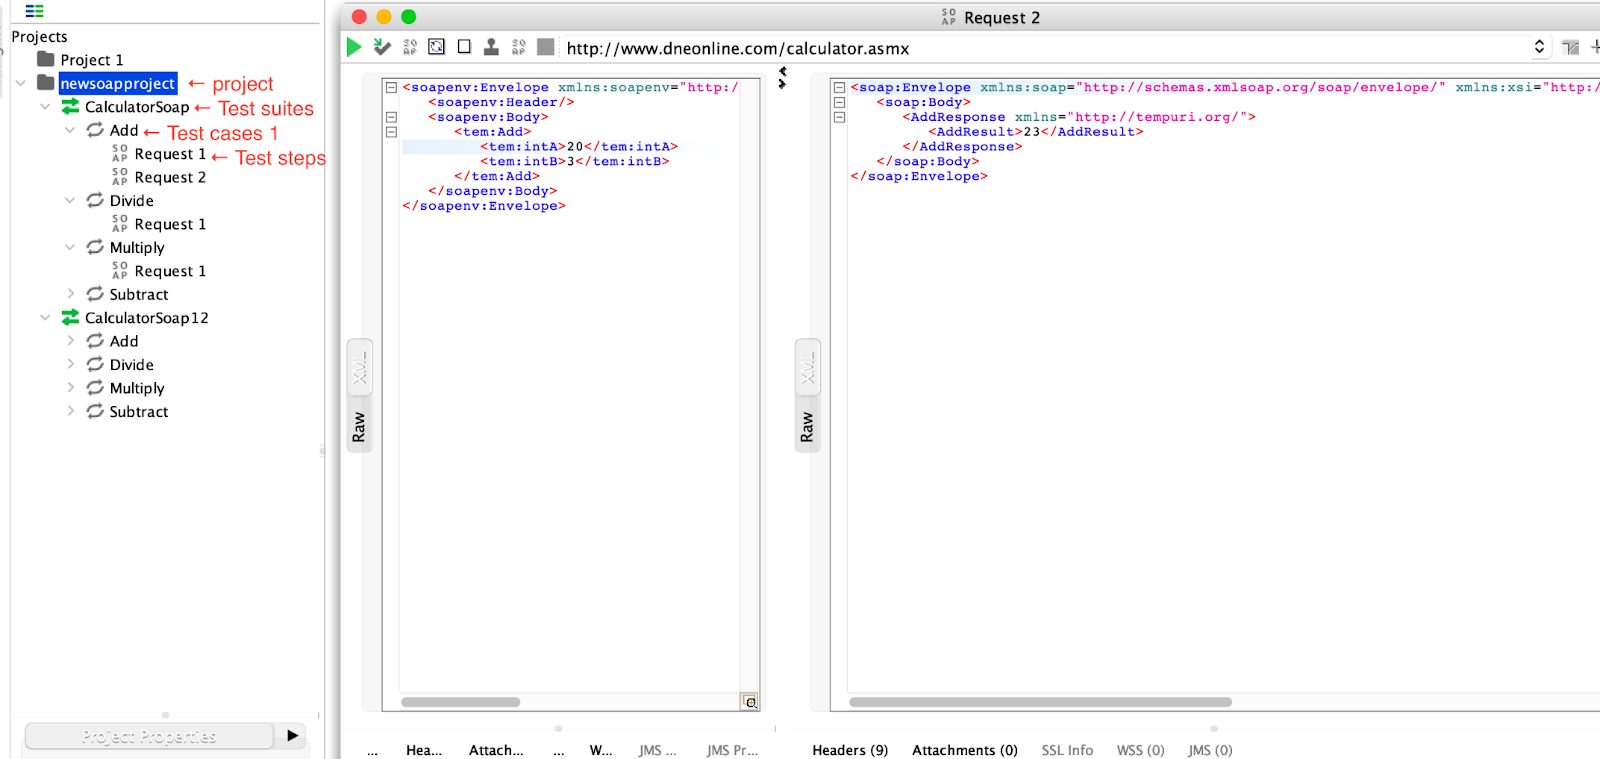
Property transfer
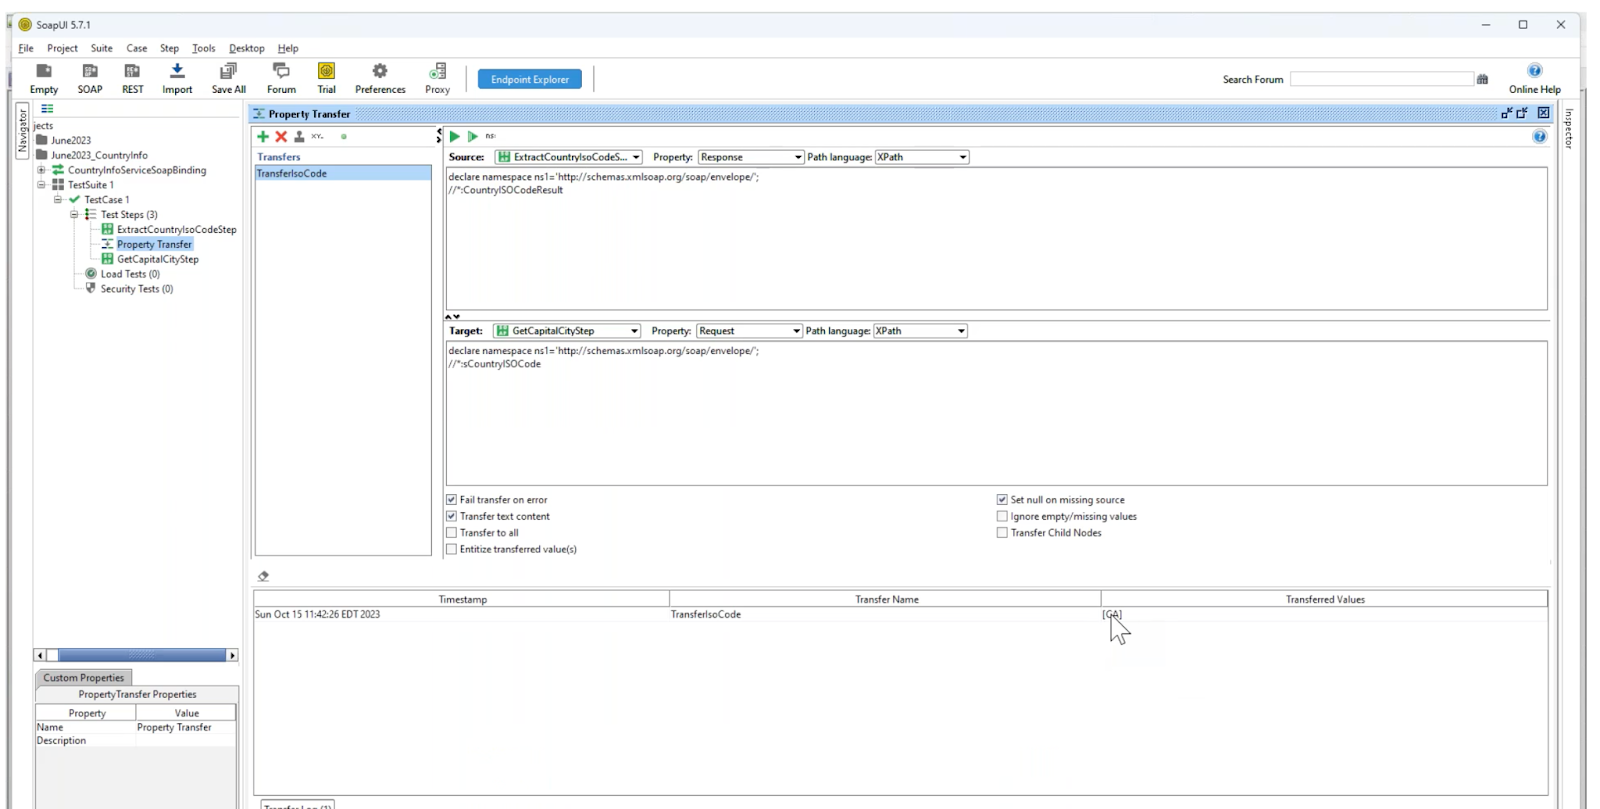
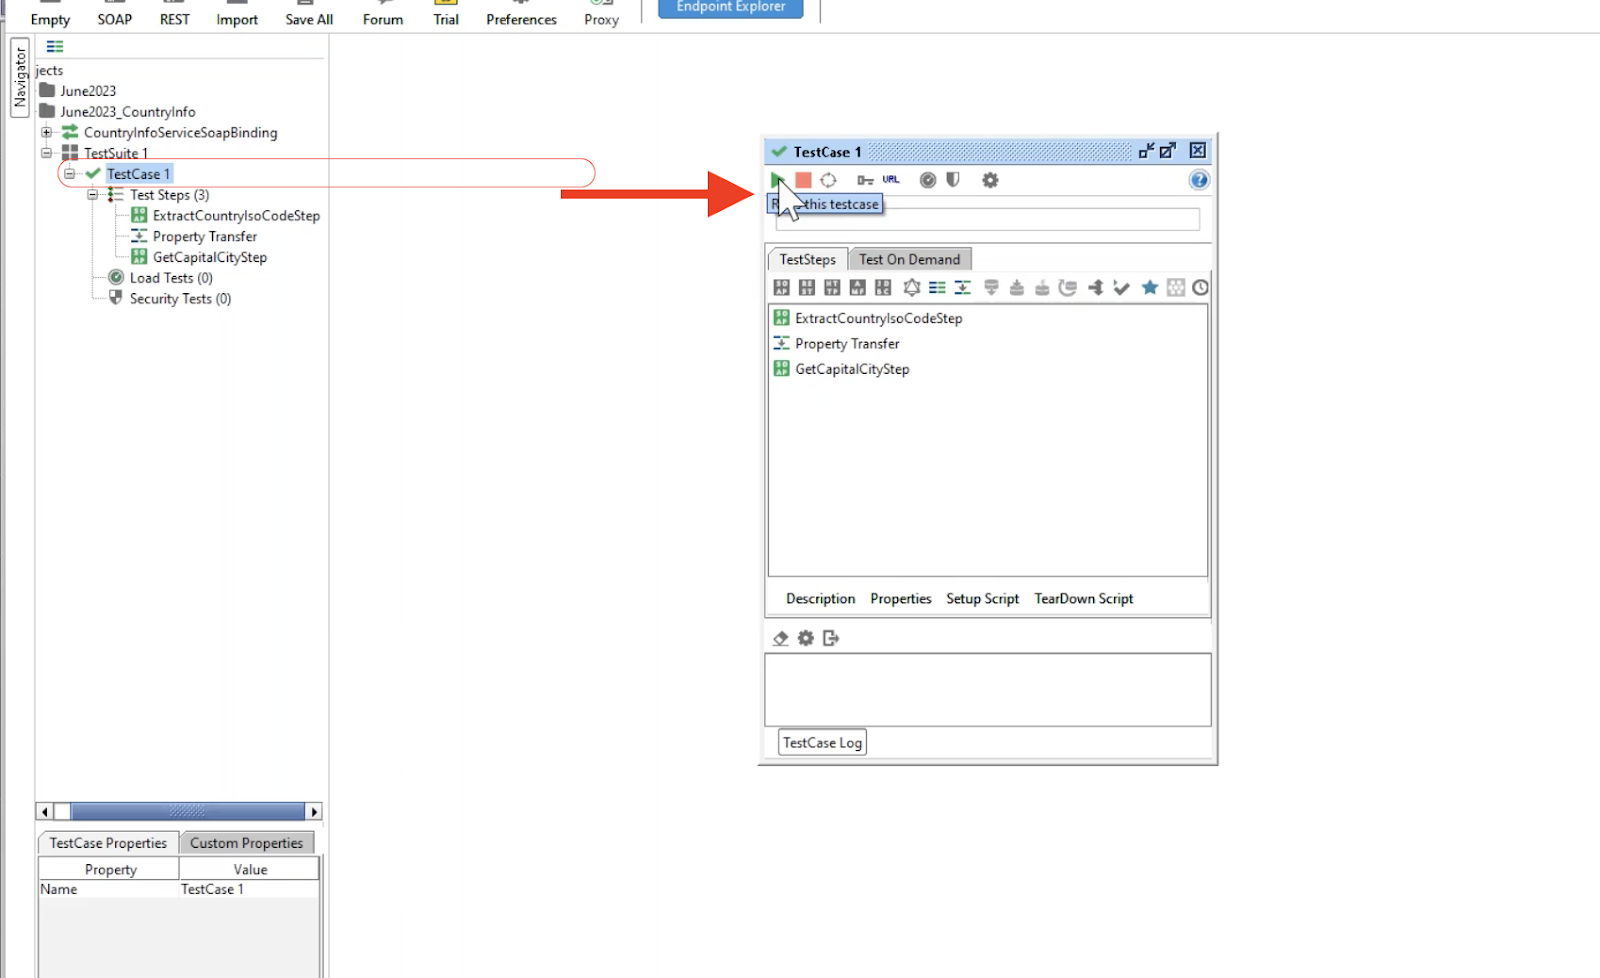
Run test cases
Download SOAPUI Open Source from here WSDL URL : http://www.dneonline.com/calculator.asmx?wsdl Exercise Objectives:
● Creating a project
● Adding a test case
● Authenticating SOAP Requests
● HTTP headers
● Assertions
Exercise Objectives:
● Importing a Project
● Adding Test Steps
● Properties and Property Transfer
● Creating a Mock Service
PostMan
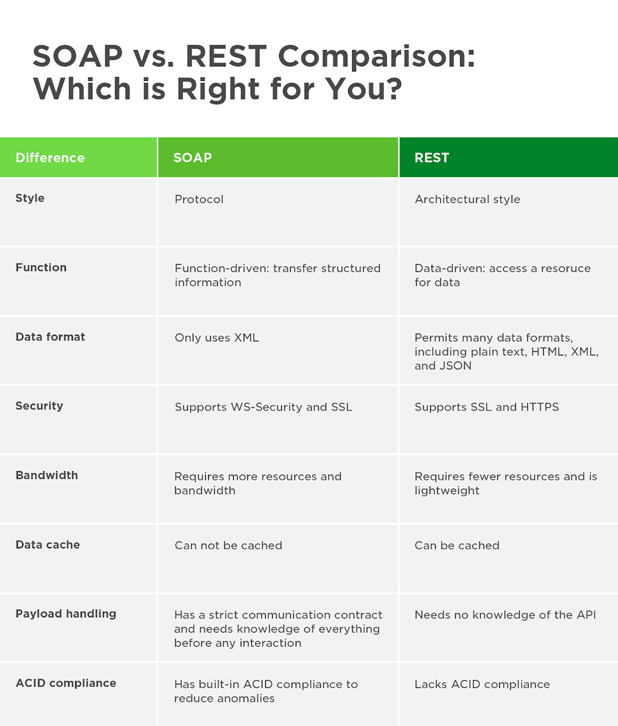
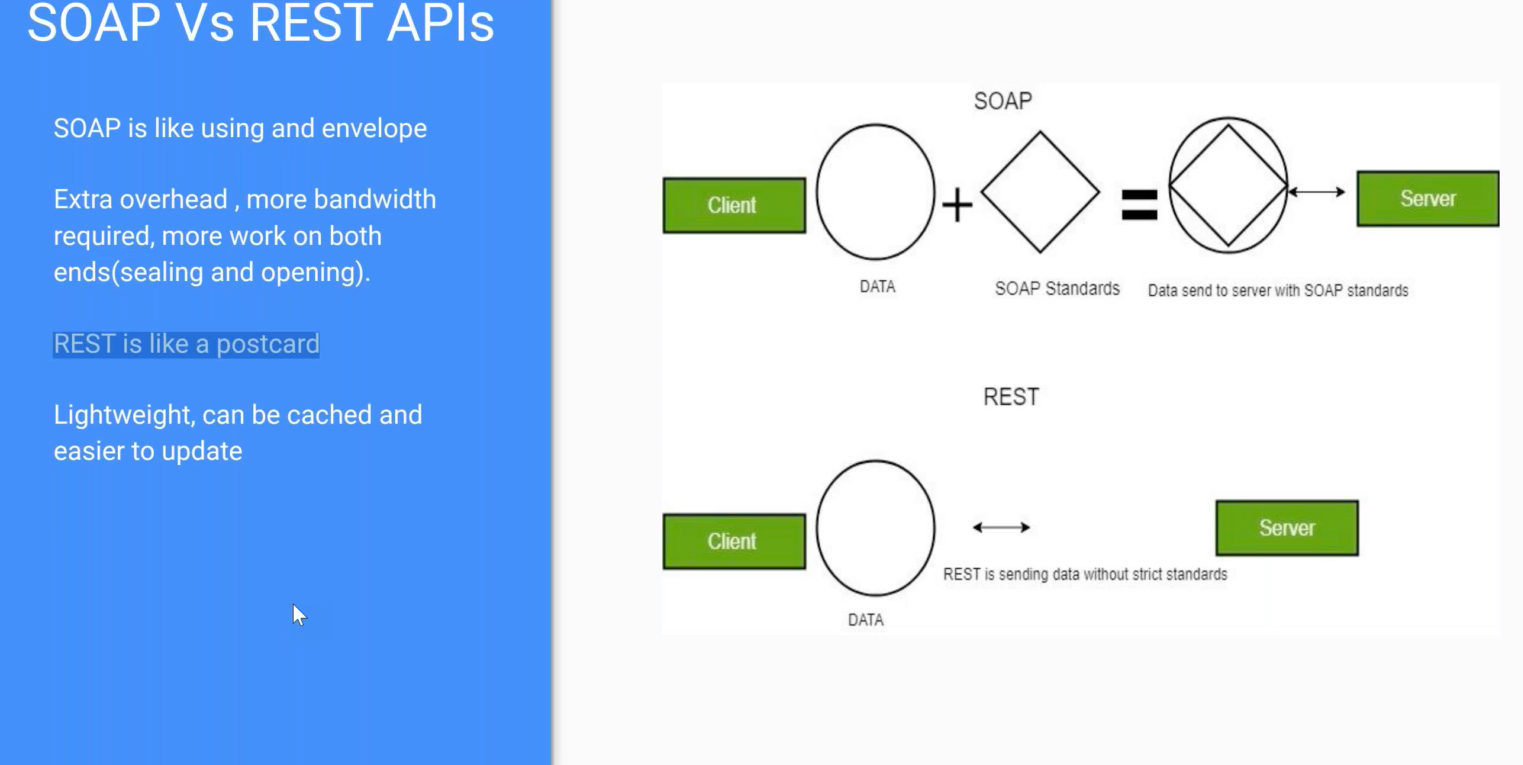
Soap vs Rest
Postman(manual testing)
Download and install : https://www.postman.com/downloads/
Sign-in the postman to save collection/request
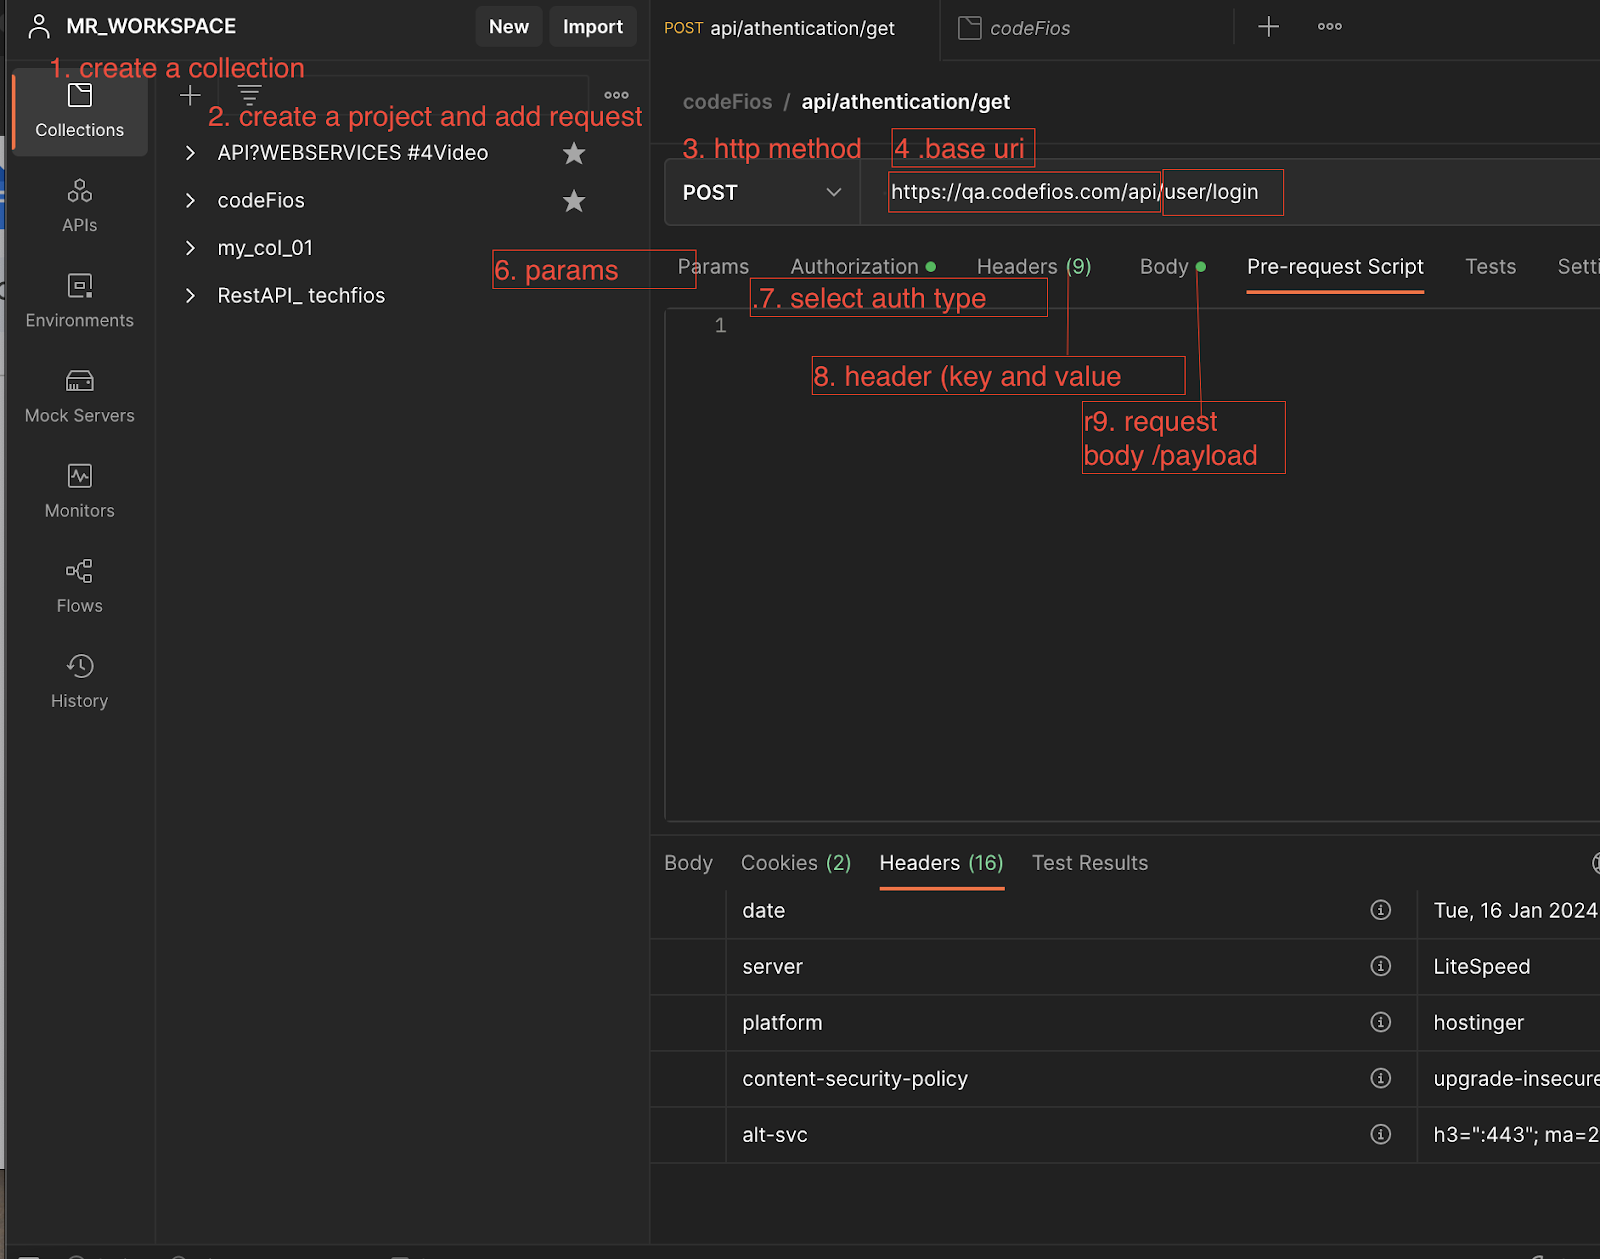
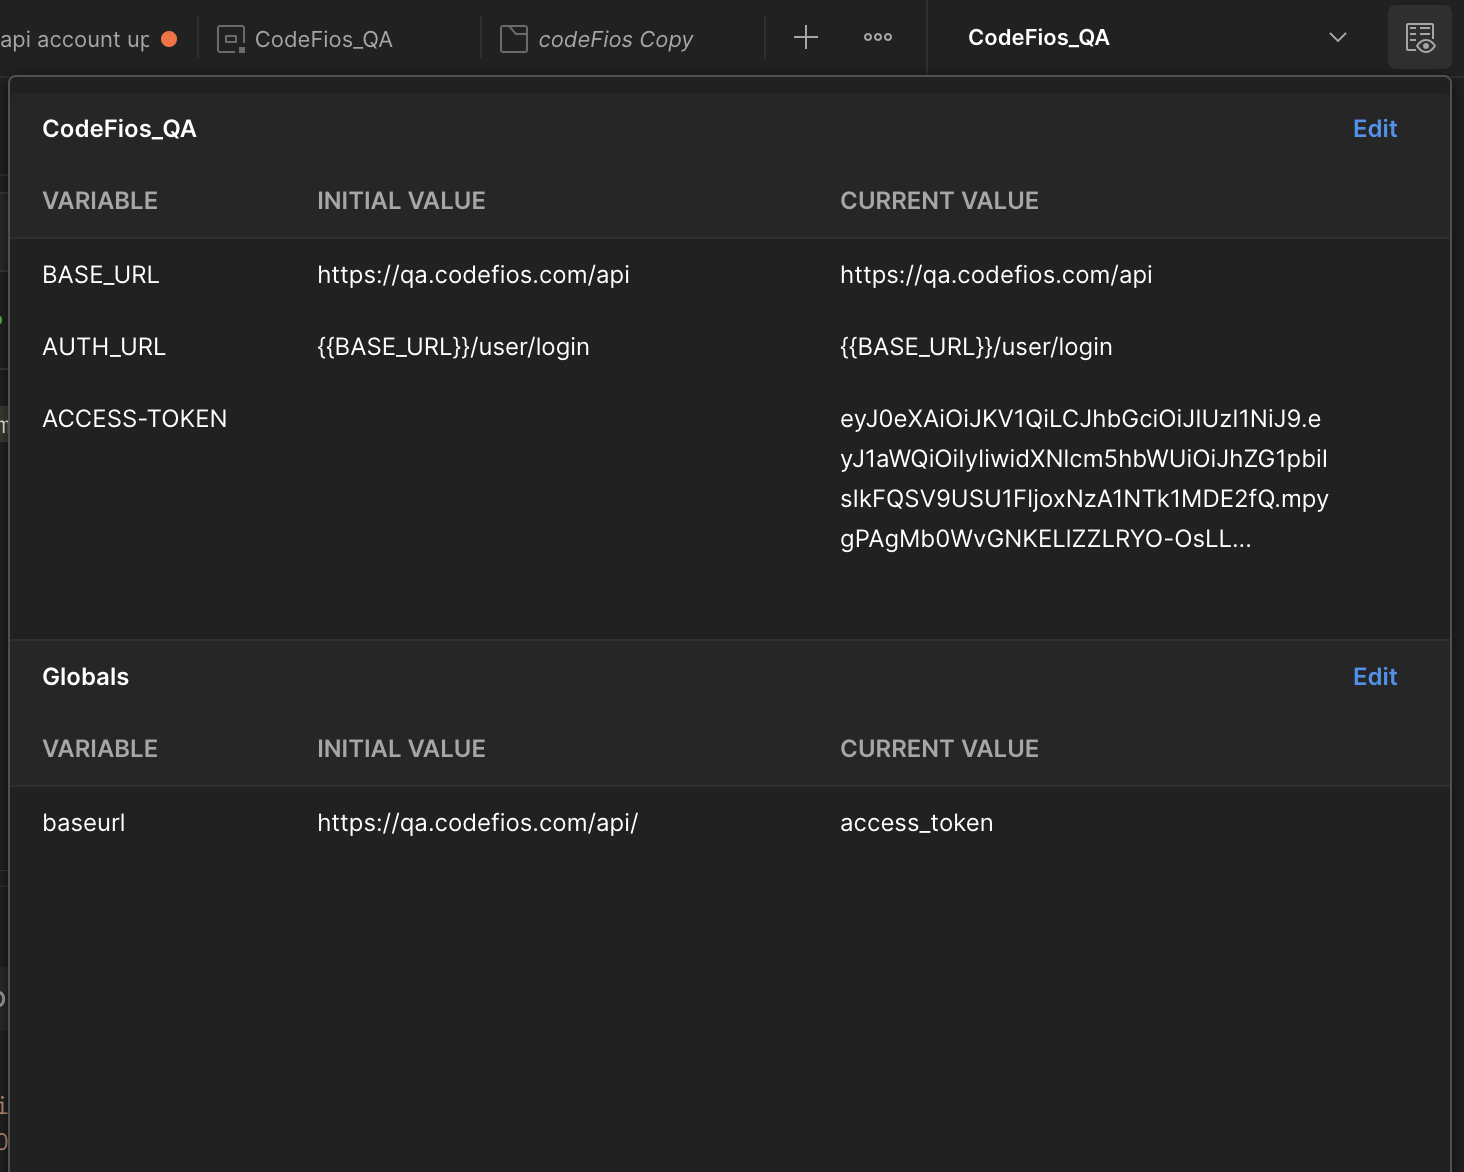
Postman
Variable scopes
SET GLOBAL VARIABLE

SET ENVIRONMENT VARIABLE
Create environment
Set variable and value
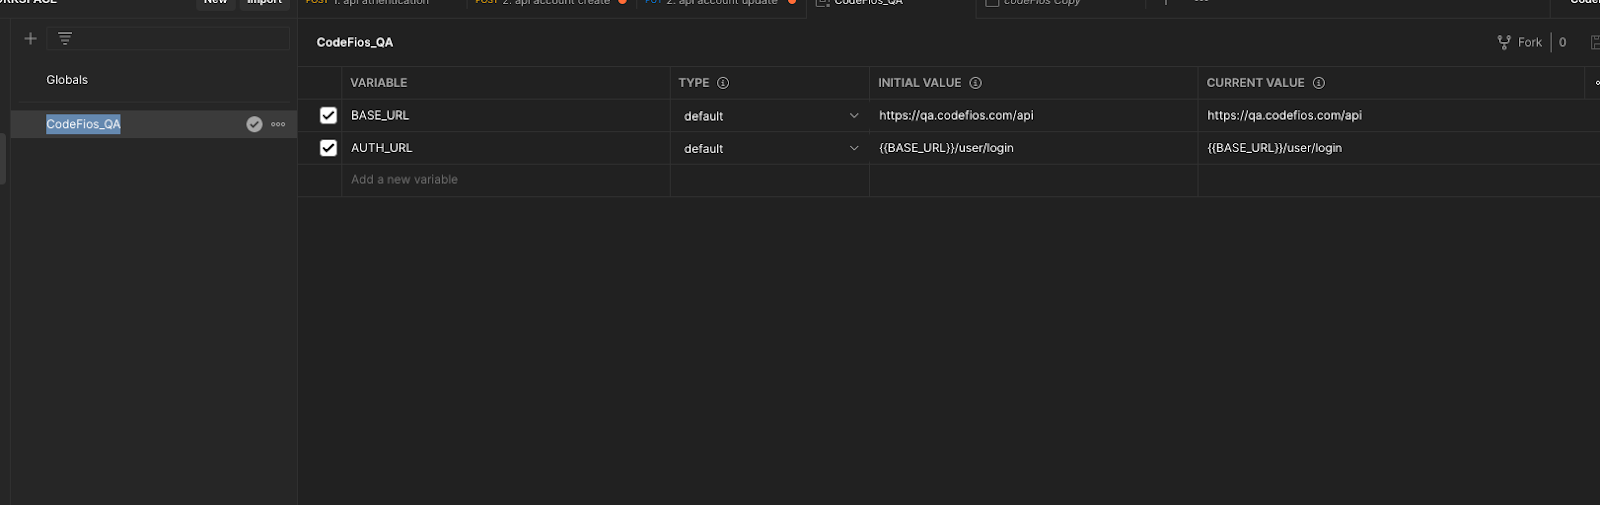
TEST: Set Environment variable and get the value from response
Set Environment variable and get the value from response
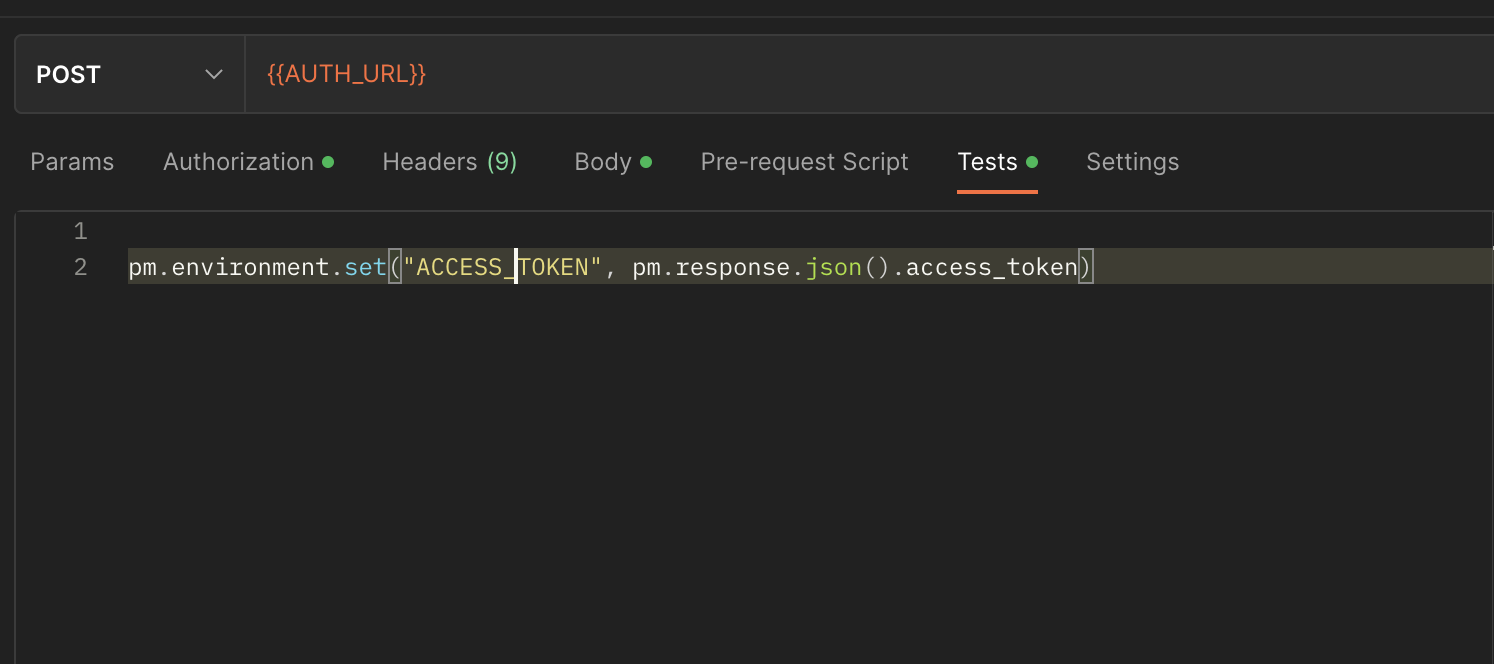
pm=var pm:Postmane → the pm object encloses all information pertaining to the script being executed and allows one to access a copy of the request beijing sent or the response received. It also allows one to get and set environment and global variable
Environment: (property) postman.environment:variables cope
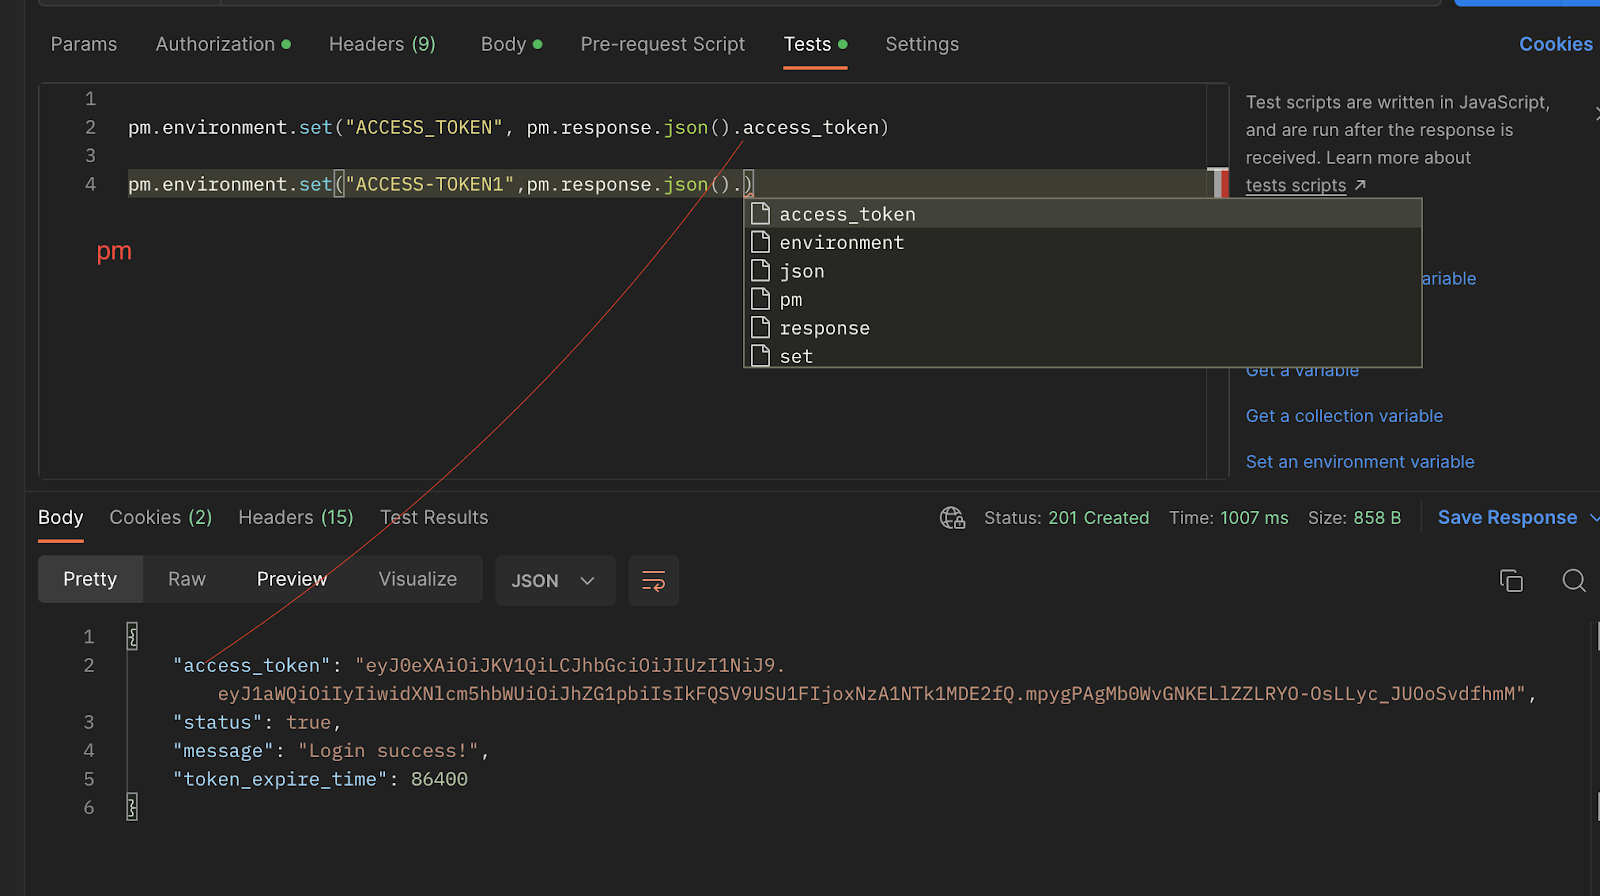
Set(key, value): creates a new variable, or updates on existing one.
pm.response.json():get response as json
.access_token: json path
ex:pm.environment.set("account_id",pm.response.json().records[0].account_id)
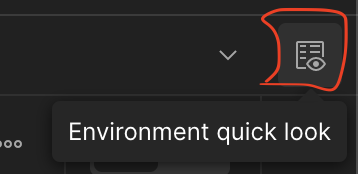
To see the variable click on Environment quick look button on top right side corner
To get codefios database
Download and install https://dbeaver.io/download/
Create new connection
44.195.13.80
student (all small)
Student@123
JUnit
Mockito
Selenium
TestNG
Spock Framework
Cucumber
FitNesse
Arquillian
DBUnit
Rest Assured
Rest Assured
Rest Assured is also a Java-based library that is mainly used to test Restful Web Services. For accessing Restful Web Service, Rest Assured library work as a headless client. By using the Rest Assured library, we can create a highly customizable HTTP request to send to the Restful server.
These are the following features of Rest Assured:
It allows us to validate JSON responses according to the schema.
It provides timeouts in tests.
It allows us to use Groovy closures or Java 8 lambdas to validate the response.
It can test different authentication methods and SSL.
It allows us to work with HTTP headers.
It works with cookies.
It allows us to work with XML data instead of JSON.
It allows us to write custom de-serializers.
API: Automation Testing (RestAssured)
RestAssured
Note:- We using manual testing document also for automation testing
Given : all input details/condition .
baseUril = https://qacodefios.com/api
Static vs not static import in java
Import static io.restAssured.RestAssured.given;
Import static io.restAssured.matcher.RestAssuredMatchers.*; //For macher method;
Create the Maven Project
Add dependency pom.xml
testng from org.testng for test
rest-assured from from io.rest-assured for automation for rest-api
json-schema-validator from from io.rest-assured for
json-path from from io.rest-assured
commons-io from from commons-io for file input and output
java-hamcres from from org.hamcrest for validate to response
hamcrest-library from from org.hamcrest
given: all input details ->
(baseURI,Header/s,Authorization,Payload/Body,QueryParameters)
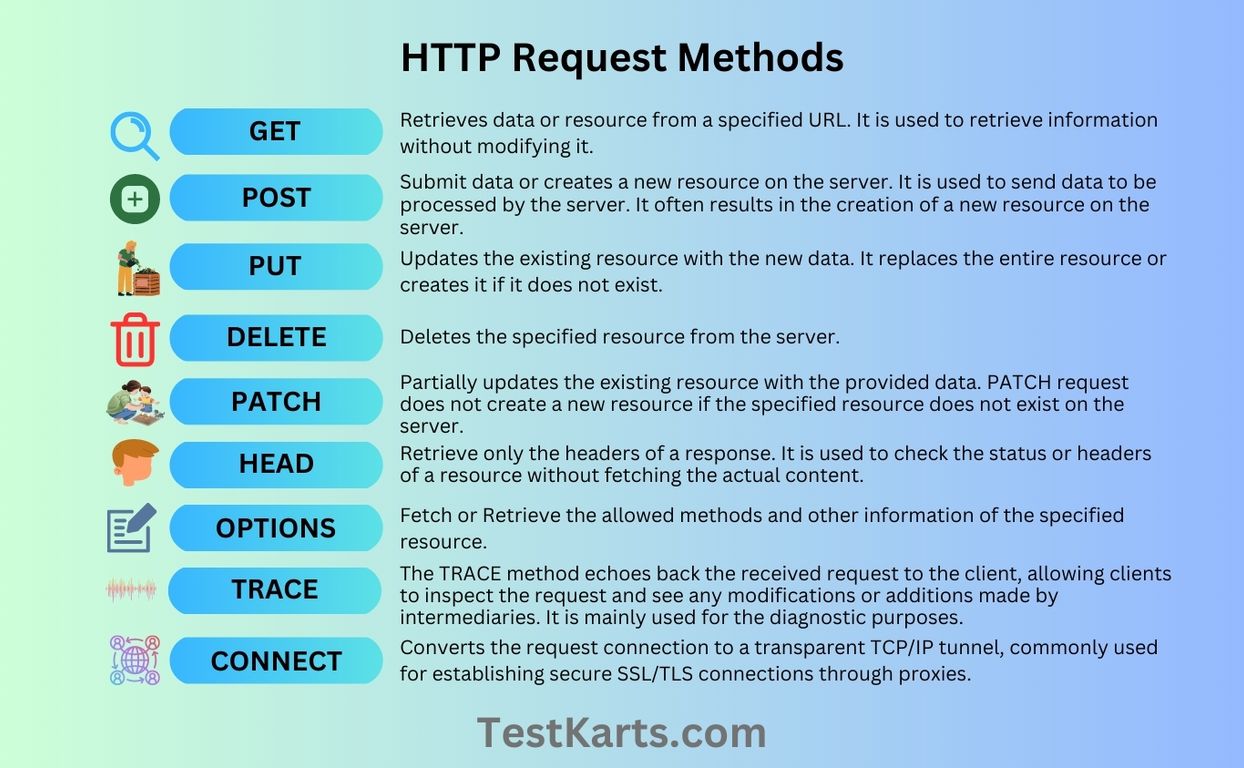
when: submit api requests->
HttpMethod(Endpoint/Resource)
then: validate
response -> (status code, Headers, responseTime, Payload/Body)
baseURI
https://qa.codefios.com/api /user/login
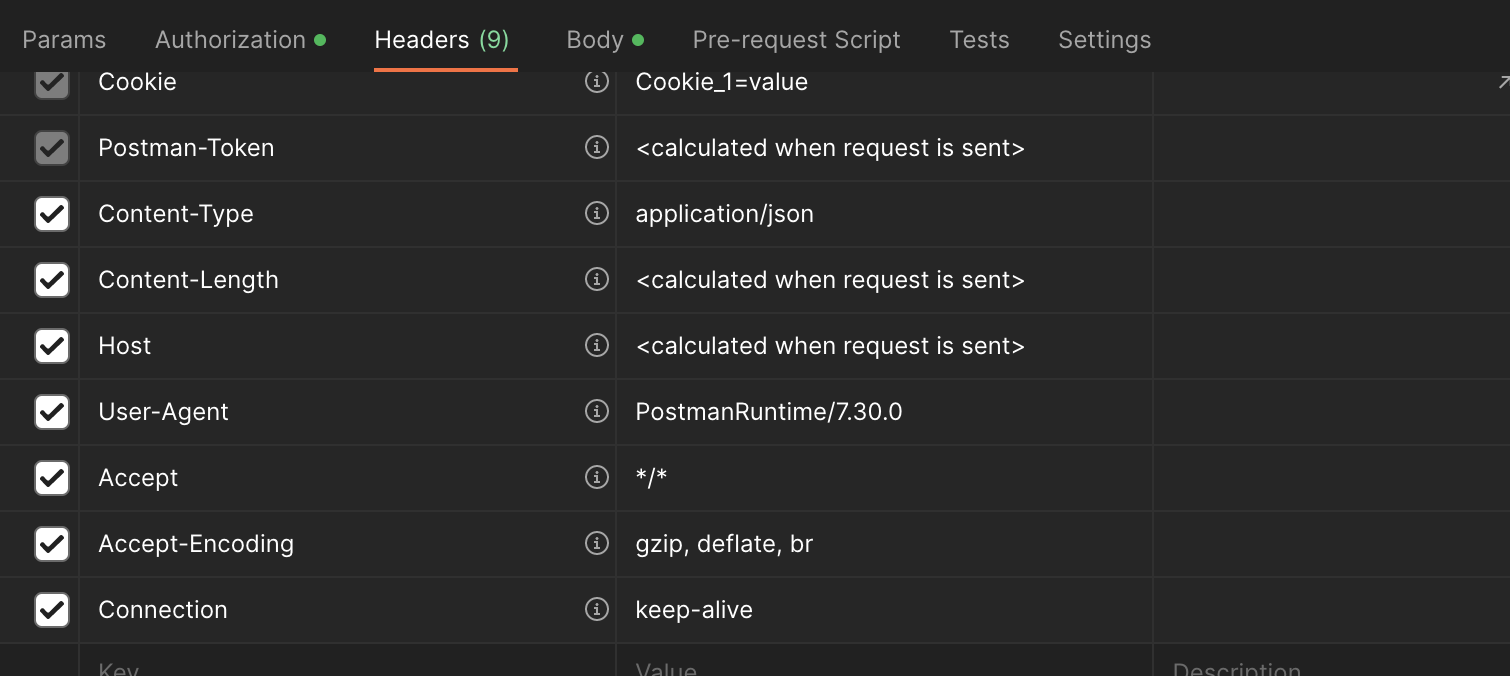
Headers:
"Content-Type" = "application/json"
“Authorization”=”eyJ0eXAiOiJKV1QiLCJhbGciOiJIUzI1NiJ9”
payload/body:
{
"username": "admin",
"password": "123456"
}
statusCode=201
response=
{
"access_token": "eyJ0eXAiNqV7cmNCahLYQWLZcQEa3asVMBU",
"status": true,
"message": "Login success!",
"token_expire_time": 86400
}
Response response =
given()
.baseUri(baseURI)
.header("Content-Type","application/json")
.body(new File(authBodyFilePath))
.log().all().
when()
.post(authEndPoint).
then()
.log().all()
.extract().response();
int statusCode = response.getStatusCode();
Assert.assertEquals(statusCode, 201, "Status codes are NOT matching!");
String responseHeaderContentType = response.getHeader("Content-Type");
Assert.assertEquals(responseHeaderContentType, "application/json", "Status Content-Types are NOT matching!");
long responseTimeInMilliSecs = response.getTimeIn(TimeUnit.MILLISECONDS);
if(responseTimeInMilliSecs <=2000) {
System.out.println("Response time is within range.");
}else {
System.out.println("Response time is out of range!");
}
String responseBody = response.getBody().asString();
JsonPath jp = new JsonPath(responseBody);
bearerToken = jp.getString("access_token");
System.out.println("Bearer Token:" + bearerToken);
}
// ………………..1st header method ……………..
.header("Content-Type","application/json")
.header("Accept-Encoding","gzip, deflate, br")
// ………………..2nd header method ……………..
Map<String, String >mapheaders = new HashMap<>();
headers.put("Content-Type", "application/json");
headers.put("Authorization", generateBeareToken);
.headers(mapheaders)
// ………………..3rd header method ……………..
Header head1 = new Header(Content-Type", "application/json");
Header head2 = new Header(Authorization", generateBeareToken);
.header(head1)
.header(head2)
Jan 20 2024
Class note
Retrurns; a string representation of the object
Returns: the body as string the
.header("Authorization", "Bearer "+GenerateBeareToken.bearerToken)
Json formatting ctrl+shift +m
Make a note for param
.auth().preemptive().basic("demo1@codefios.com ", "abc123")
Whate does it do preemptive() ?
Soft assertion vs hard assertion
JSON & XML Schema validations
We need to add 2 dependency for schema validations
Json-schema-validator
Json-path
or
Xml-schema-validator
xml -path
Using POJO class
User user =new User();
user.setName(“user1”)
user.setEmail(“email@gmail”)
Convert java object to → json object → deserialization
ObjectMaper objmaper = new ObjectMaper();
String jasonData = objmaper.writerWithDefualtPrettyPrinter().writeValueSaString(user)
Convert json data to → java object (pojo) → serialization
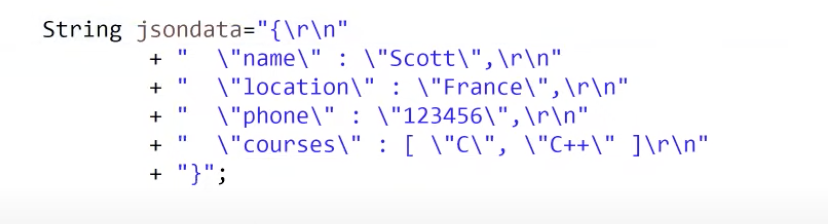
ObjectMaper objmaper = new ObjectMaper();
User userpojo=objmaper.readValue(jsondata, User.class) // json data(jsondata) to Java pojo class name (User)
String user = userpojo.getName()
String email= userpojo.getEmail()
Authorization
Authentication: user is valid or not
Authorization : permission/access (only Authentication user get authorization)
Authorization type
1. Basic
given ()
.auth().basic(“username”, “password”)
2. Digest
given ()
.auth().digest(“username”, “password”)
3. preemptive
given ()
.auth().preemptive().basic(“username”, “password”)
4. Bearer token
String bearerToken = “xnhdlfkekiboiij376rijdnkldjhhebsswy687447jdhddn”;
given ()
.headers(“authorization”, “Bearer ”+bearerToken)
5. Oauth 1.0
given ()
.auth().oauth(“consumerKey”, “consumerSecret”, “accessToken”, “tokenSecrate”)
6. Oauth 2.0
given ()
.auth().oauth2( “accessToken”)
6. API Key
given ()
.queryParm(“key”, “sd86sojs87s5s7u7dy5stsr4sfsr55figt5”)
Faker library to generate Fake data (userName, email,address)
Add dependency
<!--https://mvnrepository.com/artifact/io.rest-assured/rest-assured →
<dependency>
<groupId>io.rest-assured</groupId>
<artifactId>rest-assured</artifactId>
<version>5.3.0</version>
<scope>test</scope>
</dependency>
<!-- https://mvnrepository.com/artifact/io.rest-assured/json-path -->
<dependency>
<groupId>io.rest-assured</groupId>
<artifactId>json-path</artifactId>
<version>5.3.0</version>
<scope>test</scope>
</dependency>
<!--https://mvnrepository.com/artifact/io.rest-assured/json-schema-validator -->
<dependency>
<groupId>io.rest-assured</groupId> <artifactId>json-schema-validator</artifactId>
<version>5.3.2</version>
</dependency>
<!-- https://mvnrepository.com/artifact/org.json/json -->
<dependency>
<groupId>org.json</groupId>
<artifactId>json</artifactId>
<version>20231013</version>
</dependency>
<!-- https://mvnrepository.com/artifact/org.testng/testng -->
<dependency>
<groupId>org.testng</groupId>
<artifactId>testng</artifactId>
<version>7.8.0</version>
<scope>test</scope>
</dependency>
<!--https://mvnrepository.com/artifact/com.github.scribejava/scribejava-apis -->
<dependency>
<groupId>com.github.scribejava</groupId>
<artifactId>scribejava-apis</artifactId>
<version>8.3.1</version>
<scope>runtime</scope>
</dependency>
<!-- https://mvnrepository.com/artifact/com.github.javafaker/javafaker -->
<dependency>
<groupId>com.github.javafaker</groupId>
<artifactId>javafaker</artifactId>
<version>1.0.2</version>
</dependency>
<!-- https://mvnrepository.com/artifact/org.apache.poi/poi-ooxml -->
<dependency>
<groupId>org.apache.poi</groupId>
<artifactId>poi-ooxml</artifactId>
<version>5.2.3</version>
</dependency>
<!-- https://mvnrepository.com/artifact/org.apache.poi/poi -->
<dependency>
<groupId>org.apache.poi</groupId>
<artifactId>poi</artifactId>
<version>5.2.3</version>
</dependency>
<!-- https://mvnrepository.com/artifact/org.apache.logging.log4j/log4j-core -->
<dependency> <groupId>org.apache.logging.log4j</groupId>
<artifactId>log4j-core</artifactId>
<version>2.22.0</version>
</dependency>
<!--https://mvnrepository.com/artifact/com.aventstack/extentreports -->
<dependency>
<groupId>com.aventstack</groupId>
<artifactId>extentreports</artifactId>
<version>5.0.9</version>
</dependency>
<!-- for file input and output -->
<dependency>
<groupId>commons-io</groupId>
<artifactId>commons-io</artifactId>
<version>2.11.0</version>
</dependency>
<!-- validate to response -->
<dependency>
<groupId>org.hamcrest</groupId>
<artifactId>java-hamcrest</artifactId>
<version>2.0.0.0</version>
<scope>test</scope>
</dependency>
<dependency>
<groupId>org.hamcrest</groupId>
<artifactId>hamcrest-core</artifactId>
<version>2.1</version>
<scope>test</scope>
</dependency>
<dependency>
<groupId>org.hamcrest</groupId>
<artifactId>hamcrest-library</artifactId>
<version>2.1</version>
<scope>test</scope>
</dependency>
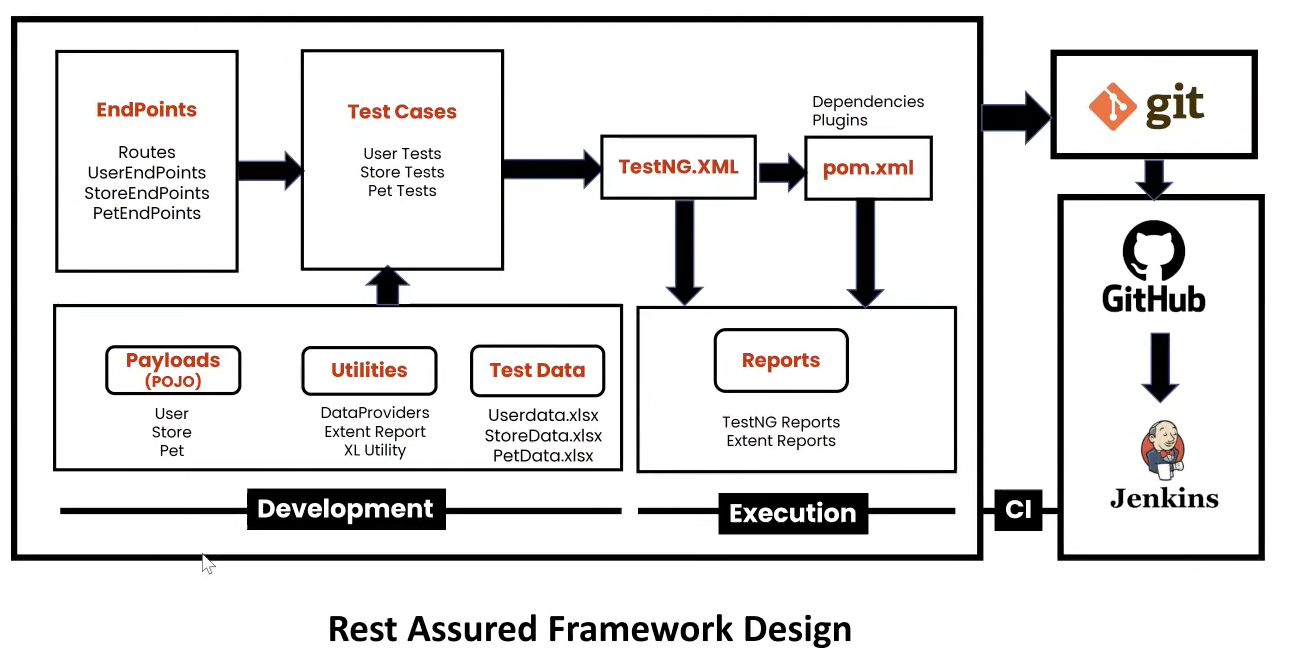
Framework Development
Framework : maintain all project related file
Objectives:
Re-usability
Maintainability
Readability
Hybrid driven
Phase
Understanding requirement
Functional specification(static)
Swagger
Choose automation tools and library- Rest Assured library
Design
Development
Execution and CI
Test case example
@ Test
Void test(){
given() : pre-re
wehne(): request type
then(): response
}
Note: we divided into to parts End points where is prerequisite and request type and Test case where we validate all response
Step 1: Create project
Step 2: Update pom.xml with required dependency
Step 3: create folder structure
Step 4: Create Routes.java → contains URLs
Step 3 Create userEndPoint.java → CURD methods implementation
Test Chaining :Response from one request becomes the basis for the next request
API chaining is a technique used in API testing to make multiple API requests in a sequence, where each request’s response becomes the basis for the next request. This can be achieved using libraries like Rest Assured in Java. API chaining is often used to test scenarios that involve multiple API endpoints or dependent operations. Below is an example of API chaining using Rest Assured:
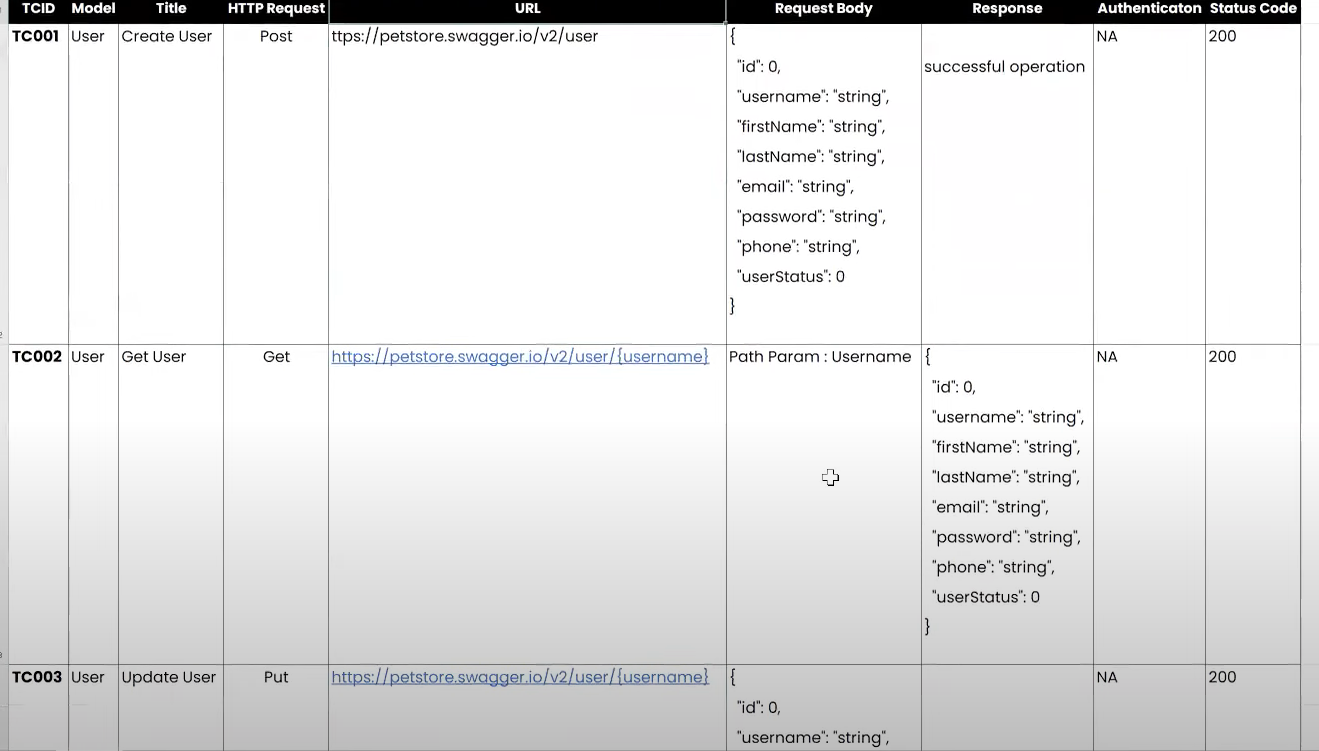
API Chaining Scenario:
Let’s assume we have a simple scenario where we want to:
- Create a user →(auto created id)
- Retrieve the created user’s details. →(get id)
- Update the user’s information. →(use id)
- Verify the updated user’s details. →(use id)
TestNG
Create TestNG xml file
Step1: Right-click on the Project folder, go to New and select ‘File’ as shown in the below image.
Step 2: Add the file name as ‘testng.xml’ as shown in the below image and click on the Finish button.
Step 3: Now you can add the below XML code in your testng.xml file. You can choose your Test suite name and the Test name as per the requirements.
<?xml version="1.0" encoding="UTF-8"?>
<!DOCTYPE suite SYSTEM "http://testng.org/testng-1.0.dtd">
<suite name="Testing Google Apps">
<test name="Regression">
<classes>
<class name="Googletest.GmailTest"/>
<class name="Googletest.MapsTest"/>
<class name="Googletest.ImagesTest"/>
</classes>
</test> <!-- Test -->
</suite> <!-- Suite -->
Data jan 13 2024
C=Continuous
I=Integration
GitHub/GitLab/BitBucket/SVN -> Continuous integration tool
-> Version control(tool)
Remote repo
Code share
Tracking
Code maintenance
Version control(tool)
C=continuous
D=Deployment/Delivery
DevOps : Development Operation
https://www.jenkins.io/download/lts/macos/
And install on machine
MAVEN_HOME
/Applications/apache-maven-3.8.3
/Applications/apache-maven-3.8.3/bin
Continuous Integration
Continuous integration is a DevOps software development practice where developers regularly merge their code changes into a central repository, after which automated builds and tests are run.
CD: Continuous Delivery
What is the difference between continuous delivery and continuous integration?
Continuous Integration happens before you build as you are testing code. Delivery means you can release something to the staging environment or the pre-production environment. Continuous Delivery is when your code is always ready to be released but isn't pushed to production unless you make the decision to do so.
Janking
downloanload :https://www.jenkins.io/download/
https://www.youtube.com/watch?v=MlvNXFdPhB8
Find the java folder from pgm like:
C:\Program Files\Java\jdk1.8.0_321
Find the java folder from pgm like
C:\Program Files\Maven\apache-maven-3.6.1
Go to : System Variable AND add 2 variables
Go to New or edit
1.
variable name: JAVA_HOME
variable value: C:\Program Files\Java\jdk1.8.0_321
2.
variable name: MAVEN_HOME
variable value: C:\Program Files\Maven\apache-maven-3.6.1
after janking
got to :Manage Jankings
A. got to : Manage Plugins
Plugin Manager
1. serch Meven and install all except Red or update
B.Go to : Global Tool Configuration
go down and find jdk and maven
then click install and provied the Ja
and MAVEN_HOME Path
then save
Go to: new Item
: Enter the name of project
: select Maven Project
: press Ok
Go to : project configure
: dis of project
: check mark on
Source Code Management : select git (check mark on)
enter the Repository URL (project url from github)
Build Triggers
: selec : Build Whenever snapshot dependency is built (if avaiable)
Build periodically (Build periodically:Schedule)time mm hh (23 13 * * * )
see more https://stackoverflow.com/questions/12472645/how-do-i-schedule-jobs-in-jenkins
Build Environment
:select : Delete workspace before build starts
Build
: Root POM (pom.xml)
Post Steps
:Run regardless of build result
HOW TO SET JAVA_HOME ON MAC OS X
Trying to run a Java application on your Mac and need to set your JAVA_HOME? Follow the instructions below to quickly and easily do it:
Open Terminal
Confirm you have JDK by typing “which java”. It should show something like /usr/bin/java.
Check you have the needed version of Java, by typing “java -version”.
JAVA_HOME is essentially the full path of the directory that contains a sub-directory named bin which in turn contains the java.
For Mac OSX – it is /Library/Java/Home
Set JAVA_HOME using this command in Terminal: export JAVA_HOME=/Library/Java/Home
echo $JAVA_HOME on Terminal to confirm the path
You should now be able to run your application
Note that this sets JAVA_HOME only for this session. If you want it to persist, you will have to add the command to your ~/.profile file. Below are instructions on how to accomplish this instead:
Open up Terminal.app (Applications >> Utilities >> Terminal)
Type: emacs .profile
add this to the end of the .profile file:
JAVA_HOME=/Library/Java/Home
export JAVA_HOME;
Save and exit emacs (ctrl-x, ctrl-s; ctrl-x, ctrl-c)
Open a new Terminal window (cmd-n) and type: $JAVA_HOME/bin/java -version
If you see something like:
java version “1.5.0_16″
Java(TM) 2 Runtime Environment, Standard Edition (build 1.5.0_16-b06-284)
Java HotSpot(TM) Client VM (build 1.5.0_16-133, mixed mode, sharing)
Comments
Post a Comment