03 Selenium
Selenium
Selenium is an open-source and a portable automated software testing tool for
testing web applications. It has capabilities to operate across different browsers
and operating systems. Selenium is not just a single tool but a set of tools that
helps testers to automate web-based applications more efficiently.
Let us now understand each one of the tools available in the Selenium suite and
their usage.
.
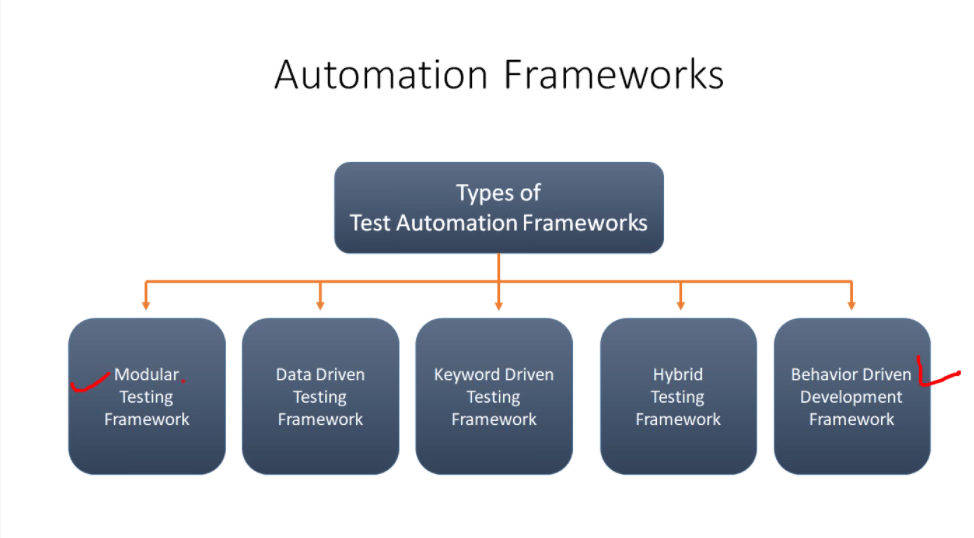
Popular automation frameworks
https://github.com/techfios-git/TestNGProjectJune23.git
Note :
driverpath for windows like → “D:\\myfile\\driver\\chromedriver.exe” → double backslash and .exe
driverpath for mac like → “D:/myfile/driver/chromedriver” → single forward slash and no .exe
System.setProperty(key, value); OR System.setProperty(properties, propertiseValue);
driver.manage().timeouts().implicitlyWait(10, TimeUnit.SECONDS);
Note
======================
Selenium older( <4.6) version
WDM supporting CFT
Download CFT (Cromedriver.exe )
→ Sysemt.setProperty(Key, Value)
WDM latest version → automate download chromedriver.exe
→ add dependency
https://mvnrepository.com/artifact/io.github.bonigarcia/webdrivermanager/5.2.3
<dependency>
<groupId>io.github.bonigarcia</groupId>
<artifactId>webdrivermanager</artifactId>
<version>5.2.3</version>
</dependency>
→ WebDriverManager.chromedriver().setup();
Selenium later( >4.6) version
After 4.6 there is an inbuild WebDriverManager in Selenium so do need to download the driver
and set property. We just need to create an instance of the driver class
(suggest going with later than the selenium 4.6 version)
A command refers to what Selenium has to do and the commands in Selenium are of three types: Actions Accessors Assertions
A command refers to what Selenium has to do and the commands in Selenium are of three types:
Actions
Accessors
Assertions
Actions
Accessors
Accessors evaluate the state of the application and store the results in a variable which is used in assertions.
For example, "storeTitle".
The following table lists the Selenium accessors that are used very frequently, however the list is not exhaustive.
Assertions
Assertions enable us to verify the state of an application and compares against the expected. It is used in 3 modes,
viz. - "assert", "verify", and "waitfor".
For example, "verify if an item from the dropdown is selected".
The following table lists the Selenium assertions that are used very frequently, however the list is not exhaustive.
Locators
Element Locators help Selenium to identify the HTML element the command refers to. All these locators can be identified with the help of FirePath and FireBug plugin of Mozilla. Please refer the Environment Setup chapter for details.
identifier=id Select the element with the specified "id" attribute and if there is no match, select the first element whose @name attribute is id.
id=id Select the element with the specified "id" attribute.
name=name Select the first element with the specified "name" attribute
dom=javascriptExpression Selenium finds an element by evaluating the specified string that allows us to traverse through the HTML Document Object Model using JavaScript. Users cannot return a value but can evaluate as an expression in the block.
xpath=xpathExpression Locate an element using an XPath expression.
link=textPattern Select the link element (within anchor tags) which contains text matching the specified pattern.
css=cssSelectorSyntax Select the element using css selector.
WebDriver
WebDriver is a tool for automating testing web applications. It is popularly known as Selenium 2.0. WebDriver uses a different underlying framework, while Selenium RC uses JavaScript Selenium-Core embedded within the browser which has got some limitations. WebDriver interacts directly with the browser without any intermediary, unlike Selenium RC that depends on a server. It is used in the following context: Multi-browser testing including improved functionality for browsers which is not well-supported by Selenium RC (Selenium 1.0). Handling multiple frames, multiple browser windows, popups, and alerts. Complex page navigation. Advanced user navigation such as drag-and-drop. AJAX-based UI elements.
Most Used Commands
The following table lists some of the most frequently used commands in WebDriver along with their syntax.
Locatier
Locating elements in Selenium WebDriver is performed with the help of findElement() and findElements() methods provided by WebDriver and WebElement class.
findElement() returns a WebElement object based on a specified search criteria or ends up throwing an exception if it does not find any element matching the search criteria.
findElements() returns a list of WebElements matching the search criteria. If no elements are found, it returns an empty list.
The following table lists all the Java syntax for locating elements in Selenium WebDriver.
Interactions
User Interactions
Selenium WebDriver is the most frequently used tool among all the tools available in the Selenium tool set. Therefore it is important to understand how to use Selenium to interact with web apps. In this module, let us understand how to interact with GUI objects using Selenium WebDriver.
We need to interact with the application using some basic actions or even some advanced user action by developing user-defined functions for which there are no predefined commands.
Listed below are the different kinds of actions against those GUI object
Text Box Interaction
Radio Button Selection
Check Box Selection
Drop Down Item Selection
Synchronization
Drag & Drop
Keyboard Actions
Mouse Actions
Multi Select
Find All Links
Text Box Interaction
In this section, we will understand how to interact with text boxes. We can put values into a text box using the 'sendkeys' method. Similarly, we can also retrieve text from a text box using the getattribute("value") command. Take a look at the following example.
Enter value
->driver.findElement(By.id("cpar1")).sendKeys("10");
Get text
->driver.findElement(By.id("cpar1")).getAttribute("value");
Radio Button Interaction
In this section, we will understand how to interact with Radio Buttons. We can select a radio button option using the 'click' method and unselect using the same 'click' method.
// Click on Radio Button driver.findElement(By.id("cpayoff1")).click();
Selected
->driver.findElement(By.id("cpayoff1")).isSelected());
IsEnabled
->driver.findElement(By.id("cpayoff1")).isEnabled());
IsDisplayed
->driver.findElement(By.id("cpayoff1")).isDisplayed());
Check Box Interaction
In this section, we will understand how to interact with Check Box. We can select a check box using the 'click' method and uncheck using the same 'click' method.
Click on check box
->driver.findElement(By.id("caddoptional")).click();
IsSelected
->driver.findElement(By.id("caddoptional")).isSelected());
IsEnabled
->driver.findElement(By.id("caddoptional")).isEnabled());
IsDisplayed
->driver.findElement(By.id("caddoptional")).isDisplayed());
Dropdown Interaction
In this section, we will understand how to interact with Dropdown Boxes. We can select an option using 'selectByVisibleText' or 'selectByIndex' or 'selectByValue' methods.
// Selecting an item from Drop Down list Box
->Select dropdown =new Select(driver.findElement(By.id("ccompound")));
->dropdown.selectByVisibleText("continuously")
// you can also use dropdown.selectByIndex(1) to
// select second element as index starts with 0.
// You can also use dropdown.selectByValue("annually")
driver.findElement(By.id("ccompound")).isSelected())
driver.findElement(By.id("ccompound")).isEnabled())
driver.findElement(By.id("ccompound")).isDisplayed()
Drag & Drop
As a tester, you might be in a situation to perform a 'Drag & drop' operation. We will perform a drag and drop operation by picking up a tree grid that is available for us on
WebElement From = driver.findElement(By.xpath(".//*[@id='j3_7']/a"));
WebElement To = driver.findElement(By.xpath(".//*[@id='j3_1']/a"));
Actions builder = new Actions(driver);
Action dragAndDrop = builder.clickAndHold(From)
.moveToElement(To)
.release(To)
.build();
dragAndDrop.perform();
Keyboard Actions
Given below are the methods to perform keyboard actions:
• sendKeys - Sends keys to the keyboard representation in the browser. Special keys that are not text, represented as Keys are recognized both as part of sequences of characters, or individually.
• pressKey - Press a key on the keyboard that is NOT text. The keys such as function keys "F1", "F2", "Tab", "Control", etc. If keyToPress is a sequence of characters, different driver implementations may choose to throw an exception or to read only the first character in the sequence.
• releaseKey - Release a key on the keyboard after executing the keypress event. It usually holds good for non-text characters.
Here are the syntax to call keyboard functions using Selenium WebDriver.
void sendKeys(java.lang.CharSequence keysToSend)
void pressKey(java.lang.CharSequence keyToPress)
void releaseKey(java.lang.CharSequence keyToRelease)
Mouse Actions
Listed below are some of the key mouse actions that one would come across in most of the applications:
•Click -
Performs a Click. We can also perform a click based on coordinates.
•contextClick
Performs a context click/right-click on an element or based on the coordinates.
•doubleClick
Performs a double-click on the webelement or based on the coordinates. If left empty, it performs double-click on the current location.
•mouseDown
Performs a mouse-down action on an element or based on coordinates.
•mouseMove
Performs a mouse-move action on an element or based on coordinates.
•mouseUp
Releases the mouse usually followed by mouse-down and acts based on coordinates.
Here are the syntax to call mouse actions using Selenium WebDriver:
void click(WebElement onElement)
void contextClick(WebElement onElement)
void doubleClick(WebElement onElement)
void mouseDown(WebElement onElement)
void mouseUp(WebElement onElement)
void mouseMove(WebElement toElement)
void mouseMove(WebElement toElement, long xOffset, long yOffset)
Multi Select Action
Sometimes we would be in a situation to select two or more items in a list box or text area. To understand the same, we would demonstrate multiple selection from the list using
driver.findElement(By.id("ContentHolder_lbSelectionMode_I")).click();
driver.findElement(By.id("ContentHolder_lbSelectionMode_DDD_L_LBI1T0")).click();
Or
// Perform Multiple Select
Actions builder = new Actions(driver);
WebElement select = driver.findElement(By.id("ContentHolder_lbFeatures_LBT));
List<WebElement> options = select.findElements(By.tagName("td"));
System.out.println(options.size());
Action multipleSelect = builder.keyDown(Keys.CONTROL)
.click(options.get(2))
.click(options.get(4))
.click(options.get(6))
.build();
multipleSelect.perform();
Find All Links
Testers might be in a situation to find all the links on a website. We can easily do so by finding all elements with the Tag Name "a", as we know that for any link reference in HTML, we need to use "a" (anchor) tag.
List<WebElement> links = driver.findElements(By.tagName("a"));
System.out.println("Number of Links in the Page is " + links.size());
for (int i = 1; i<=links.size(); i=i+1)
{
System.out.println("Name of Link# " + i - + links.get(i).getText());
}
Synchronization
To synchronize between script execution and application, we need to wait after performing appropriate actions. Let us look at the ways to achieve the same.
Thread.Sleep
Thread.Sleep is a static wait and it is not a good way to use in scripts, as it is sleep without condition.
Thread.Sleep(1000); //Will wait for 1 second.
Explicit Waits
An 'explicit wait' waits for a certain condition to occur before proceeding further. It is mainly used when we want to click or act on an object once it is visible.
WebDriver driver = new FirefoxDriver(); driver.get("Enter an URL"S);
WebElement DynamicElement = (new WebDriverWait(driver, 10)).until(ExpectedConditions.presenceOfElementLocated(By.id("DynamicEle ment")));
Implicit Wait
Implicit wait is used in cases where the WebDriver cannot locate an object immediately because of its unavailability. The WebDriver will wait for a specified implicit wait time and it will not try to find the element again during the specified time period.
Once the specified time limit is crossed, the WebDriver will try to search the element once again for one last time. Upon success, it proceeds with the execution; upon failure, it throws an exception.
It is a kind of global wait which means the wait is applicable for the entire driver. Hence, hardcoding this wait for longer time periods will hamper the execution time.
WebDriver driver = new FirefoxDriver(); driver.manage().timeouts().implicitlyWait(10, TimeUnit.SECONDS); driver.get("Enter an URL");
WebElement DynamicElement = driver.findElement(By.id("DynamicElement"));
Fluent Wait
A FluentWait instance defines the maximum amount of time to wait for a condition to take place, as well as the frequency with which to check the existence of the object condition.
Let us say we will 60 seconds for an element to be available on the page, but we will check its availability once in every 10 seconds.
Wait wait = new FluentWait(driver)
.withTimeout(60, SECONDS)
.pollingEvery(10, SECONDS)
.ignoring(NoSuchElementException.class);
WebElement dynamicelement = wait.until(new Function<webdriver,webElement>(){
public WebElement apply(WebDriver driver){
return driver.findElement(By.id("dynamicelement"));
}
}
);
Test design Techniques
There are various components involved in designing the tests. Let us understand some of the important components involved in designing a framework as well. We will learn the following topics in this chapter:
• Page Object Model
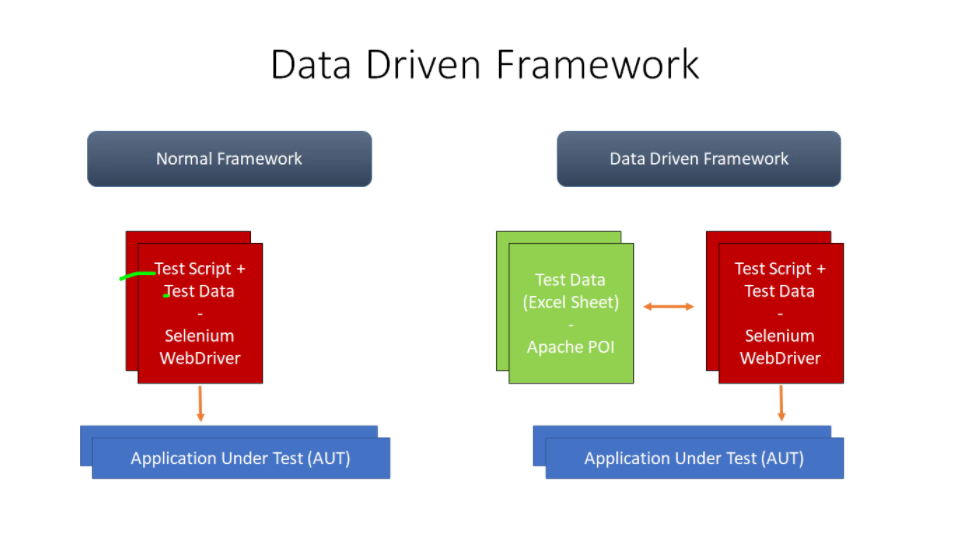
• Parameterizing using Excel
• Log4j Logging
• Exception Handling
• Multi Browser Testing
• Capture Screenshots
• Capture Videos
Page Object Model
Selenium acts on webelements with the help of their properties such ID, name, XPath, etc. Unlike QTP which has an inbuilt object repository (OR), Selenium has no inbuilt ORs.
Hence we need to build an OR which should also be maintainable and accessible on demand. Page Object Model (POM) is a popular design pattern to create an Object Repository in which each one of those web-elements properties are created using a class file.
Advantages
•POM is an implementation where test objects and functions are separated from each other, thereby keeping the code clean.
•The objects are kept independent of test scripts. An object can be accessed by one or more test scripts, hence POM helps us to create objects once and use them multiple times.
• Since objects are created once, it is easy to access as well as update a particular property of an object.
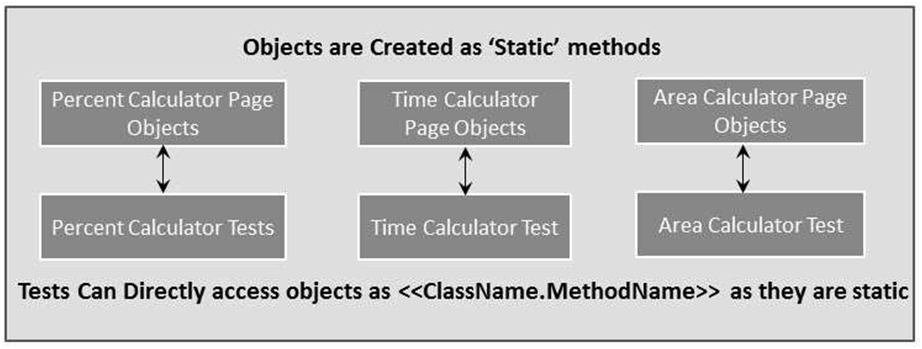
POM Flow Diagram
Objects are created for each one of the pages and methods are developed exclusively to access to those objects. Let us use http://calculator.net for understanding the same.
There are various calculators associated with it and each one of those objects in a particular page is created in a separate class file as static methods and they all are accessed through the 'tests' class file in which a static method would be accessing the objects.
Log4j Logging
Log4j is an audit logging framework that gives information about what has happened during execution. It offers the following advantages:
• Enables us to understand the application run.
• Log output can be saved that can be analyzed later.
• Helps in debugging, in case of test automation failures.
• Can also be used for auditing purposes to look at the application's health.
Components
1. Instance of Logger class.
2. Log level methods used for logging the messages as one of the following:
• error
• warn
• info
• debug
• log
Exception Handling
When we are developing tests, we should ensure that the scripts can continue their execution even if the test fails. An unexpected exception would be thrown if the worst case scenarios are not handled properly.
If an exception occurs due to an element not found or if the expected result doesn't match with actuals, we should catch that exception and end the test in a logical way rather than terminating the script abruptly.
Syntax
The actual code should be placed in the try block and the action after exception should be placed in the catch block. Note that the 'finally' block executes regardless of whether the script had thrown an exception or NOT.
try
{
// Perform Action
}
catch(ExceptionType1 exp1)
{
// Catch block 1
}
catch(ExceptionType2 exp2)
{
// Catch block 2
}
catch(ExceptionType3 exp3)
{
// Catch block 3
}
finally
{
// The finally block always executes.
}
Multi Browser Testing
Users can execute scripts in multiple browsers simultaneously. For demonstration, we will use the same scenario that we had taken for Selenium Grid. In the Selenium Grid example, we had executed the scripts remotely; here we will execute the scripts locally.
First of all, ensure that you have appropriate drivers downloaded. Please refer the chapter "Selenium Grid" for downloading IE and Chrome drivers.
Example
For demonstration, we will perform percent calculator in all the browsers simultaneously.
public class TestNGClass{
private WebDriver driver;
private String URL = "http://www.calculator.net";
@Parameters("browser") @BeforeTest
public void launchapp(String browser){
if(browser.equalsIgnoreCase("firefox")){
System.out.println(" Executing on FireFox");
System.setProperty("webdriver.gecko.driver","D:\\GeckoDriver\\geckodriver.exe" );
driver = new FirefoxDriver();
driver.get(URL);
driver.manage().timeouts().implicitlyWait(10, TimeUnit.SECONDS);
driver.manage().window().maximize();
}
else if (browser.equalsIgnoreCase("chrome")){
System.out.println(" Executing on CHROME"); System.out.println("Executing on IE"); System.setProperty("webdriver.chrome.driver", "D:\\chromedriver.exe");
driver = new ChromeDriver(); driver.get(URL);
driver.manage().timeouts().implicitlyWait(10, TimeUnit.SECONDS); driver.manage().window().maximize();
}else if (browser.equalsIgnoreCase("ie")){
System.out.println("Executing on IE"); System.setProperty("webdriver.ie.driver", "D:\\IEDriverServer.exe");
driver = new InternetExplorerDriver(); driver.get(URL);
driver.manage().timeouts().implicitlyWait(10, TimeUnit.SECONDS); driver.manage().window().maximize();
}else{
throw new IllegalArgumentException("The Browser Type is Undefined");
}
}
@Test
public void calculatepercent(){
// Click on Math Calculators driver.findElement(By.xpath(".//*[@id='menu']/div[3]/a")).click();
// Click on Percent Calculators
driver.findElement(By.xpath(".//*[@id='menu']/div[4]/div[3]/a")).click();
// Enter value 10 in the first number of the percent Calculator driver.findElement(By.id("cpar1")).sendKeys("10");
// Enter value 50 in the second number of the percent Calculator driver.findElement(By.id("cpar2")).sendKeys("50");
// Click Calculate Button driver.findElement(By.xpath(".//*[@id='content']/table/tbody/ tr/td[2]/input")).click();
// Get the Result Text based on its xpath
String result =
driver.findElement(By.xpath(".//*[@id='content']/p[2]/span
/font/b")).getText();
// Print a Log In message to the screen System.out.println(" The Result is " + result);
if(result.equals("5")){
System.out.println(" The Result is Pass");
}else{
System.out.println(" The Result is Fail");}
}
@AfterTest
public void closeBrowser(){
driver.close();
}
}//class closed
WebElemen
driver.findElement(By.id("firstname"));
Store WebElement as a variable
WebElement
Note: Recommendation to use is By class
WebDriverWait wait = WebDriverWait(driver, 15);
Selenium introduce PageObjectModel including @FindBy and PageFactory.intiElement(driver, Class.class)
Save webElement
@FindBy (how = How.XML, using = “xpath”) WebElement userName;
To create object of class (instance)and pass driver on that class
LoginPage loginPage = PageFactory.initElements(driver, LoginPage.class);
Page Object Model
https://github.com/myicskt/selenium_pageObjectModel_2023.git
Page Object Model _Using ExcelFile
https://github.com/myicskt/-selenium_pageObjectModel_Excel_2023.git
Note: to get runtime data like(user name generate at run time) s
Page Object Model _Using JOSN (java script object Notaion)
Json is a way of cummintcation
Object vs array
A collection name _vlaue pairs an ordered lis of values
Start and closing with {} start and closing []
{“name”: “java”, “ver”:”num”} [{“name”: “java”, “ver”:”num”},
{“name”: “php”, “ver”:”num”} }
Json rules
Json file have .json as extension, ex. User.json
key/value pare {“key”:”value}
Double quotes “ “ ;
Value should be a valid JSON data type
Data is separated by comma (,)
Curly braces should object {....}
Square brackets hold arrays [ ]
Gson is a Java library → Add Gson dependency
Headless browser
A headless browser is a web browser without a graphical user interface (GUI). It operates in a "headless" mode, meaning it runs in the background without opening a window or rendering the content visually. Headless browsers are useful for automated testing and web scraping tasks where you don't need to interact with the browser visually but still need to manipulate web pages and extract data.
In Selenium with Java, you can use headless browsers like Chrome or Firefox using their respective headless modes. For example:
Using a headless browser can speed up your tests and make them more efficient because there's no overhead of rendering the web page visually. It also allows you to run tests in environments where there's no GUI available, such as on servers or in CI/CD pipelines.
Chrome
You can use Chrome's headless mode by setting the ChromeOptions.addArguments("--headless") .
System.setProperty("webdriver.chrome.driver", "/path/to/chromedriver");
// Create ChromeOptions instance and enable headless mode
ChromeOptions options = new ChromeOptions();
options.addArguments("--headless"); // Enable headless mode
// Instantiate ChromeDriver with ChromeOptions
WebDriver driver = new ChromeDriver(options);
Firefox:
You can use Firefox's headless mode by using the GeckoDriver and setting the FirefoxOptions FirefoxOptions.setHeadless(true) .
// Set the path to the GeckoDriver executable
System.setProperty("webdriver.gecko.driver", "/path/to/geckodriver");
// Create FirefoxOptions instance and enable headless mode
FirefoxOptions options = new FirefoxOptions();
options.setHeadless(true);
// Enable headless mode // Instantiate FirefoxDriver with FirefoxOptions
WebDriver driver = new FirefoxDriver(options);
// Navigate to a website
driver.get("https://www.example.com");
There are several headless browser. Here is a lis of some commonly used headless browser.
Chrome
Firefox
PhantomJS
HtmlUnit
HtmlUnit
Selenium Grid with Docker:
ReplyDeleteIn Selenium's Page Factory, the @FindBy annotation is used to declare a field as a proxy for a WebElement and to specify how to locate that element. There are two ways to use @FindBy:
Using Locator Strategies directly:
In this approach, you directly specify the locator strategy (such as id, name, className, xpath, etc.) and the locator value in the @FindBy annotation itself.
Example:
java
Copy code
import org.openqa.selenium.WebElement;
import org.openqa.selenium.support.FindBy;
public class LoginPage {
@FindBy(id = "username")
private WebElement usernameInput;
@FindBy(id = "password")
private WebElement passwordInput;
@FindBy(id = "loginButton")
private WebElement loginButton;
// Other elements...
}
Using the how and using attributes:
In this approach, you use the how attribute to specify the locator strategy (enum constant from org.openqa.selenium.support.How) and the using attribute to specify the locator value.
Example:
java
Copy code
import org.openqa.selenium.WebElement;
import org.openqa.selenium.support.FindBy;
import org.openqa.selenium.support.How;
public class LoginPage {
@FindBy(how = How.ID, using = "username")
private WebElement usernameInput;
@FindBy(how = How.ID, using = "password")
private WebElement passwordInput;
@FindBy(how = How.ID, using = "loginButton")
private WebElement loginButton;
// Other elements...
}
Both approaches achieve the same result: they locate the web element using the specified locator strategy and value. The choice between the two approaches is a matter of personal preference and readability. Some developers may prefer the first approach for its simplicity and brevity, while others may prefer the second approach for its explicitness and consistency with the How enum.