09 Jenkins
Download and install Jenkins 2.46
Prerequisites
→ For 2.46 it required java 11
→256 MB of RAM and 10 GB is a recommended ( Minimum hardware requirements:)
→ 50 GB+ of drive space
→ 2.426.1 (November 2023) -Java 11, Java 17, or Java 21
→ 2.361.1 (September 2022) -Java 11 or Java 17
→ 2.346.1 (June 2022) -Java 8, Java 11, or Java 17
→ 2.164.1 (March 2019) -Java 8 or Java 11
Step:1
→ download jenkins from : https://www.jenkins.io/download/
→ install Jenkins
→ set destination folder
→logon type
→selet Run service as localSystem
→select port num default is 8080
→select Java home directory
→ next → finished
Step 2: run and stop jenkins server
→Open services app in windows
Search for Jenkins
Right click, properties
On Log On tab configure the credentials you want to use
Reboot Jenkins
Step 3: user and password (my)
→user: root
→password root
Step 4: set system variable
→JAVA_HOME
→ C:\Program Files\Java\jdk-11 → Add on system variable (JAVA_HOM)
→ C:\Program Files\Java\jdk-11\bin → Add on system variable > path
→MAVEN_HOME
→ C:\Program Files\Maven\apache-maven-3.6.1 → Add on system variable (MAVEN_HOME)
→ C:\Program Files\Maven\apache-maven-3.6.1\bin → Add on system variable > path
Step 5: FIND JAVA AND MAVEN Path from CMD
→ ECHO %JAVA_HOME%
→ ECHO %MAVEN_HOME%
********************************************************************************
AFTER LOG IN GENKINS
→
Step 1: add plugins
→Manage jenkins > plugins > available plugins >
→ select all except red
Step 2 : set set java and maven
→Manage jenkins > tools >
→JDK installations
→ add JDK → name (JDK)
→ uncheck Install automatically
→ java home path (C:\Program Files\Java\jdk-11)
→Maven installations
→ add Maven→ name (Maven→ )
→ uncheck Install automatically
→ java home path (C:\Program Files\Java\jdk-11) → And save
Step 3 : Add Job
New items
enter an item(project) name
Select Maven project
Press Ok
Description
Source Code Management -> git ->
Repository URL→https://github.com/myicskt/2023_2_19-jenkinesTest.git
Branches to build
Branch Specifier (blank for 'any')
Build Triggers
MINUTES (0-59), HOURS(0-23), DAYMONTH(1-31), MONTH (1-12), DAYWEEK (0-7) where 0 and 7 are sunday
14 15 * * * → run 3:14:10 PM every day
00 00 * * * → run every day at midnight
00 00 * * 1-5 →every day from Monday to Friday
Build when a change is pushed to GitLab. GitLab webhook URL: http://localhost:8070/project/first%20project?
GitHub hook trigger for GITScm polling?
Poll SCM?
Build Environment
Check → Delete workspace before build starts
Pre Steps→ blank for 'any’
Build
Root POM →pom.xml
Goals and options → clean install
Post Steps→ blank
Build Settings
E-mail Notification →
Recipients→ myicskt@gmail.com
Check
Send e-mail for every unstable build
Send separate e-mails to individuals who broke the build
Send e-mail for each failed module?
Post-build Actions
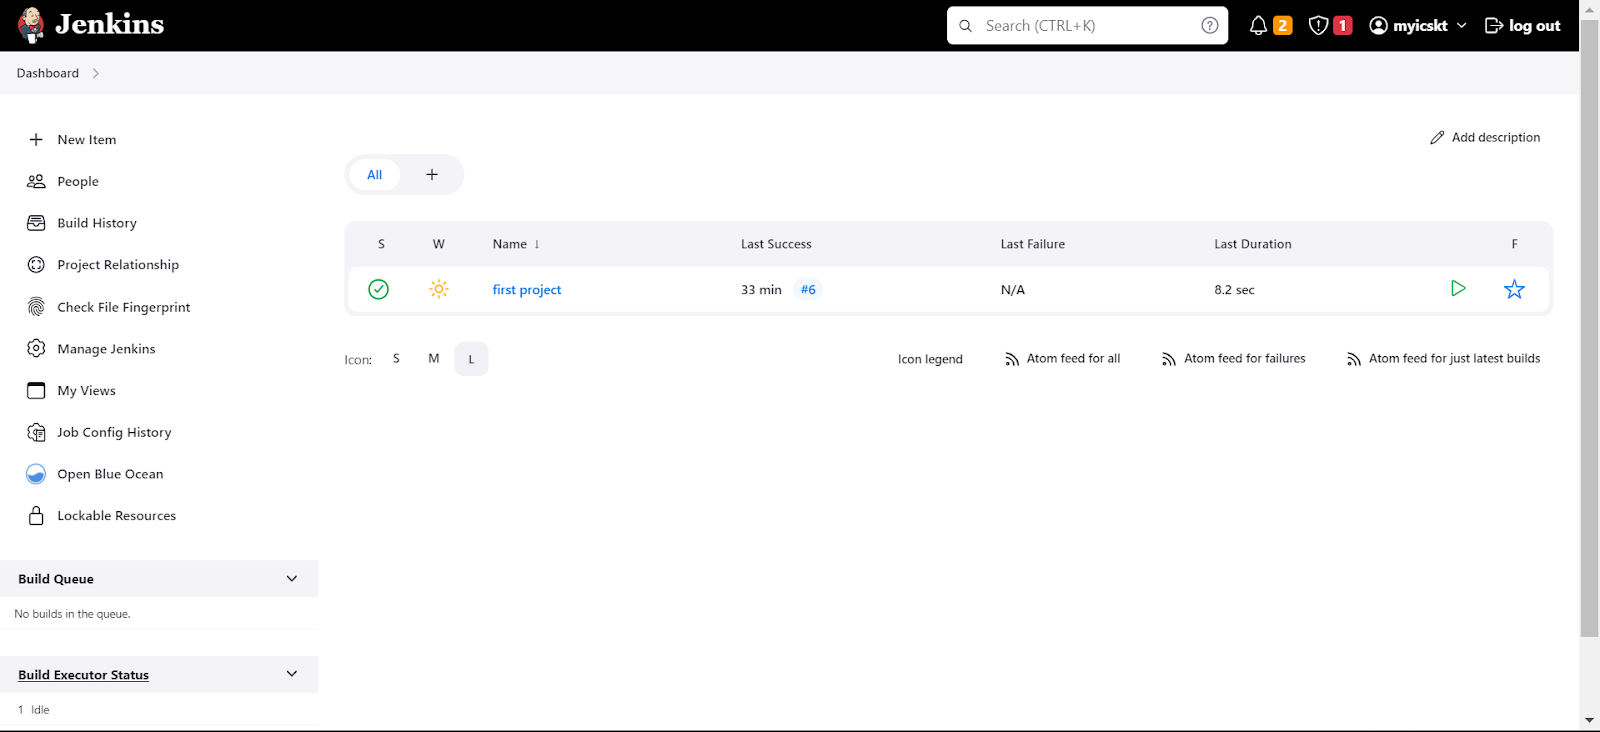
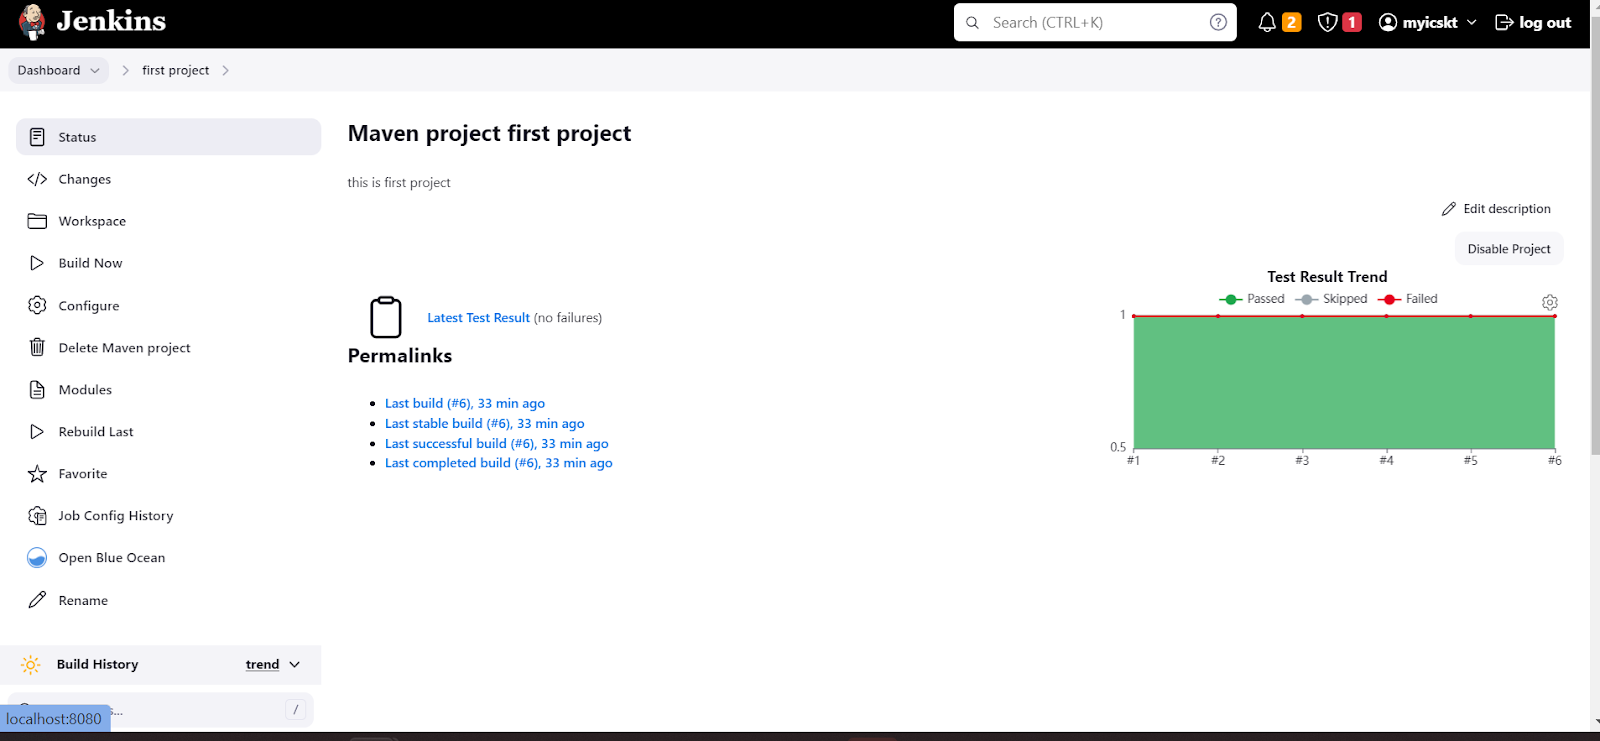
Project
Status → we can see project name, last result report, test result trend(graph)
Change code → if there is nay change in githug(source code) we can see here
Workspace → source code
Build now → build the project now
Configuration →
1. General configuration , 2. Source code management, 3. Build tigger, 4. Build environment, 5. Pre steps, 6. Build, 7. Post steps 8. Build setting, 9 post build action.
Delet project → To delet the project
Models
Rebuild last
Favorite
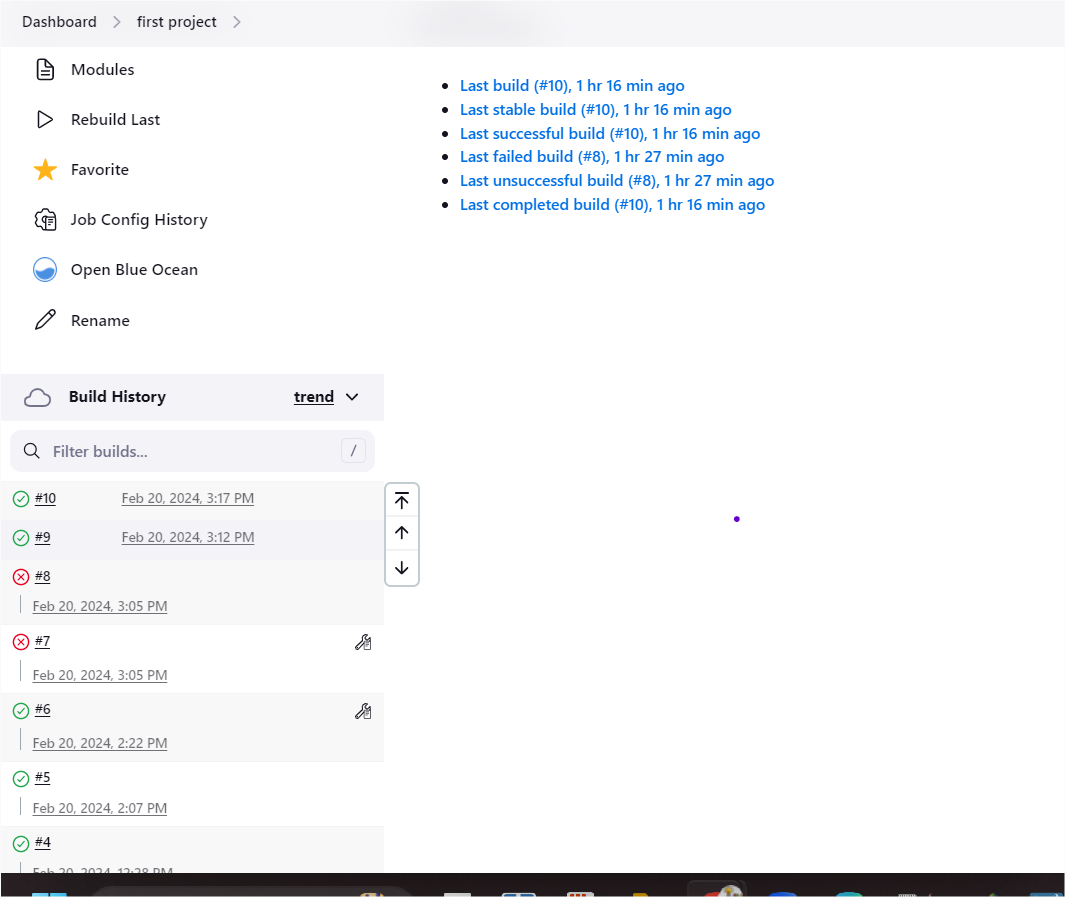
Job history
Open blue ocean → set list of test and report
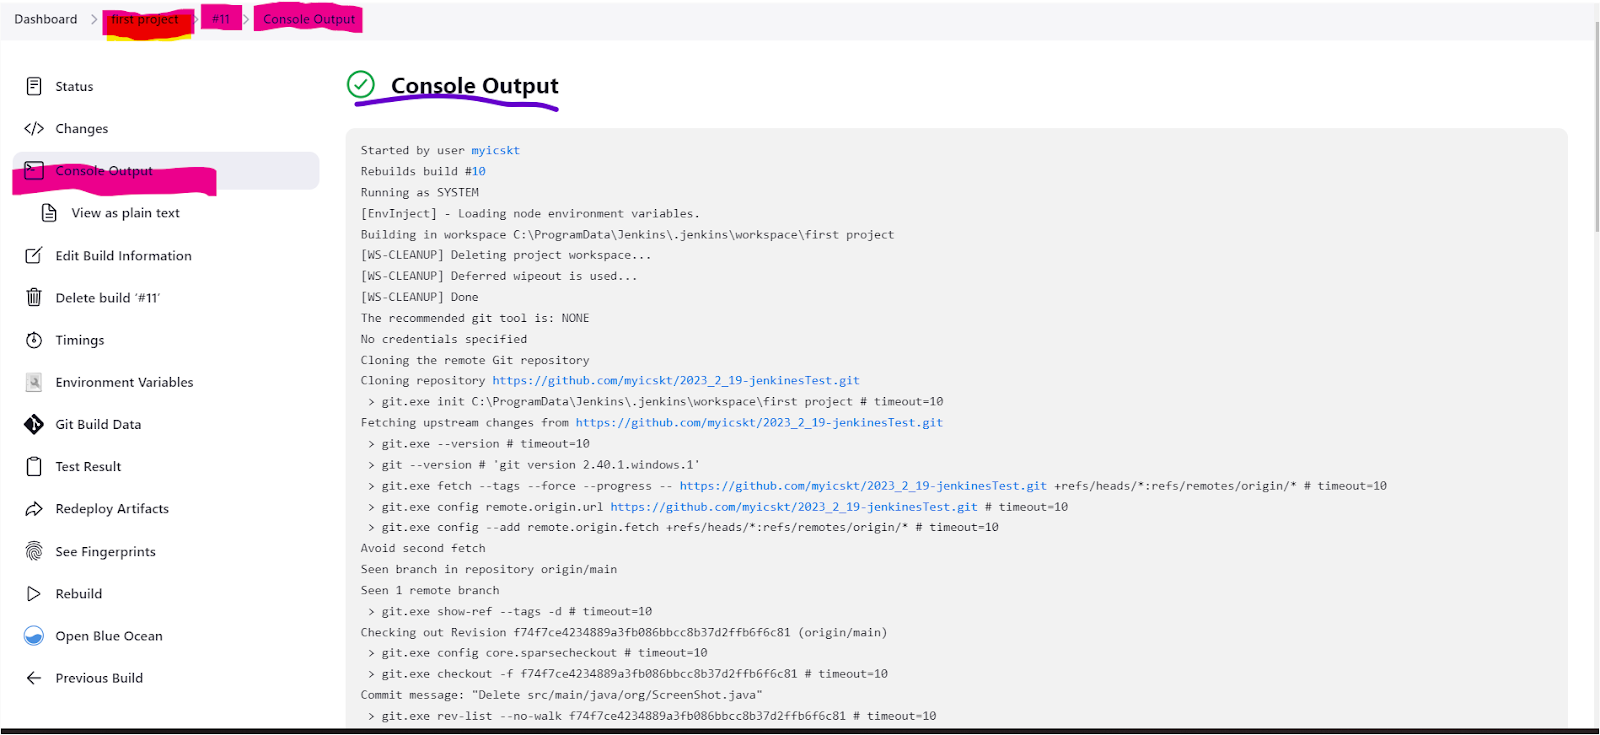
To see console output
Go to → project → click on build num→ console Output
Headless browser
A headless browser is a web browser without a graphical user interface (GUI). It operates in a "headless" mode, meaning it runs in the background without opening a window or rendering the content visually. Headless browsers are useful for automated testing and web scraping tasks where you don't need to interact with the browser visually but still need to manipulate web pages and extract data.
In Selenium with Java, you can use headless browsers like Chrome or Firefox using their respective headless modes. For example:
Using a headless browser can speed up your tests and make them more efficient because there's no overhead of rendering the web page visually. It also allows you to run tests in environments where there's no GUI available, such as on servers or in CI/CD pipelines.
Chrome
You can use Chrome's headless mode by setting the ChromeOptions.addArguments("--headless") .
System.setProperty("webdriver.chrome.driver", "/path/to/chromedriver");
// Create ChromeOptions instance and enable headless mode
ChromeOptions options = new ChromeOptions();
options.addArguments("--headless"); // Enable headless mode
// Instantiate ChromeDriver with ChromeOptions
WebDriver driver = new ChromeDriver(options);
Firefox:
You can use Firefox's headless mode by using the GeckoDriver and setting the FirefoxOptions FirefoxOptions.setHeadless(true) .
// Set the path to the GeckoDriver executable
System.setProperty("webdriver.gecko.driver", "/path/to/geckodriver");
// Create FirefoxOptions instance and enable headless mode
FirefoxOptions options = new FirefoxOptions();
options.setHeadless(true);
// Enable headless mode // Instantiate FirefoxDriver with FirefoxOptions
WebDriver driver = new FirefoxDriver(options);
// Navigate to a website
driver.get("https://www.example.com");
There are several headless browser. Here is a lis of some commonly used headless browser.
Chrome
Firefox
PhantomJS
HtmlUnit
HtmlUnit
Selenium Grid with Docker:
Comments
Post a Comment