05 Behaviour-Driven Development (BDD)
Behaviour-Driven Development (BDD)
Behaviour-Driven Development (BDD) is the software development process that Cucumber was built to support.
There’s much more to BDD than just using Cucumber.
What is BDD?
BDD is a way for software teams to work that closes the gap between business people and technical people by:
Encouraging collaboration across roles to build shared understanding of the problem to be solved
Working in rapid, small iterations to increase feedback and the flow of value
Producing system documentation that is automatically checked against the system’s behaviour
We do this by focusing collaborative work around concrete, real-world examples that illustrate how we want the system to behave. We use those examples to guide us from concept through to implementation, in a process of continuous collaboration.
BDD and agile
We assume that your team are using some kind of agile methodology already, planning work in small increments of value like User Stories. BDD does not replace your existing agile process, it enhances it.
Think of BDD as a set of plugins for your existing process that will make your team more able to deliver on the promises of agile: timely, reliable releases of working software that meets your organisation’s evolving needs, requiring some maintenance effort and discipline.
Rapid iterations
We assume you would like to be able to respond quickly to feedback from your users, and do only the minimal work necessary to meet those needs.
BDD encourages working in rapid iterations, continuously breaking down your user’s problems into small pieces that can flow through your development process as quickly as possible.
Three practices
Essentially, day-to-day BDD activity is a three-step, iterative process:
First, take a small upcoming change to the system – a User Story – and talk about concrete examples of the new functionality to explore, discover and agree on the details of what’s expected to be done.
Next, document those examples in a way that can be automated, and check for agreement.
Finally, implement the behaviour described by each documented example, starting with an automated test to guide the development of the code.
The idea is to make each change small and iterate rapidly, moving back up a level each time you need more information. Each time you automate and implement a new example, you’ve added something valuable to your system, and you’re ready to respond to feedback.
We call these practices Discovery, Formulation, and Automation.
Behavior Driven Development (FromJavaPoint)
BDD (Behavioral Driven Development) is a software development approach that was developed from Test Driven Development (TDD).
BDD includes test case development on the basis of the behavior of software functionalities. All test cases are written in the form of simple English statements inside a feature file, which is human-generated. Acceptance test case statements are entirely focused on user actions.
BDD is written in simple English language statements, not in a typical programming language. BDD improves communication between technical and non-technical teams and stakeholders.
Let's understand through an example, how we can develop test cases on the basis of the behavior of a particular function.
In the following example, we are going to take the login function of a web application.
Example:
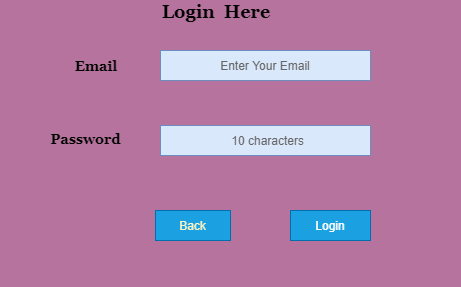
In order to ensure the working of Login Functionality, we are developing acceptance test cases on the basis of BDD
Feature:
Login Function Access software when login is successful
Scenario: Login
Given User has its Email
And Password
When User enters the correct Email and Password
Then It should be logged in
Scenario: Unsuccessful Login
When User enters either wrong Email or Password
Then It should be reverse back on the login page with an error message
Need to Choose BDD
TDD works satisfactorily unless the business owners are familiar with the use of the unit testing. Also, their technical skills should strong enough, which is not always possible.
In these circumstances, BDD is advantageous because test cases are written in a common English language, which is easily understandable by all stakeholders.
The familiar, easily understandable language is the most significant advantage of using BDD because it plays a vital role in cooperation between technical and non-technical teams to perform a task with better efficiency.
Characteristics of BDD
Strong collaboration
BDD provides a strong collaboration between involved parties. It is just because of easy test cases which are written in the English language. In cucumber testing, stockholders play a vital role in constructive discussions as only they know the expectations from the software.
High Visibility
Everyone gets strong visibility in the progress of the project due to the easy English language.
The software design follows the business value
BDD gives great importance to business value and needs. By setting priorities with the client, depending on the value provided by them, developers are able to give a better result because they have a strong understanding of how the customer thinks.
The Ubiquitous Language
As mentioned earlier, test cases are written in the ubiquitous language, which is understandable by all the members of the team, whether they are from a technical field or not. This helps to reduce misconceptions and misunderstanding between the members related to concepts. Ubiquitous language makes easy joining of new members into the working.
Software development meets the user need.
BDD focuses on the business's needs so that users can be satisfied, and of course, satisfied users imply a growing business. With BDD, tester focuses on the behavior which has more impact than the implementation.
More confidence from the developers' sideThe teams using BDD are generally more confident because they do not break the code, and when it comes to their work, a better forecast is done.
Lower Costs
By improving the quality of the code, BDD basically reduces the cost of maintenance and minimizes the risks of the project.
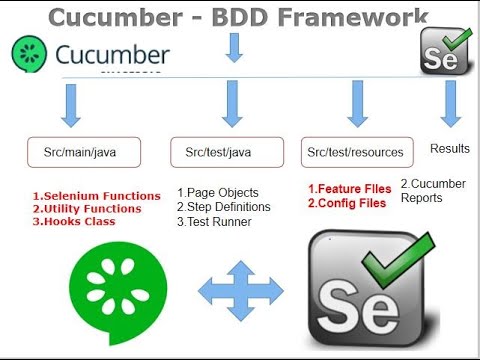
Cucumber

Cucumber is a tool that supports Behaviour-Driven Development(BDD).
Cucumber Testing
Cucumber is a widely used tool for Behaviour Driven Development because it provides an easily understandable testing script for system acceptance and automation testing.
Our Cucumber testing tutorial provides basic and advanced concepts of Cucumber testing. This Cucumber testing tutorial is designed for beginners and professionals.
In this tutorial, you will find all crucial terminologies such as Behaviour Driven Development, Feature File, Scenario, Step Definition, Tag, etc of cucumber testing.
What is Cucumber Testing
Cucumber is a Behavior Driven Development tool used to develop test cases for the behavior of software's functionality. It plays a supporting role in automated testing.
In other words,
"Cucumber is a software tool used by the testers to develop test cases for the testing of behavior of the software."
Cucumber tool plays a vital role in the development of acceptance test cases for automation testing. It is mainly used to write acceptance tests for web applications as per the behavior of their functionalities.
It follows a BDD (Behavior Driven Development) framework to observe the behavior of the software's functionalities.
In the Cucumber testing, the test cases are written in a simple English text, which anybody can understand without any technical knowledge. This simple English text is called the Gherkin language.
It allows business analysts, developers, testers, etc. to automate functional verification and validation in an easily readable and understandable format (e.g., plain English).
We can use Cucumber along with Watir, Selenium, and Capybara, etc. It supports many other languages like PHP, Net, Python, Perl, etc.
What is BDD?
BDD (Behavioral Driven Development) is a software development approach that was developed from Test Driven Development (TDD).
BDD includes test case development in the form of simple English statements inside a feature file, which is human-generated. Test case statements are based on the system's behavior and more user-focused.
BDD is written in simple English language statements rather than a typical programming language, which improves the communication between technical and non-technical teams and stakeholders.
Which language is used in cucumber?
Cucumber tool was originally written in the "Ruby" programming language. It was exclusively used only for testing of Ruby as a complement to the RSpec BDD framework.
But now, Cucumber supports a variety of different programming languages including Java, JavaScript, PHP, Net, Python, Perl, etc. with various implementations. In Java, it supports native JUnit.
Basic Terms of Cucumber
Feature File
Features
Tags
Gherkin Language
Step Definition
Cucumber test cases are written parallel with the code development of software. These test cases are called step in a Gherkin Language.
How does Cucumber Testing Works?
Cucumber test cases are written parallel with the code development of software. These test cases are called step in a Gherkin Language.
Firstly, Cucumber tool reads the step written in a Gherkin or plain English text inside the feature file.
Now, it searches for the exact match of each step in the step definition file. When it finds its match, then executes the test case and provides the result as pass or fail.
The code of developed software must correspond with the BDD defined test scripts. If it does not, then code refactoring will be required. The code gets freeze only after successful execution of defined test scripts.
Software tools supported by Cucumber
The piece of code to be executed for testing may belong to different software tools like Selenium, Ruby on Rails, etc. But cucumber supports almost all popular software platforms, and this is the reason behind Cucumber's popularity over other frameworks such as JDave, Easyb, JBehave, etc. Some Cucumber supported tools are given below:
Ruby on Rails
Selenium
PicoContainer
Watir
Advantages of Cucumber Tool
The main focus of the Cucumber Testing is on the end-user experience, as the success of the software ultimately depends on the end-user experience.
The test case writing is very easy and understandable.
It provides an end-to-end testing framework, unlike other tools.
It supports almost all popular different languages like Java.net, JavaScript Ruby, PHP, etc.
It works as a bridge between business and technical language, and this bridge is sustainable because of test cases written in a plain English text.
The testing environment set up and execution both are very quick and easy.
It is a well efficient tool for testing.
Prerequisite: Before learning software testing, you should have basic knowledge of software testing, System behavior, and hand-on experience of some testing tools.
Audience: This tutorial is designed for testing professionals such as developers, analysts, and testers who are intending to learn the fundamentals of Cucumber and want to put it into practice.
CUCUMBER VS SELENIUM
Feature File in Cucumber Testing
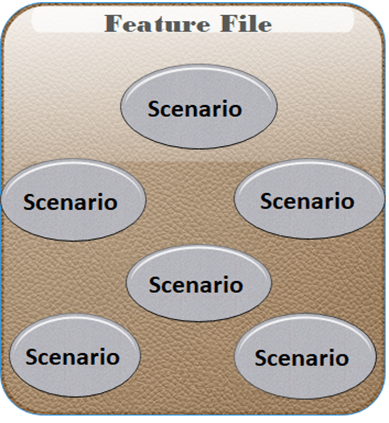
The feature file is the essential segment of cucumber tool, which is used to write acceptance steps for automation testing. Acceptance steps generally follow the application specification.
A feature file is usually a common file which stores feature, scenarios, and feature description to be tested.
The feature file is an entry point, to write the cucumber tests and used as a live document at the time of testing.
The extension of the feature file is ".feature". Each functionality of the software must have a separate feature file.

Example:
In order to ensure the working of Login Functionality, we are implementing the cucumber test by creating a feature file. It will verify whether the Login Functionality is working properly or not.
Feature: Login
Scenario: Login Functionality
Given user navigates to the website javatpoint.com
And there user logs in through Login Window by using Username as "USER" and Password as "PASSWORD"
Then login must be successful.
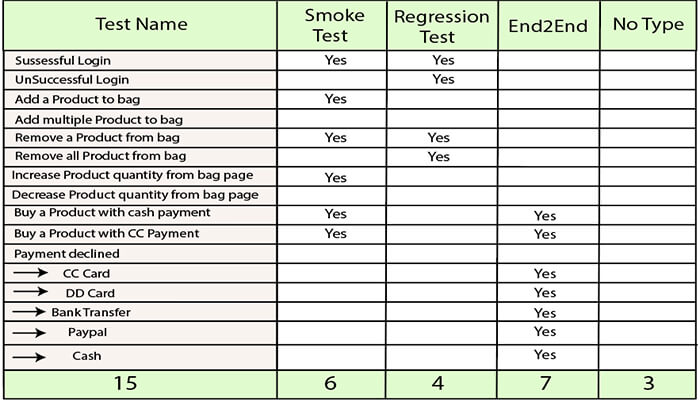
After performing the automation testing, a table is created as a result of automation testing. This table is used in tags.
The resulting table looks like the following table:
Feature file with Multiple Scenario
Feature file can contain multiple scenarios or scenario outlines. We can write all possible Scenarios of a particular feature in a feature file.
By using the keyword "Scenario" or "Scenario Outline", One Scenario can be separated from another.
However, a single feature file can contain any number of scenarios but focuses only on one feature such as registration, login etc at a time. Therefore, it is better to keep the scenarios related to a particular feature in a single feature file.
Scenarios can be executed parallel, or you can execute them together in a group. Let's take an example for more clarity:
Example:
Feature File 1:
Feature: Registration
Background:
Given user on the homepage
And user follows "Sign in"
@regression
Scenario: Create a New User
When user fills "registration email textbox" with "abc@gmail.com"
And user clicks "create an account button"
And user enters the following details
| First Name | Chitrali|
| Last Name | Sharma|
| Password | Inquiry@1234 |
| Date | 17| | Month | 02| | Year | 1992 |
And user clicks "register button"
Scenario: User does not follow form validations
When user enters wrong characters
Then error message displayed with invalid password
And user returns back on registration page
Feature File 2:
Feature: Login
Background:
Given user on the login page
And user follows "Log in"
@regression @smoke
Scenario: Verification of Login Function
Given user on the Login Page
And user enters "email address" with "chitrali.sharma27@gmail.com"
And user enters "password" with "Inquiry@1234"
And user click "log in" button
Then user should see "My Account"
Scenario: Unsuccessful login
Given user on the Login Page
And user enters "email address" with "chitrali.sharma27@gmail.com"
And user enters "password" with "qsder@1234"
And user clicks "login" button
Then error message displayed with wrong password
And user returns back on login page
Comments in Feature File
If we do not need to execute a particular scenario at a time, then we can comment on that scenario.
In Eclipse, to comment a multi-line or use block comment first select all the lines to be commented and then press Ctrl + /. Similarly, to remove comments, we need to press Ctrl + \. Other IDEs may contain other shortcuts to do this.
While commenting on any scenario, do not forget to comment on the complete scenario. Otherwise, remaining lines of scenario which are not commented will be considered as a part of the previous scenario.
What is tag in Cucumber testing?
In Cucumber, tags are used to associate a test like smoke, regression etc. with a particular scenario.
Tag fulfils the following purposes:
If we have many scenarios in the feature file, to keep them in one group, we use tags in Cucumber, through which we will be able to prepare reports for specific scenarios under the same tag.
By default, Cucumber executes all the scenarios inside the feature file, but if we need to execute or skip any specific scenario under a specific test, so we can declare scenarios within a tag.
We can declare a tag in a feature file by the following syntax:
@TestName
Scenario: Mention the Scenario
Where,
@: It is a symbol used to declare a tag.
TestName: It is the name of a specific test.
Scenario: It is a scenario.
Now, if we need to execute a scenario under multiple tests, in this case, we can create a set of
Example:
Suppose, a feature file of an application contains 100 test scenarios, and when we test this application through Cucumber testing each time 100 test scenarios will get executed unnecessarily. And due to that, system performance is getting low.
To overcome this problem, we can use a tag.
Let's take an instance of a feature file with few scenarios.
@SmokeTest
Scenario: Search contact
Given: Desired contact will be displayed
@RegressionTest
Scenario: Search a deal
Given: Desired deal will be displayed
@SmokeTest
Scenario: Search an email
Given: Desired email will be displayed
There are two benefits by using the tag in the above feature file:
First, the @SmokeTest or @RegressionTest tag contains only those scenarios that are applicable to the smoke or regression testing.
Second, scenarios can be included or excluded as per the requirement at the time of execution.
AD
Now suppose, we need to test only those scenarios which are declared under the smoke test, then we can mention @SmokeTest tag inside the testing code in the following way:
tags={"@SmokeTest"}
How to create a set of multiple tags in cucumber testing?
Multiple tests by using a tag.
@TestName @TestName
Scenario: Mention the scenario
We can also use multiple tags when we need to perform more than one testing of a single scenario.
Example:
@SmokeTest tag @RegressionTest tag
Scenario: Search contact
Given: Desired contact will be displayed
@RegressionTest tag
Scenario: Search a deal
Given: Desired deal will be displayed
@SmokeTest tag
Scenario: Search an email
Given: Desired email will be displayed
As per the above example, we can test the first scenario for both smoke testing and regression testing.
The testing through multiple tags can be done by using two operators:
AD
OR operator
AND operator
OR operator
The OR operator can be used in the case, when we need to test an application like this, if the application has failed in the first test, then the next test should be checked. If the next test is also failed, then another next test should be checked and so on.
In other words, each test case among from the set of multiple tags must be tested whether it is failed or pass.
To use the OR operator in the test executing program, use the following syntax:
Tags= {"@FirstTest, @SecondTest"}
Example:
tags= {"@SmokeTest, @RegressionTest"}
In the above example, OR operator executes all the tagged tests i.e., @SmokeTest, @RegressionTest.
AND Operator
The AND operator can be used in the case, when we need to test an application like this, if the application has passed in the first test, then jump to check the next test, but if it gets failed, then testing should be terminated.
To use the AND operator in the test executing program, use the following syntax:
tags= {"@FirstTest", "@SecondTest"}
Example:
tags= {"@SmokeTest", "@RegressionTest"}
In the above example, AND operator executes the first test, if the result of this test is passed then it will jump to check the next test. But if the result is failed then testing will be terminated.
How to ignore tags in Cucumber testing?
In the case, when we need to skip a test, then we can use Special symbol "~" within the tag. This Special Character also works to skip both Scenarios and Features. And this can also work in conjunction with OR or AND.
Example:
Suppose there is a group of @SmokeTest and @RegressionTest tests. Now, we need to skip the regression test, to do that, consider the following code:
tags={"@SmokeTest", "~@RegressionTest"}
***********************************************************************************************
Gherkin Language
***********************************************************************************************
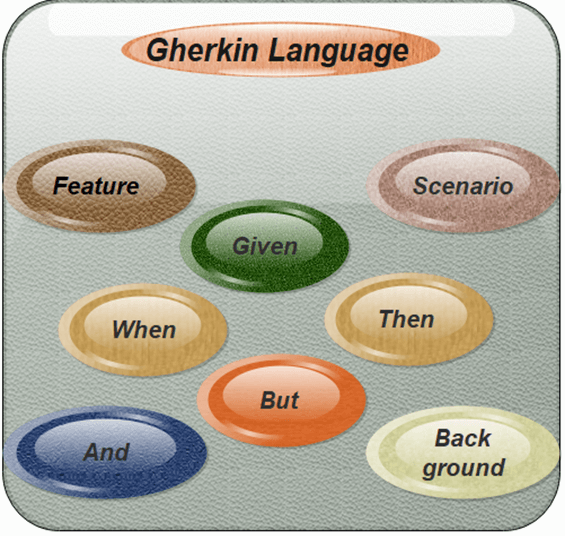
As we have learned in the cucumber testing, feature files are created with the executable test scripts. The language, in which these executable test scripts are written, is known as Gherkin language.
Basically, Gherkin is a plain English text language used to interpret and execute the test scripts.
Keywords
Each line that isn’t a blank line has to start with a Gherkin keyword, followed by any text you like. The only exceptions are the free-form descriptions placed underneath Example/Scenario, Background, Scenario Outline and Rule lines.
The primary keywords are:
Feature:
The purpose of the Feature keyword is to provide a high-level description of a software feature, and to group related scenarios.
The first primary keyword in a Gherkin document must always be Feature, followed by a : and a short text that describes the feature.
Rule (as of Gherkin 6): The (optional) Rule keyword has been part of Gherkin since v6.
Example (or Scenario):
This is a concrete example that illustrates a business rule. It consists of a list of steps.
The keyword Scenario is a synonym of the keyword Example.
Steps: (Given, When, Then, And, But for steps (or *)
Each step starts with Given, When, Then, And, or But(or*).
Cucumber executes each step in a scenario one at a time, in the sequence you’ve written them in. When Cucumber tries to execute a step, it looks for a matching step definition to execute.
Keywords are not taken into account when looking for a step definition. This means you cannot have a Given, When, Then, And or But step with the same text as another step.
Given, When, Then, And, But for steps (or *)
Describe an initial context (Given steps)
Describe an event (When steps)
Describe an expected outcome (Then steps)
Note: “ * ” Gherkin also supports using an asterisk (*) in place of any of the normal step keywords. This can be helpful when you have some steps that are effectively a list of things, so you can express it more like bullet points where otherwise the natural language of And etc might not read so elegantly.
Background
You can only have one set of Background steps per Feature or Rule. If you need different Background steps for different scenarios, consider breaking up your set of scenarios into more Rules or more Features.
For a less explicit alternative to Background, check out conditional hooks.
Scenario Outline (or Scenario Template)
The Scenario Outline keyword can be used to run the same Scenario multiple times, with different combinations of values.
The keyword Scenario Template is a synonym of the keyword Scenario Outline.
Copying and pasting scenarios to use different values quickly becomes tedious and repetitive:
Scenario outlines allow us to more concisely express these scenarios through the use of a template with < >-delimited parameters:
Scenario Outline: eating
Given there are <start> cucumbers
When I eat <eat> cucumbers
Then I should have <left> cucumbers
Examples:
| start | eat | left |
| 12 | 5 | 7 |
| 20 | 5 | 15 |
Note: Instate of using { } Use (.+) to pass data in step definition
There are a few secondary keywords as well:
""" (Doc Strings)
| (Data Tables)
@ (Tags)
# (Comments)
When Cucumber supports the English text, why do we need a separate Gherkin language?
It has been discussed several times that Cucumber supports plain English text, then why we need a separate Gherkin language. The answer to this lies in the concept of the BDD (Behavior Driven Development).
As we know, BDD involves various software behavior development possibilities while preparing test scripts. These can be development-related possibilities or business-related possibilities. In order to accomplish these possibilities, we need members from different communities like testers, developers, product owners, and project managers while developing test scripts.
Since these members do not belong to the same community; therefore, it is hardly possible to use the common language by each of them. Due to that, the concept of the test script is at high risk. In order to reduce this risk, Gherkin was developed.
Gherkin offers a common set of keywords in the plain English text, which can be used by members from different communities and can get the same output from the test scripts.
Gherkin offers the following specific keywords to write the common test scripts in the feature file:
Feature
Scenario
Given
When
Then
But
And
Background
Feature
Each feature file of Cucumber testing starts with a feature keyword. It is a standalone unit or functionality to be tested. For example, login feature, payment transfer feature, registration feature, etc.
Example:
Feature: Login
Scenario: Login verification
Given user navigates to the website javatpoint.com
And user logs in through Login Window by using Username as "USER" and Password as "PASSWORD"
Then login must be successful.
Scenario
Each feature contains the required number of tests to test the feature. Each test is named as a Scenario.
For example, feature login functionality can contain two scenarios, first for a successful login and second for unsuccessful login.
Scenario: Successful Login with Valid entries
Given user navigates to the website javatpoint.com
And user logs in through Login Window by using Username as "USER" and Password as "PASSWORD"
Then login must be successful.
Scenario: Unsuccessful Login with Invalid entries
Given user navigates to the website javatpoint.com
And user logs in through Login Window by using Username as "USER" and Password as "1234erty"
But user entered wrong username and password
Then login must be unsuccessful.
Given
This keyword refers to the pre-condition of the test. For example, to access any web application, the first requirement or precondition is to navigate its home page, because, from the home page, we can navigate to other links such as signup, login, etc.
Example:
Feature: Login
Scenario: Login verification
Given user navigates to the website javatpoint.com
And user logs in through Login Window by using Username as "USER" and Password as "PASSWORD"
Then login must be successful.
When
It usually refers to the actions of a user that is to be executed.
Example:
Scenario: Successful Login with Valid entries
Given user navigates to the website javatpoint.com
When User Navigate to Login Page
And user logs in through Login Window by using Username as "USER" and Password as "PASSWORD"
Then login must be successful.
When user fills "registration email textbox" with "abc@gmail.com".
Then
This keyword refers to the outcome of the previous step or upcoming action.
ADExample:
Scenario: Successful Login with Valid entries
Given user navigates to the website javatpoint.com
When User Navigate to Login Page
And user logs in through Login Window by using Username as "USER" and Password as "PASSWORD"
Then login must be successful.
But
This keyword is used to add negative conditions.
Example:
Scenario: Unsuccessful Login with Invalid entries
Given user navigates to the website javatpoint.com
And user logs in through Login Window by using Username as "USER" and Password as "1234erty"
But user entered wrong password
Then login must be unsuccessful.
And
This keyword is used to add more conditions into your steps.
Example:
Given User is on Home Page
And Login Link is displayed
When User Navigates to Login form
And User enters email and Password
Then Login Successfully will be displayed
And Logout Link should be displayed
Background
This keyword is used to define the steps that are common to all tests in the feature file. For example, Navigation to Home Page, Click on the Login, Enter User Name and Password, Click on Submit button are the common steps in almost all web applications.
Tips for using Background
Don’t use Background to set up complicated states, unless that state is actually something the client needs to know.
For example, if the user and site names don’t matter to the client, use a higher-level step such as Given I am logged in as a site owner.
Keep your Background section short.
The client needs to actually remember this stuff when reading the scenarios. If the Background is more than 4 lines long, consider moving some of the irrelevant details into higher-level steps.
Make your Background section vivid.
Use colourful names, and try to tell a story. The human brain keeps track of stories much better than it keeps track of names like "User A", "User B", "Site 1", and so on.
Keep your scenarios short, and don’t have too many.
If the Background section has scrolled off the screen, the reader no longer has a full overview of what’s happening. Think about using higher-level steps, or splitting the *.feature file.
What is a feature in cucumber testing?
A feature is a functionality or standalone unit of a software application. In other words, the feature is a parameter which is used to test the requirements of the customer from the software product.
Let's understand it through a very common example of a social networking site.
Few basic features of the social networking site can be determined as -
Create and delete the user from the social networking site.
User login functionality to access the social networking site.
Sharing videos or photos on the social networking site.
Sending a friend request.
Logout or sign out.
At the time of testing, it is best practice that we should determine the features first, before deriving the test scripts to be tested.
What is Scenario in Cucumber Testing?

The scenario is one of the core structures of the Gherkin language. Scenario includes all the possible circumstances of the feature and test scripts for these circumstances.
The keyword "Scenario" represents a scenario in Gherkin language.
One feature can have multiple scenarios, and each scenario consists of one or more steps.
What is tag in Cucumber testing?
In Cucumber, tags are used to associate a test like smoke, regression etc. with a particular scenario.
Tag fulfils the following purposes:
If we have many scenarios in the feature file, to keep them in one group, we use tags in Cucumber, through which we will be able to prepare reports for specific scenarios under the same tag.
By default, Cucumber executes all the scenarios inside the feature file, but if we need to execute or skip any specific scenario under a specific test, we can declare scenarios within a tag.
We can declare a tag in a feature file by the following syntax:
@TestName
Scenario: Mention the Scenario
Let's take an instance of a feature file with few scenarios.
@SmokeTest
Scenario: Search contact
Given: Desired contact will be displayed
@RegressionTest
Scenario: Search a deal
Given: Desired deal will be displayed
@SmokeTest
Scenario: Search an email
Given: Desired email will be displayed
S
NOTE: We can use stags={"@SmokeTest"}
we can create a set of multiple tests by using a tag.
@TestName@TestName
Scenario: Mention the scenario
@SmokeTest tag @RegressionTest tag
Scenario: Search contact
Given: Desired contact will be displayed
@RegressionTest tag
Scenario: Search a deal
Given: Desired deal will be displayed
@SmokeTest tag
Scenario: Search an email
Given: Desired email will be displayed
The testing through multiple tags can be done by using two operators:
OR operator
OR operator: The OR operator can be used in the case, when we need to test an application like this, if the application has failed in the first test, then the next test should be checked. If the next test is also failed, then another next test should be checked and so on.
Tags= {"@FirstTest, @SecondTest"}
Example:
tags= {"@SmokeTest, @RegressionTest"}
AND operator
AND Operator: The AND operator can be used in the case, when we need to test an application like this, if the application has passed in the first test, then jump to check the next test, but if it gets failed, then testing should be terminated.
To use the AND operator in the test executing program, use the following syntax:
tags= {"@FirstTest", "@SecondTest"}
Example:
tags= {"@SmokeTest", "@RegressionTest"}
In the above example, AND operator executes the first test, if the result of this test is passed then it will jump to check the next test. But if the result is failed then testing will be terminated.
How to ignore tags in Cucumber testing?
In the case, when we need to skip a test, then we can use Special symbol "~" within the tag. This Special Character also works to skip both Scenarios and Features. And this can also work in conjunction with OR or AND.
Example:
Suppose there is a group of @SmokeTest and @RegressionTest tests. Now, we need to skip the regression test, to do that, consider the following code:
tags={"@SmokeTest", "~@RegressionTest"}
What is Hook in Cucumber?
In Cucumber, the hook is the block of code which can be defined with each scenario in step definition file by using the annotation @Before and @After. These @Before and @After annotations create a block in which we can write the code.
Cucumber hook facilitates us to handle the code workflow better and also helps us to reduce code redundancy.
Syntax:
@Before setup () {
logic
} @
Scenario
Given
When
And
Then
@After cleanup (){
logic
As per the code logic, hook's job is to start and close the web driver session after a specific function/method. Hence, in actual, it is not relevant to any function/method or scenario.
Note: Hooks can be defined only in the step definition file.
The Need of Hook
At the time of testing, we may encounter circumstances where we need to perform some conventional prerequisite steps before the testing of the test scenario.
Consider the following prerequisite to understand the kind of prerequisites which may encounter at the time of testing:
To Start a web driver
Set up of Data Base connections
Set up of test data
Set up of browser cookies
Navigation to a certain page
Similarly, there are always some prerequisite steps which may encounter after testing:
To stop the web driver
To Close DB connections
To Clear the test data
To Clear browser cookies
To Log out from the application
Printing reports or logs
Taking the screenshots of error
AD
In order to handle these types of conventional prerequisite steps, using cucumber hook is the best option.
Hook Annotations
Unlike TestNG Annotations, the cucumber supports only two hooks:
@Before
@After
@Before
As the name suggests, we can use the @Before hook with the function/method after which we need to start web driver.
@After
As the name suggests, we can use the @After hook with the function/method after which we need to close the web driver.
Let's understand this notion better with an example of a step definition file.
Example:
Here is an instance of a step definition file of a Maven testing project. This project is created for the testing of web application javaTpoint.
In order to use the hook, we created the step definition file named hookTest.java under the package javatpointTest.
package javatpointTest;
import *
public class hookDemo {
WebDriver driver = null;
@Before public void setUp(){
driver = new FirefoxDriver();
}
@Given("^User navigates to javatpoint$")
public void goToFacebook() {
driver.navigate().to("https://www.javatpoint.com/");
}
@When("^ user enter Username as \"([^\"]*)\" and Password as \"([^\"]*)\"$" ")
public void User_enter_Username_and_Password(String arg1, String arg2) {
driver.findElement(By.id("emailAddress")).sendKeys(arg1);
driver.findElement(By.id("password")).sendKeys(arg2);
driver.findElement(By.id("u_0_v")).click();
}
@Then("^login should be unsuccessful$")
public void validateRelogin() {
if(driver.getCurrentUrl().equalsIgnoreCase(
"https://www.javatpoint.com/login.php?login_attempt=1&lwv=110")){
System.out.println("Test Pass");
} else {
System.out.println("Test Failed");
}
driver.close();
}
@After public void cleanUp(){
driver.close();
}
}
Tagged Hooks
The hook can also we used with tag. We can use @before and @after hooks with a specific test.
Example:
@Before ('@RegressionTest)
@After ('@RegressionTest)
We can also use the same concept of the hook with logical and/or operator.
Example:
AD
@Before ('@RegressionTest, @SmokeTest)
@ After ('@RegressionTest, @SmokeTest)
<dependencies>
<!--selenium→
<dependency>
<groupId>org.seleniumhq.selenium</groupId>
<artifactId>selenium-java</artifactId>
<version>3.14.0</version>
</dependency>
<!--junit or testng-->
<dependency>
<groupId>junit</groupId>
<artifactId>junit</artifactId>
<version>4.10</version>
<scope>test</scope>
</dependency>
<!--cucumber for java -->
<dependency>
<groupId>io.cucumber</groupId>
<artifactId>cucumber-java</artifactId>
<version>5.2.0</version>
<scope>test</scope>
</dependency>
<!--cucumber for junit / or change junit ot testNG-->
<dependency>
<groupId>io.cucumber</groupId>
<artifactId>cucumber-junit</artifactId>
<version>5.2.0</version>
<scope>test</scope>
</dependency>
<!-- Gherkin langung - writing feater file -->
<dependency>
<groupId>io.cucumber</groupId>
<artifactId>gherkin</artifactId>
<version>5.2.0</version>
</dependency>
<!-- for test report-->
<dependency>
<groupId>net.masterthought</groupId>
<artifactId>cucumber-reporting</artifactId>
<version>5.0.1</version>
</dependency>
<!-- file related thing screenshot and common io-->
<dependency>
<groupId>commons-io</groupId>
<artifactId>commons-io</artifactId>
<version>2.11.0</version>
</dependency>
<!-- mysql driver using database-->
<dependency>
<groupId>mysql</groupId>
<artifactId>mysql-connector-java</artifactId>
<version>8.0.25</version>
</dependency>
</dependencies>
Feature file.feature
RunnerClass.class
JUnit Runner
Create one empty class with the @RunWith(Cucumber.class) annotation.
Executing this class as any JUnit test class will run all features found on the classpath in the same package as this class.Name of the class could be anything like RunYoursTest.java
JUnit Runner with @CucumberOptions
@CucumberOptions annotation provides the same options as the cucumber jvm command line. for example: we can specify the path to feature files, path to step definitions, if we want to run the execution in dry mode or not etc.This is very helpful and importance if we are using IDE such eclipse only to execute our project.
Lets take above mentioned RunWith(Cucumber.class) annotation. The options to be used are defined with the @CucumberOptions.
@RunWith(Cucumber.class)
@CucumberOptions(//your cucumber options goes here)
public class RunYoursTest
{
// This class will be empty
}
Features: Features Options helps Cucumber to locate the Feature file in the project folder structure.All we need to do is to specify the folder path and Cucumber will automatically find all the ‘.features‘ extension files in the folder.
It can be defined like:
@CucumberOptions(
features = “Feature“
Or if the feature file is in the deep folder structure:
features = “src/test/features”
)
features = “src/test/features”
)
Logical AND
features = {“classpath:features1”}
)
Logical OR
features = {“src/test/features,src/test/features1”}
)
Logical OR,AND, NOT
features = {“src/features,src/features1”,”~src/features1”}
)
Glue: It is almost the same think as Features Option but the only difference is that it helps Cucumber to locate theStep Definition file. Whenever Cucumber encounters a Step, it looks for a Step Definition inside all the files present in the folder mentioned in Glue Option.
It can be defined like-
@CucumberOptions(
features = “Feature“
glue = “stepDefinition“
// Or if the Step Definition file is in the deep folder structure-
glue = “src/test/stepDeinition“
`` )
Running cucumber tests based on Tags
The tags can be used when specifying what tests to run through any of the running mechanism.
So, tags is just another parameter in the cucumber options annotation. We can also pass multiple tags as values separated by commas if we need so.
Tag expressions-
Running Scenarios with a Tag: Cucumber run scenarios with a particular tag.
Running Scenarios without Tag:Cucumber can exclude scenarios with a particular tag by inserting the tilde character before the tag.
@CucumberOptions(
features = “src/test/features“,
tags ={“@Webdriver“},
NOT (without Tag)
tags ={“~@SoapUI“},
OR
tags={“@SoapUI,@Functional"},
AND
tags={“@SoapUI”,”@Functional"},
OR, AND, NOT
tags ={“@SoapUI,@Functional","~@Regression"},
)
dryRun: This option can either set as true or false (default value is false). If it is set as true, it means that Cucumber will only checks that every Step mentioned in the Feature File have corresponding code written in Step Definition file or not. So in case any of the function is missed in the Step Definition for any Step in Feature File, it will give us the message. So If you writing scenarios first and then implementing step definitions then add dryRun = true.
strict: if strict option is set to false then at execution time if cucumber encounters any undefined/pending steps then cucumber does not fail the execution and undefined steps are skipped and BUILD is SUCCESSFUL.If Strict option is set to true then at execution time if cucumber encounters any undefined/pending steps then cucumber does fails the execution and undefined steps are marked as fail and BUILD is FAILURE. This is what the Console output looks like:
monochrome: This option can either set as true or false (default value is false). If it is set as true, it means that the console output for the Cucumber test are much more readable. And if it is set as false, then the console output is not as readable as it should be. For practice just add the code ‘monochrome = true‘ in TestRunner class.
Snippet Style: Cucumber generates code snippets in Underscore style by default. If you want to change the format of cucumber snippets then you can set snippet type in your cucumber options. There are two types of snippets,
1- SnippetType.CAMELCASE
2- SnippetType.UNDERSCORE
Plugin: plugin Option is used to specify different formatting options for the output reports. Various options that can be used as for-matters are:
Pretty: Prints the Gherkin source with additional colors and stack traces for errors.
HTML: This will generate a HTML report at the location mentioned in the for-matter itself.
JSON: This report contains all the information from the gherkin source in JSON Format. This report is meant to be post-processed into another visual format by 3rd party tools such as Cucumber Jenkins.
JUnit: This report generates XML files just like Apache Ant’s JUnit report task. This XML format is understood by most Continuous Integration servers, who will use it to generate visual reports.
@RunWith(Cucumber.class)
@CucumberOptions(plugin = {"pretty" ,"html:Folder_Name" ,
"json:Folder_Name/cucumber.json" ,
"junit:Folder_Name/cucumber.xml"})
RunnerFile.java
import org.junit.runner.RunWith;
import io.cucumber.junit.Cucumber;
import io.cucumber.junit.CucumberOptions;
@RunWith(Cucumber.class)
@CucumberOptions(
features = “Feature“,
//Or
features = "src/test/resources/features/codeFios_Login.feature",
//Or
features = {
"src/test/resources/features/codeFios_Login.feature",
"src/test/resources/features/codeFios_AddCustomer.feature"
},
glue = “stepDefinition“
//Or
glue = “src/test/stepDeinition“
tags = "",
monochrome = true,
dryRun = false,
plugin = {
// generate report
"pretty",
"html:target/reports/cucumber.html",
"json:target/reports/cucumber.json",
"junit:target/reports/cucumber.xml"
}
)
public class Runner {
}
Data Driven Testing in Cucumber
Run test case from command line(with out opening ide)
Rename runner file as RunnerTest.java or TestRunner.java
Check junit version: Note: make sure junit dependency version should be 4.11 or later
The Surefire Plugin can be invoked by calling the test phase of the build lifecycle.
mvn test (on command line)
We can have surefire-plugins to The Surefire Plugin is used during the test phase of the build lifecycle to execute the unit tests of an application. It generates reports in two different file formats:
Plain text files (*.txt)
XML files (*.xml)
<build>
<pluginManagement>
<plugins>
<plugin>
<groupId>org.apache.maven.plugins</groupId>
<artifactId>maven-surefire-plugin</artifactId>
<version>3.2.3</version>
</plugin>
</plugins>
</pluginManagement>
</build>
Filter tag on command line
TestRunner.java :tags = {"@smoke","@regeneration"},
Command to run smoke test : mvn test -Dcucumber.filter.tags="@smoke"
Command to run regeneration test : mvn test -Dcucumber.filter.tags="@regeneration"
Retrieving Scenario name into hooks (Cucumber BDD )
public class MyHook{
@Before
Public void setup (Scenario scenario){
String scenarioName =scenario.getName()
}
@After
Public void tearDown (Scenario scenario){
String scenarioName =scenario.getName()
}
}
Note : if there is ClassNoFoundException from nowhere we need to update the project :
Right click on project
Click on Maven
Select update project
Check on force update and apply
Publiclishing cucumber Report on Cloud using properties file
Create file on src/test/resource path :
Cucumber.properties
Or junit-platform.properties
Enable true :
Cucumber.publish.enabled=true
Publiclishing cucumber Report on Cloud using using Environment variable
Open command Prompt and run as admin
Type : setx /M CUCUMBER_PUBLIC “true”
Press enter
Restart your machin
Date 01/05/2024
Note
Build Tool
Apache Maven
Apache Ant
Gradle
CircleCI
Some important topic
Cucumber Hook
Background:
Scenario outline
TakesScreenShot interface
Reference variable vs object
Date 01/06/2024 mdislam@techfios.com
public class DatabasePage {
Connection connection;
Statement statement;
ResultSet resultSet;
String columnValue;
public String getDataFromDatabase(String columnName) {
try {
// set properties for MySql
Class.forName("com.mysql.cj.jdbc.Driver");
// String sqlUrl = "jdbc:mysql:// + hostName: + portNumber/ + databaseName";
String sqlUrl = "jdbc:mysql://44.195.13.80:3306/june_2023";
String sqlUsername = "student";
String sqlPassword = "Student@123";
String sqlQuery = "SELECT * FROM login_data WHERE user_id=1;";
// Create a connection to the DB
connection = DriverManager.getConnection(sqlUrl, sqlUsername, sqlPassword);
// Empower connection reference variable to execute queries
statement = connection.createStatement();
// Execute query
resultSet = statement.executeQuery(sqlQuery);
while(resultSet.next()) {
columnValue = resultSet.getString(columnName);
}
} catch (ClassNotFoundException e) {
e.printStackTrace();
} catch (SQLException e) {
e.printStackTrace();
}finally {
if(resultSet !=null) {
try {
resultSet.close();
} catch (SQLException e) {
e.printStackTrace();
}
}
if(connection !=null) {
try {
connection.close();
} catch (SQLException e) {
e.printStackTrace();
}
}
}
return columnValue;
}
}
API TESTING: MENAUL AND AUTOMATION
API Testing Document Example:
API Documentation API Base_URL:
1. API for Authentication :
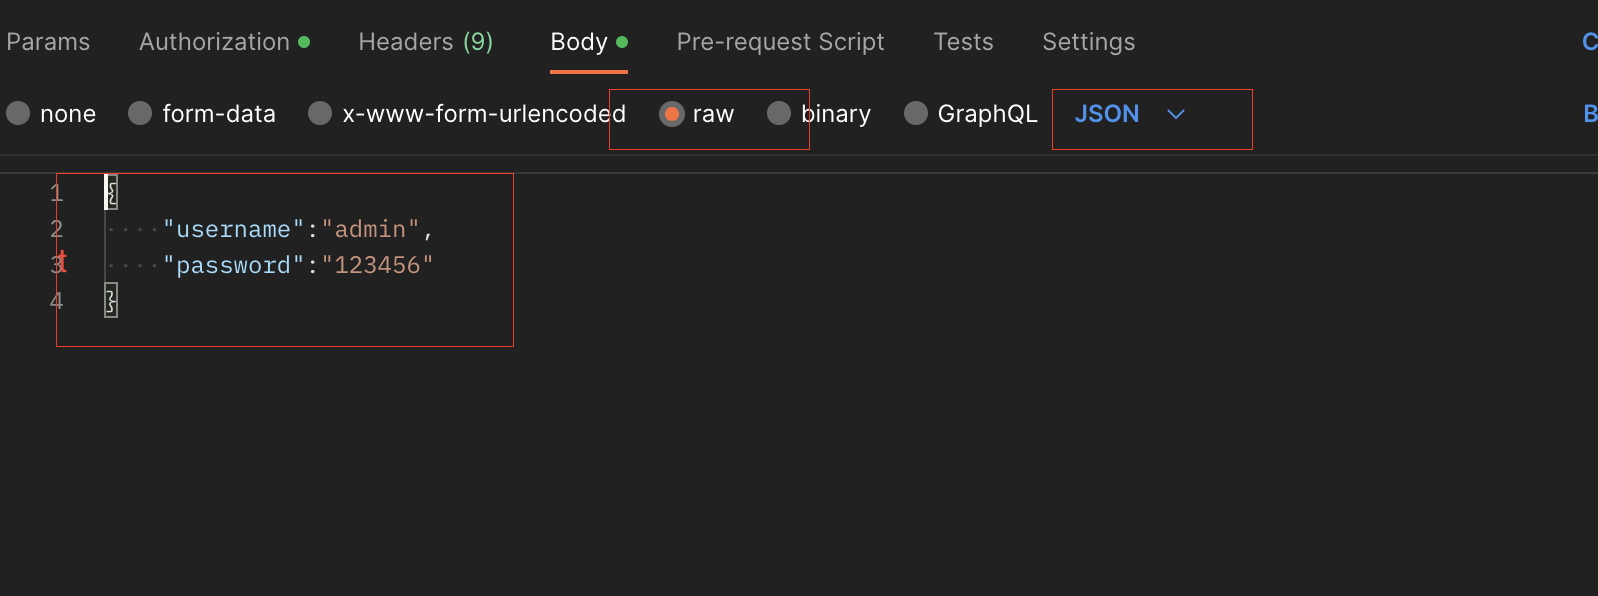
API Post data Definition
Request Payload (Json):
{
"username": "admin",
"password": "123456"
}
Response example:
STATUS CODE: 201 Created
{
"access_token": "eyJ0eXAiOiJKV1QiLCJhbGciOiJIUzI1NiJ9.eyJ1aWQiOiIyIiwidXNlcm5hbWUiOiJhZG1pbiIsI kFQSV9USU1FIjoxNjk3OTA5ODAyfQ.9wu_-4iEr1JG8Z9r2EdlqV3BZWaLpVtqE8mS-zZJJWo",
"status": true,
"message": "Login success!", "token_expire_time": 86400
}
2. API for Create New Accounts:
API Post data Definition
Request JSON example:
{
"account_name": "MD Techfios account 111", "description": "Test description 1", "balance": 100.22,
"account_number": 123456789, "contact_person": "MD Islam"
}
Response example:
STATUS CODE: 200 OK
{
"message": "Account created successfully."
}
3. API for Update Existing Record
API Post data Definition
Request JSON example:
{
"account_id": "47",
"account_name": "MD Techfios account 111", "account_number": "123456789", "description": "Test description 1", "balance": "1000.22",
"contact_person": "MD Islam"
}
Response example:
STATUS CODE: 200 OK
{
"message": "Account updated successfully."
}
4. API for Get All Accounts Info
API Post data Definition
Request JSON example:
Not Required
Response example:
STATUS CODE: 200 OK
{
"records": [
{
"account_id": "47",
"account_name": "MD Techfios account 111", "account_number": "123456789", "description": "Test description 1", "balance": "100.22",
"contact_person": "MD Islam"
},
{
"account_id": "46",
"account_name": "account 3",
"account_number": "134548", "description": "",
"balance": "100.00", "contact_person": ""
},
{
"account_id": "45",
"account_name": "Test account Rashed2", "account_number": "58555525255", "description": "Test desc",
"balance": "500.00", "contact_person": "abc"
}
]
}
5. API for Get single Accounts Info
API query prams Definition
Request JSON example:
Not Required
Response example:
STATUS CODE: 200 OK
{
"account_id": "2",
"account_name": "Test account 365", "description": "Test desc", "balance": "500.00",
"permission": null, "account_number": "58555525255", "contact_person": "abc"
}
6. API for Delete Accounts Info
API query prams Definition
Response example:
STATUS CODE: 200 OK
{
"message": "Account deleted successfully."
}
Response Table:
Web Service
For soap-UI
Download : https://www.soapui.org/downloads/soapui/
And install
Create project
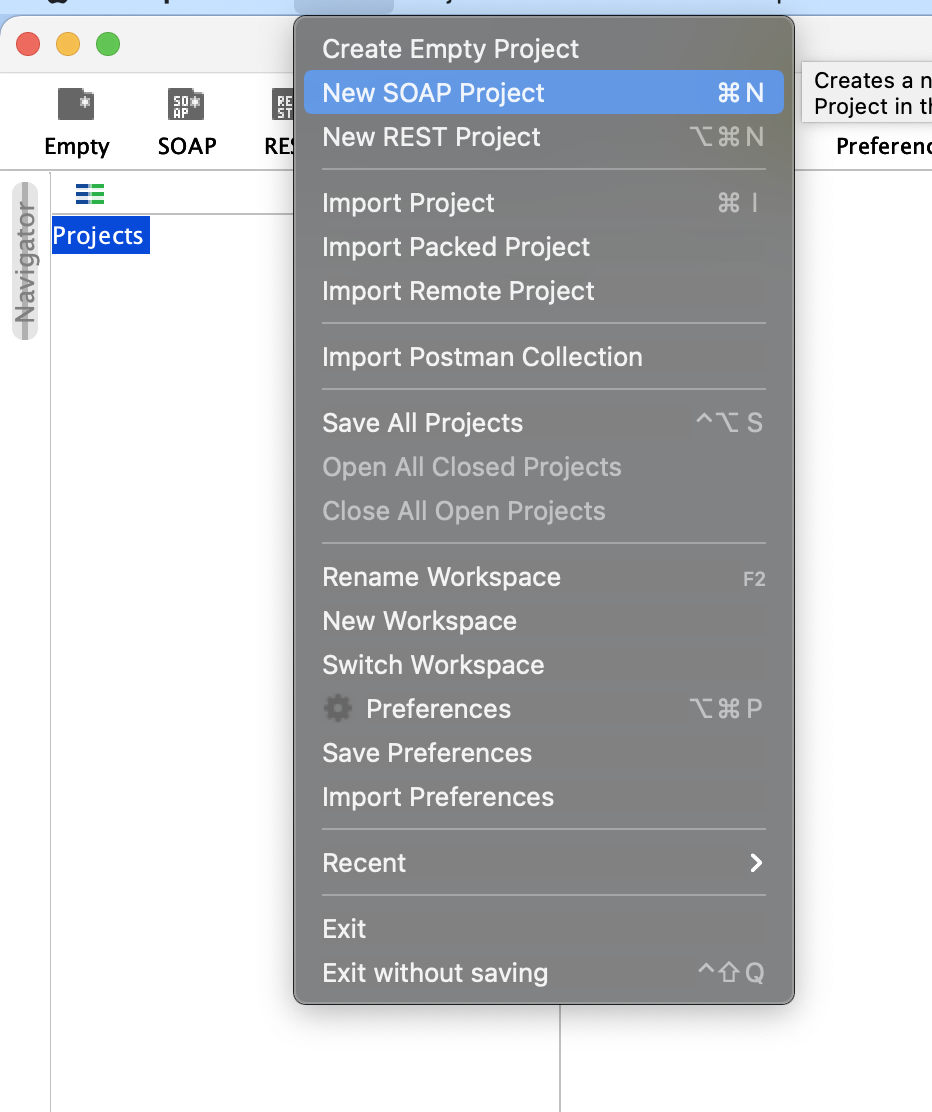
Give the project name and
Enter http://www.dneonline.com/calculator.asmx?wsdl
Add new request add button
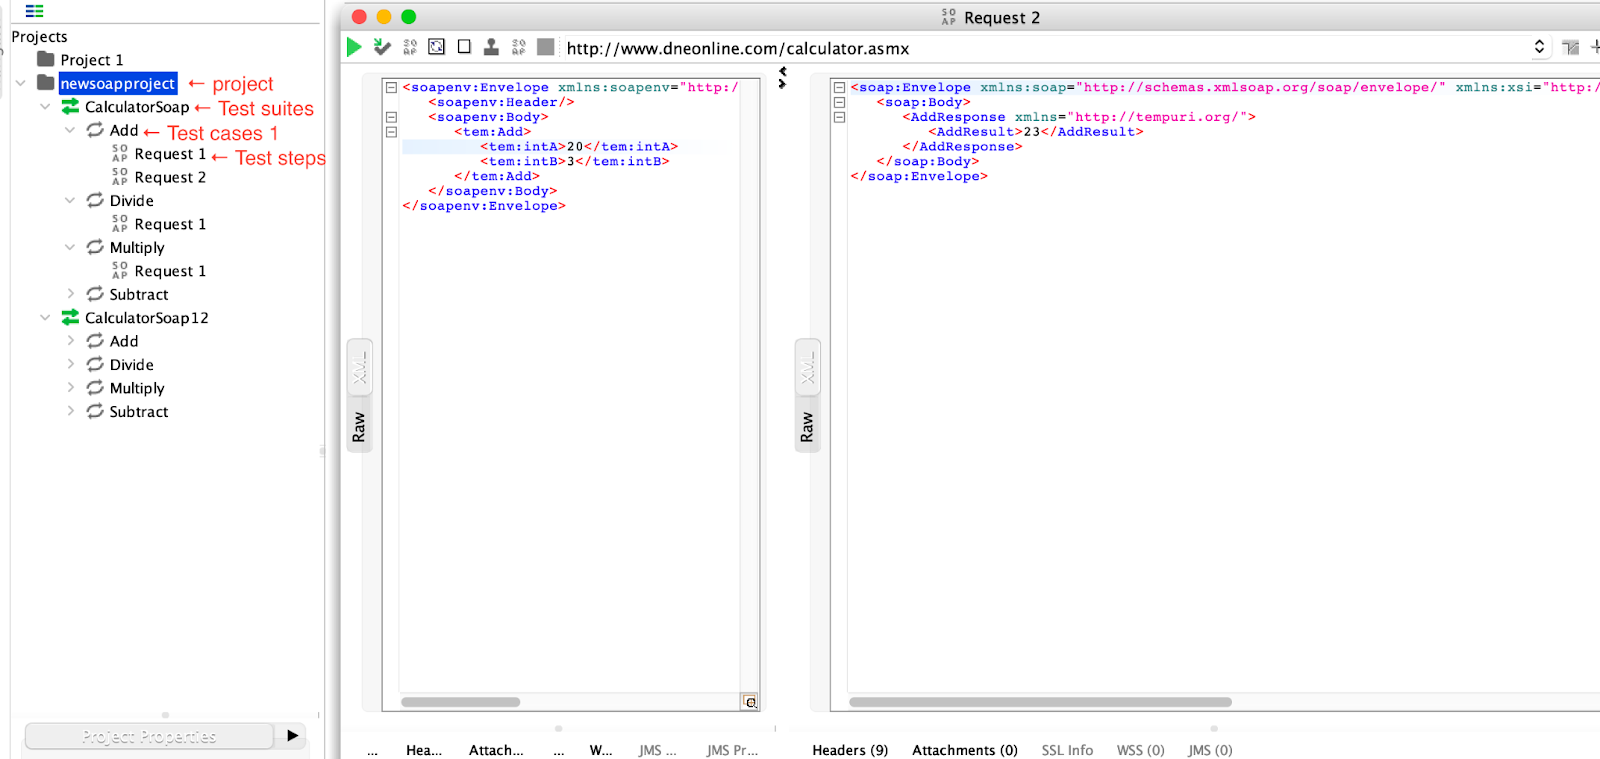
Property transfer


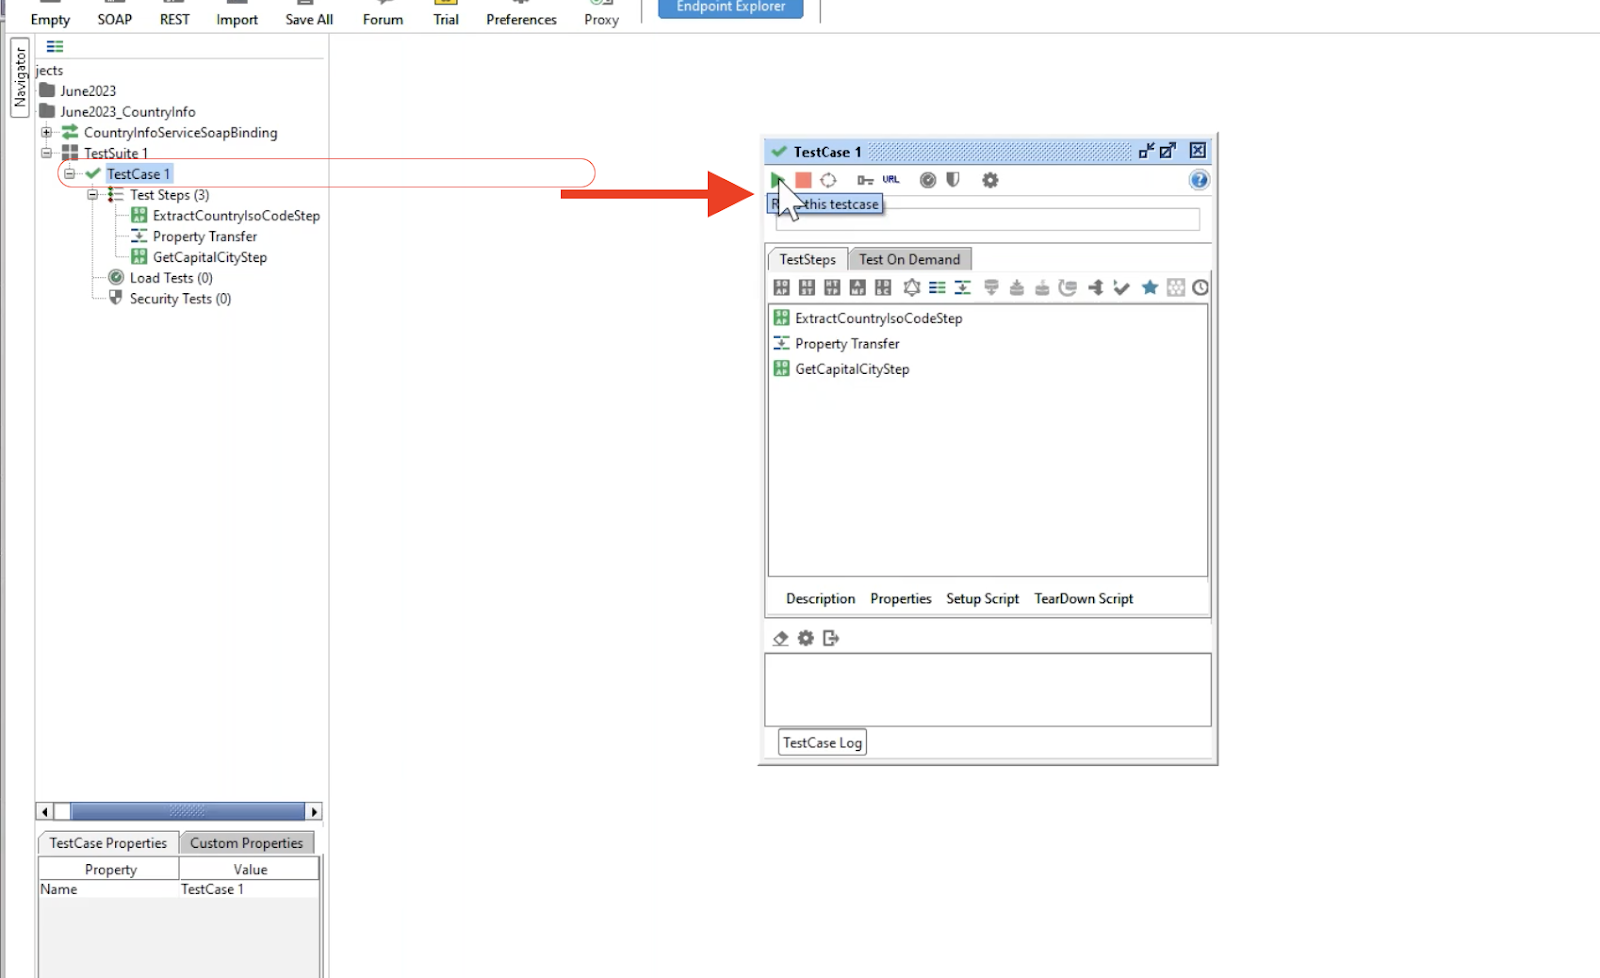
Run test cases
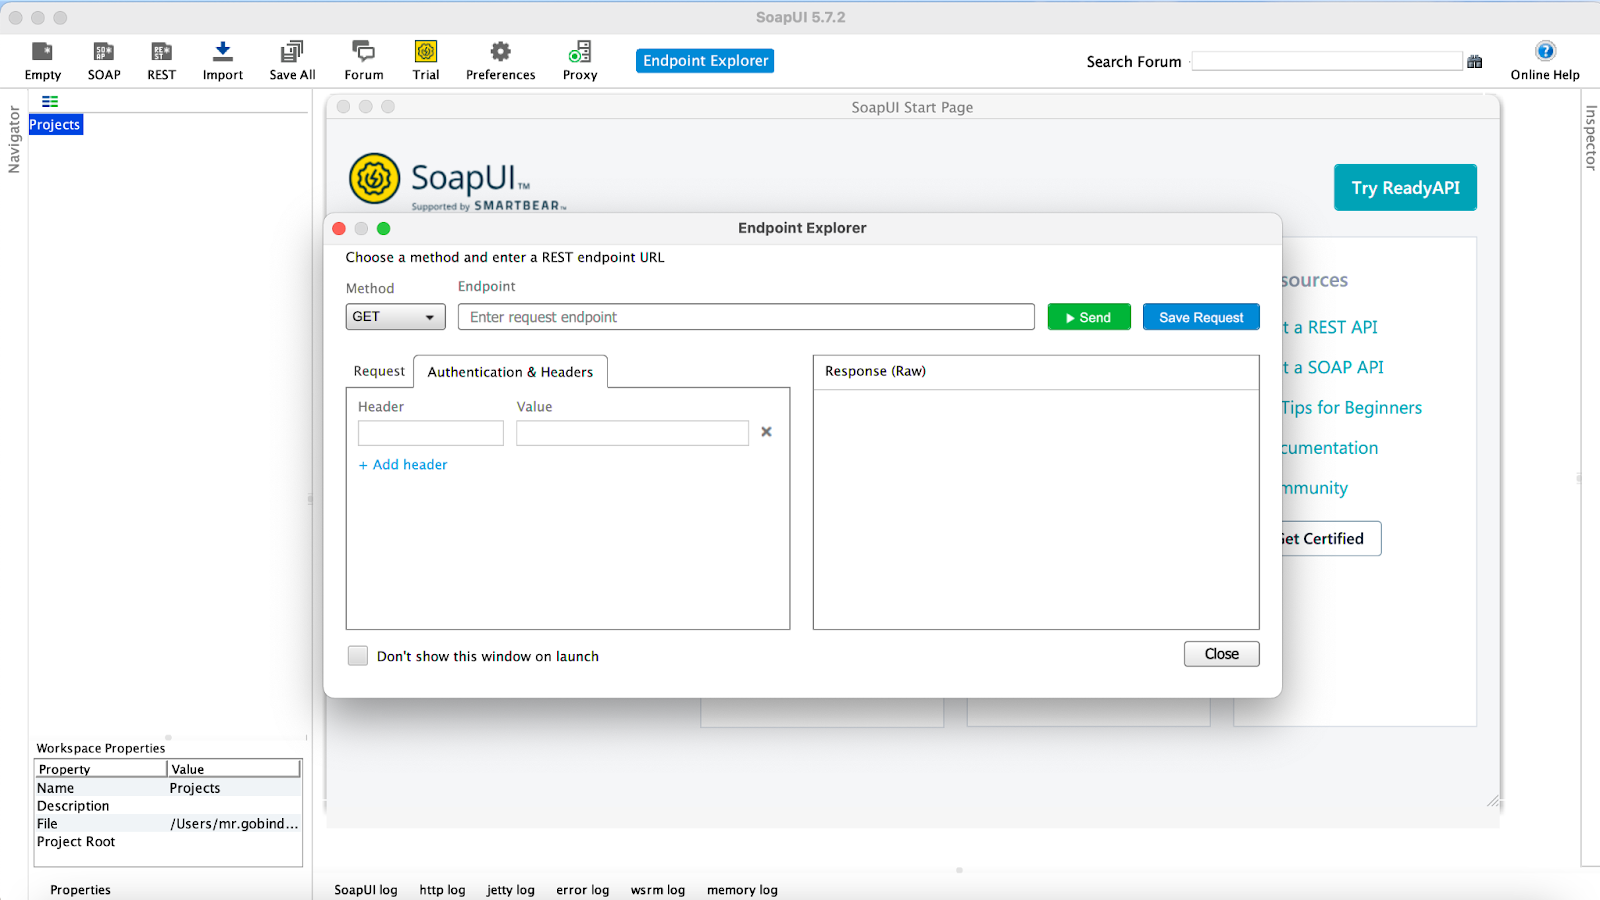
Download SOAPUI Open Source from here WSDL URL : http://www.dneonline.com/calculator.asmx?wsdl Exercise Objectives:
● Creating a project
● Adding a test case
● Authenticating SOAP Requests
● HTTP headers
● Assertions
Exercise Objectives:
● Importing a Project
● Adding Test Steps
● Properties and Property Transfer
● Creating a Mock Service
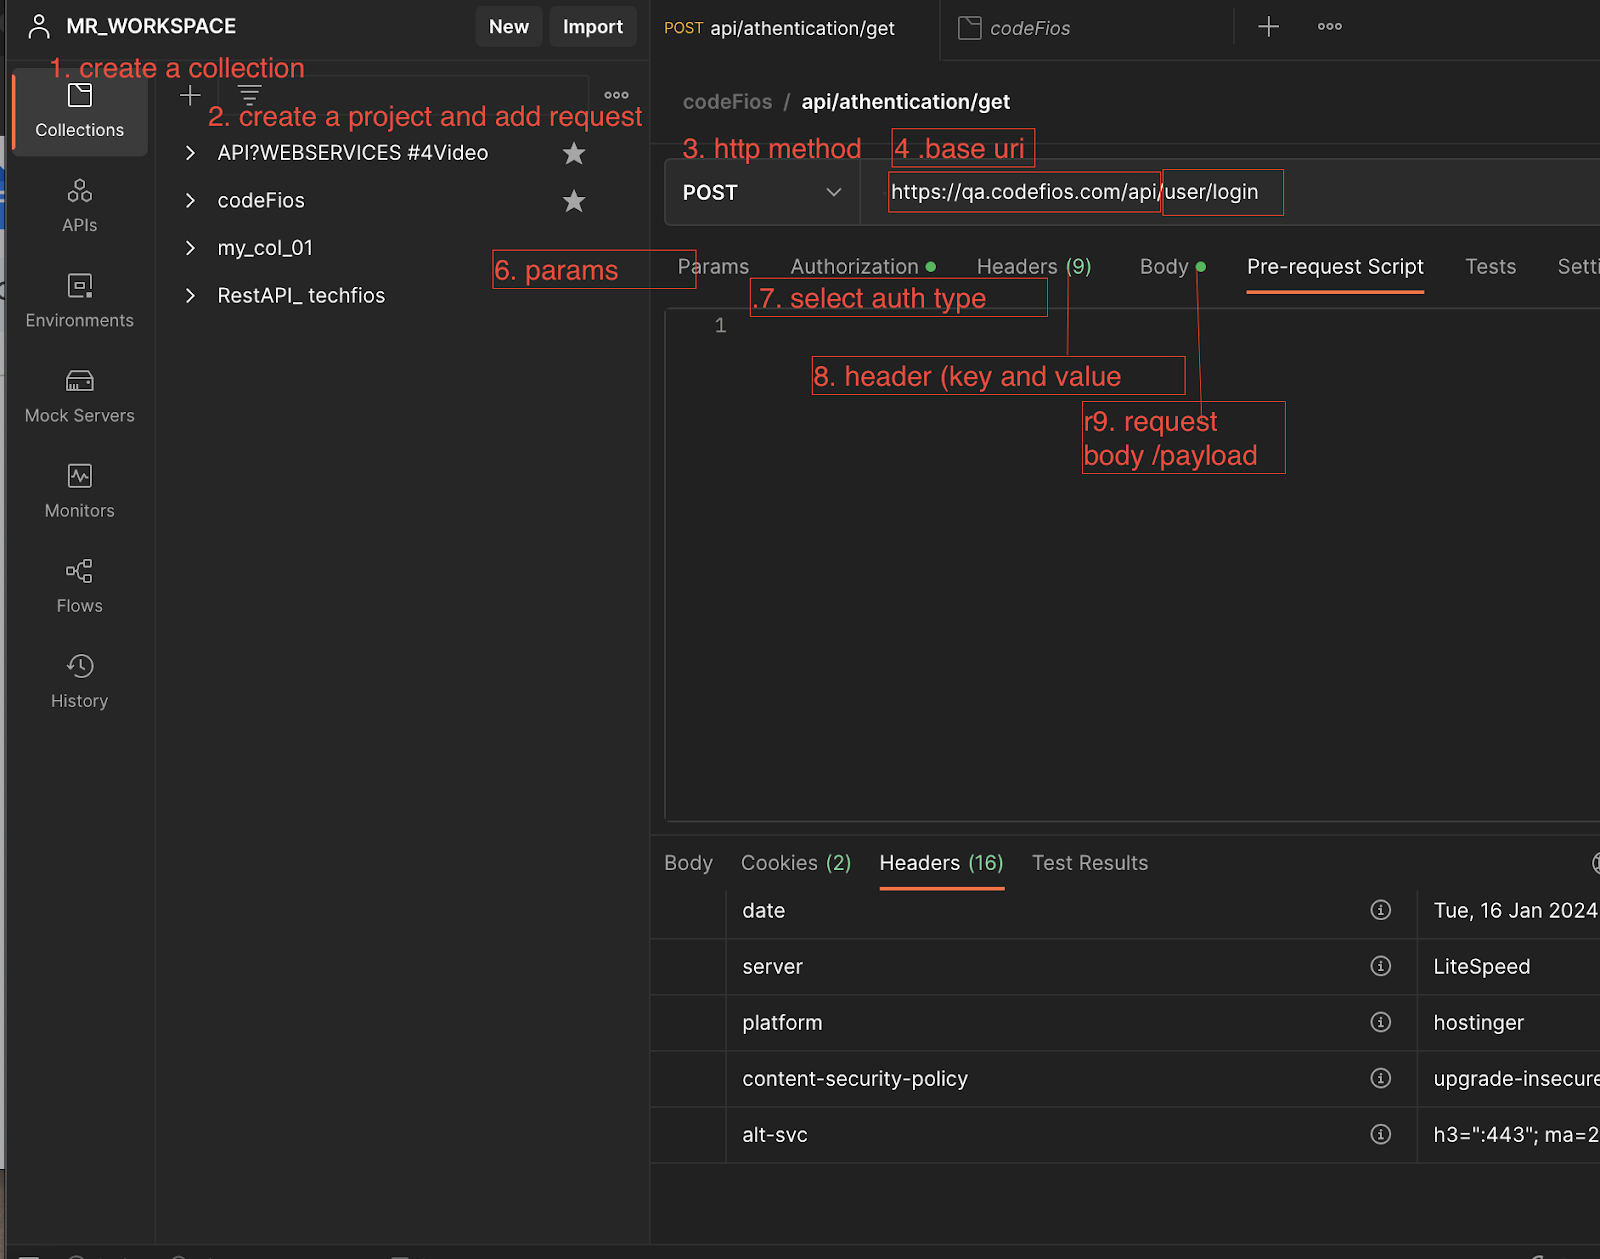
PostMan
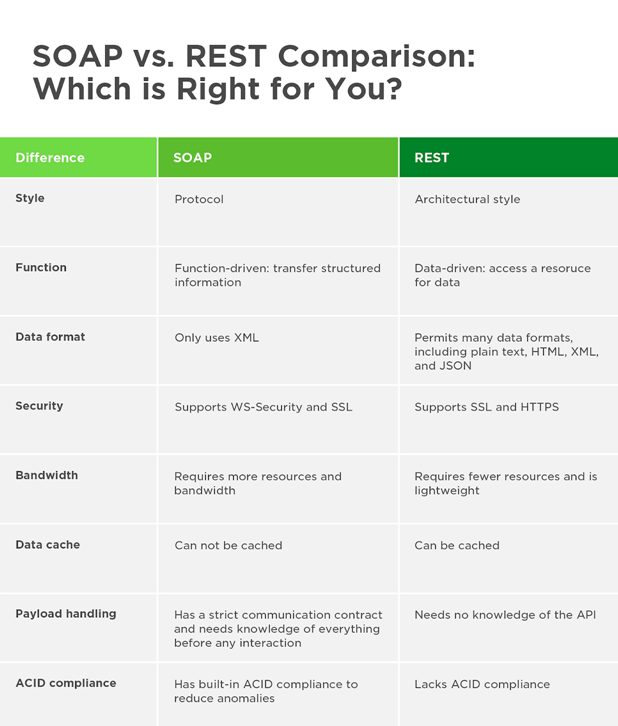
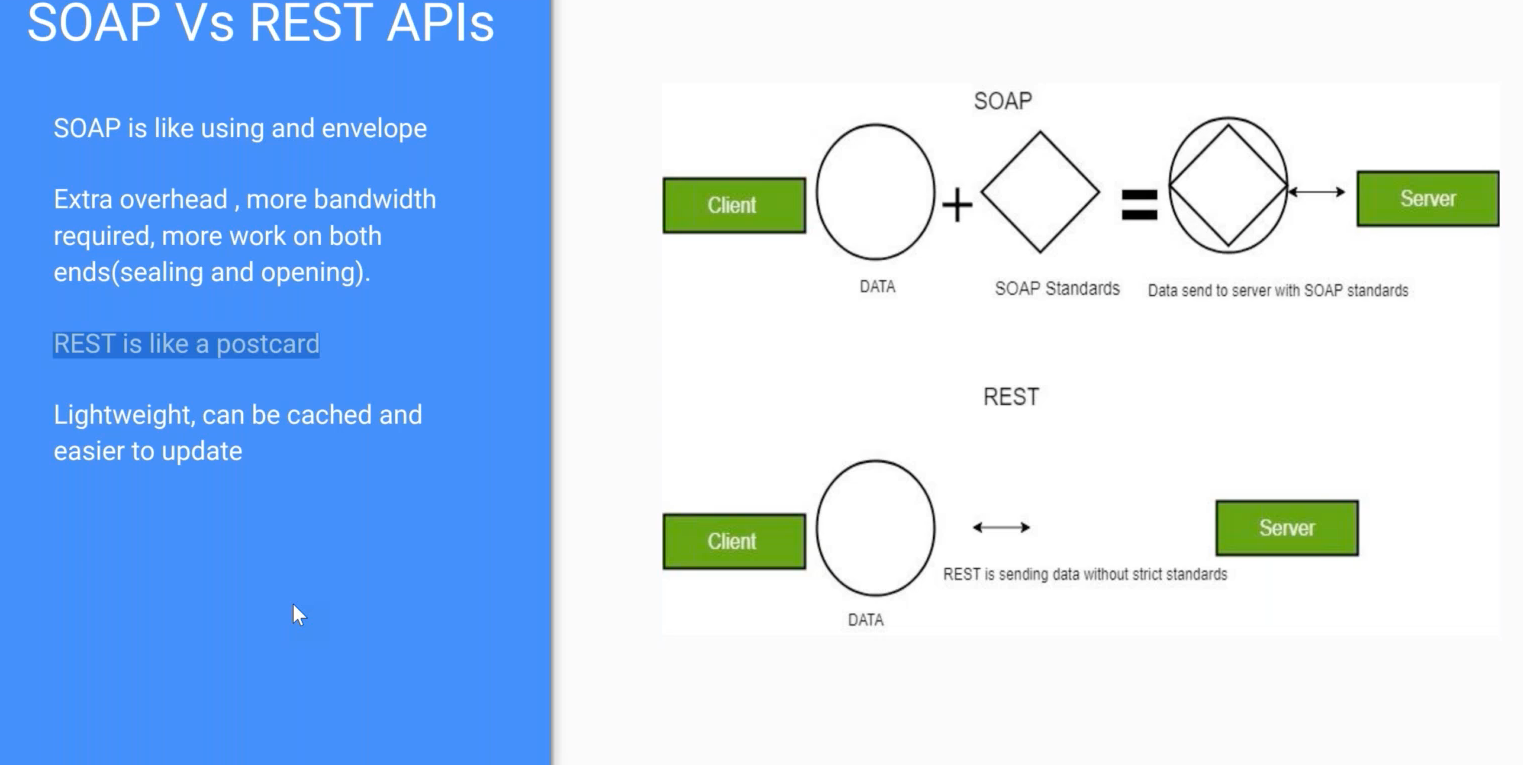
Soap vs Rest
Postman(manual testing)
Download and install : https://www.postman.com/downloads/
Sign-in the postman to save collection/request
Postman
Variable scopes
SET GLOBAL VARIABLE
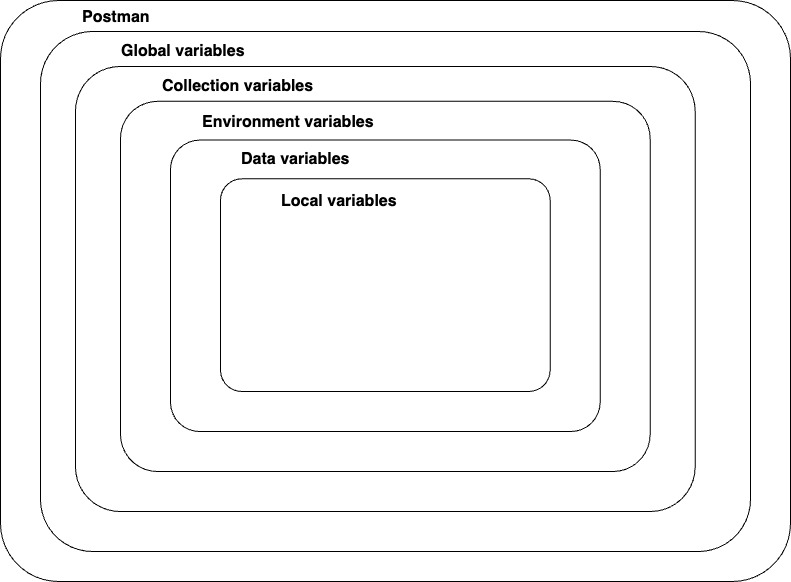
SET ENVIRONMENT VARIABLE
Create environment
Set variable and value
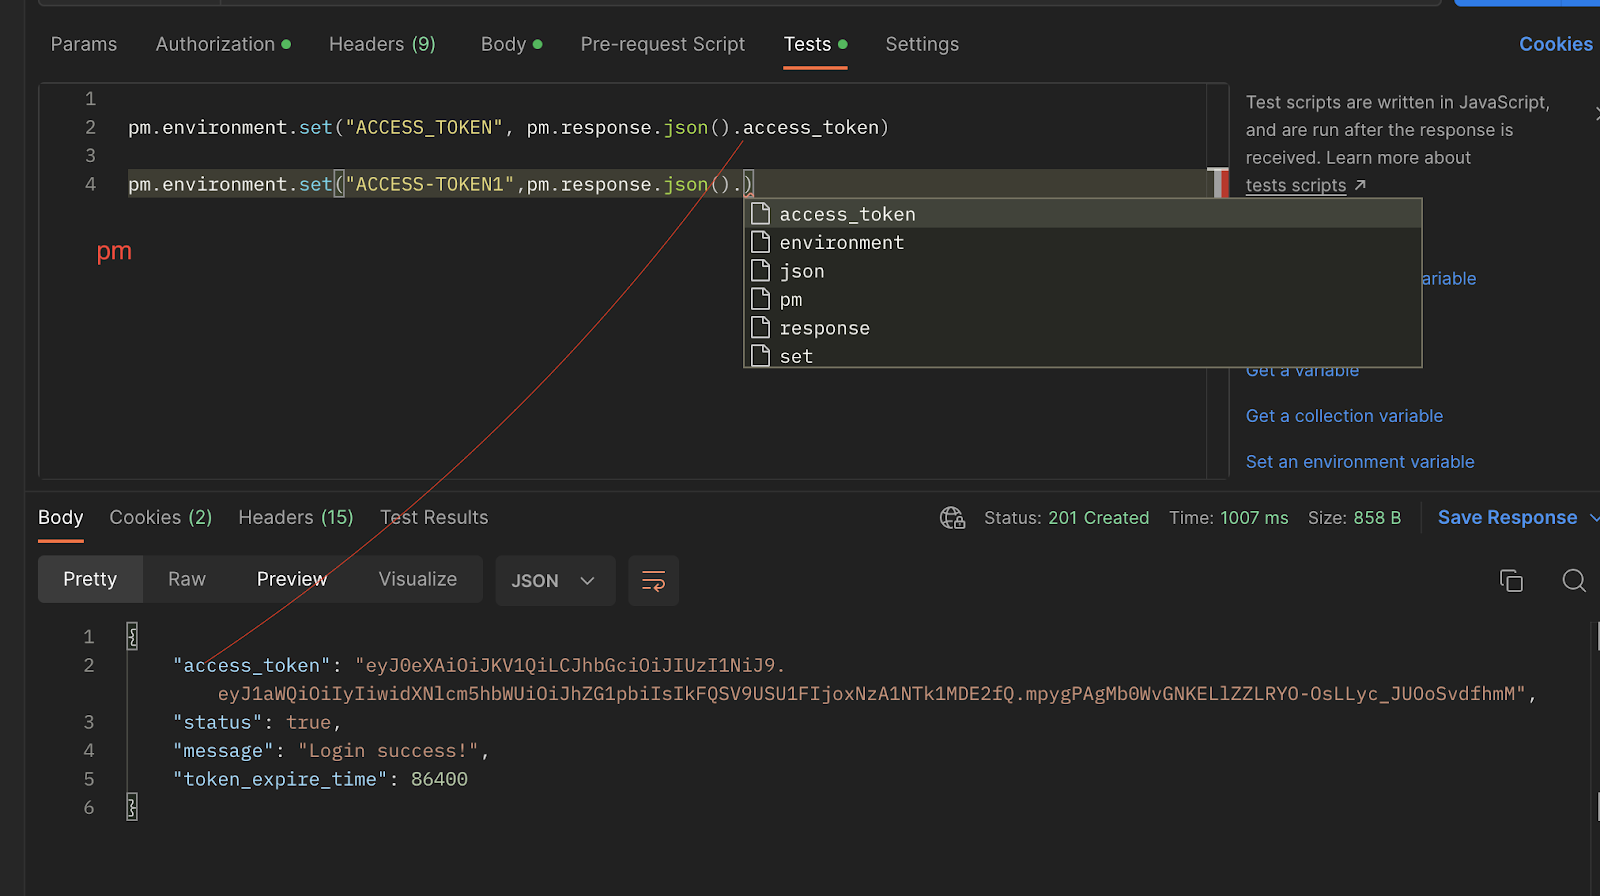
TEST: Set Environment variable and get the value from response
Set Environment variable and get the value from response
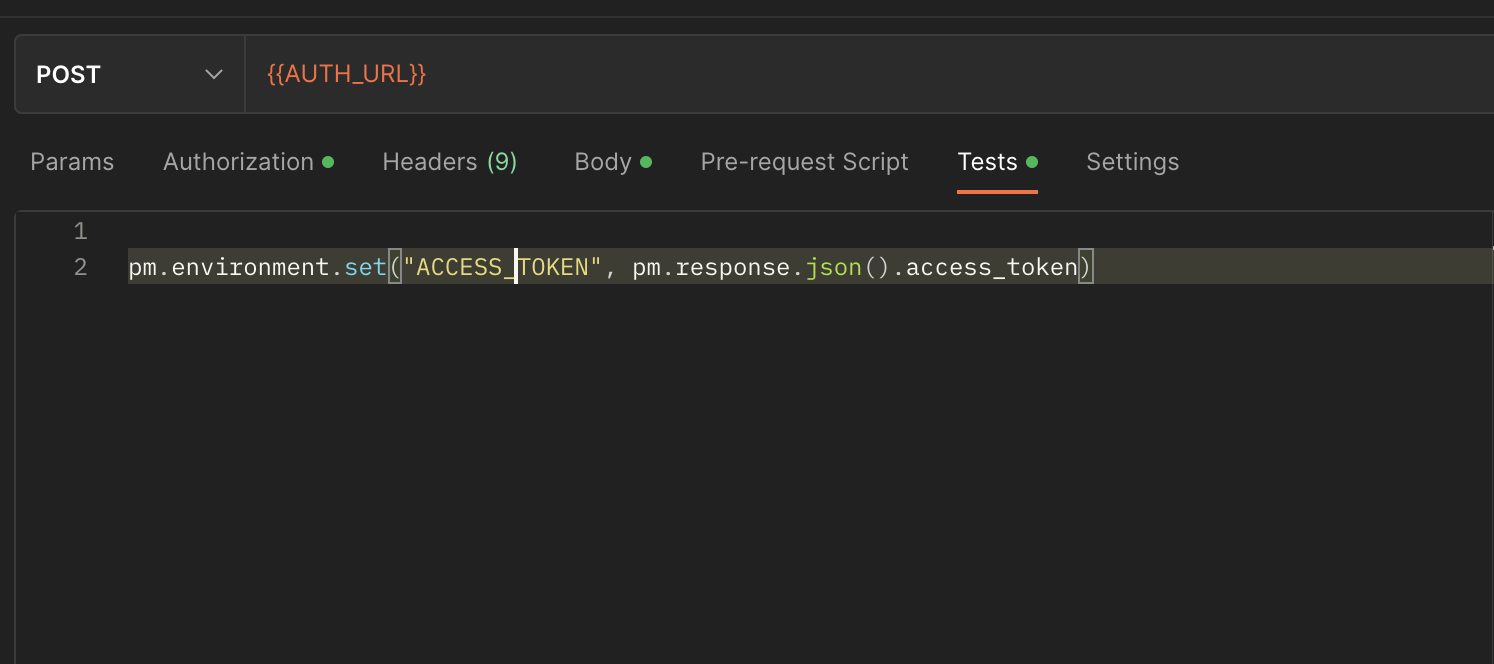
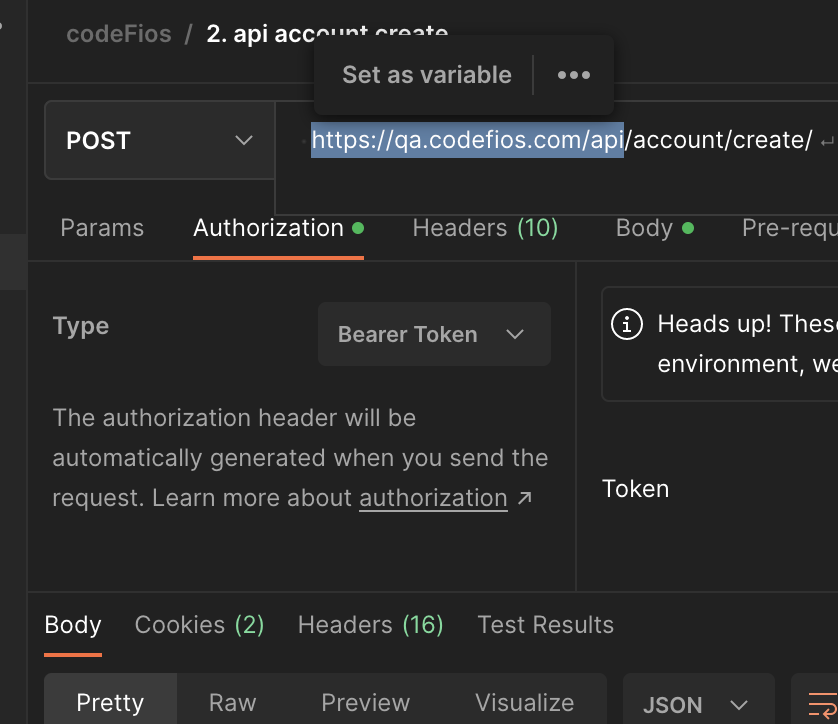
pm=var pm:Postmane → the pm object encloses all information pertaining to the script being executed and allows one to access a copy of the request beijing sent or the response received. It also allows one to get and set environment and global variable
Environment: (property) postman.environment:variables cope
Set(key, value): creates a new variable, or updates on existing one.
pm.response.json():get response as json
.access_token: json path
ex:pm.environment.set("account_id",pm.response.json().records[0].account_id)
To see the variable click on Environment quick look button on top right side corner


To get codefios database
Download and install https://dbeaver.io/download/
Create new connection
44.195.13.80
student (all small)
Student@123
JUnit
Mockito
Selenium
TestNG
Spock Framework
Cucumber
FitNesse
Arquillian
DBUnit
Rest Assured
Rest Assured
Rest Assured is also a Java-based library that is mainly used to test Restful Web Services. For accessing Restful Web Service, Rest Assured library work as a headless client. By using the Rest Assured library, we can create a highly customizable HTTP request to send to the Restful server.
These are the following features of Rest Assured:
It allows us to validate JSON responses according to the schema.
It provides timeouts in tests.
It allows us to use Groovy closures or Java 8 lambdas to validate the response.
It can test different authentication methods and SSL.
It allows us to work with HTTP headers.
It works with cookies.
It allows us to work with XML data instead of JSON.
It allows us to write custom de-serializers.
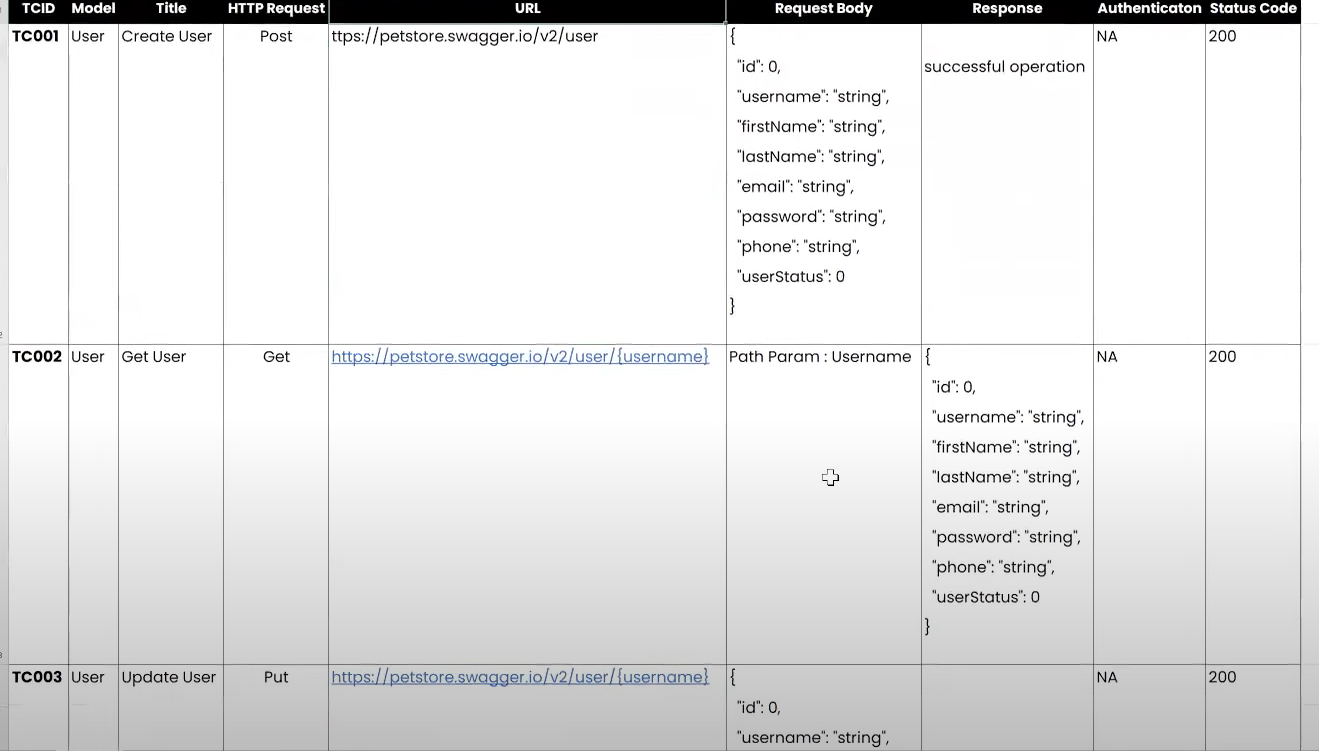
API: Automation Testing (RestAssured)
RestAssured
Note:- We using manual testing document also for automation testing
Given : all input details/condition .
baseUril = https://qacodefios.com/api
Static vs not static import in java
Import static io.restAssured.RestAssured.given;
Import static io.restAssured.matcher.RestAssuredMatchers.*; //For macher method;
Create the Maven Project
Add dependency pom.xml
testng from org.testng for test
rest-assured from from io.rest-assured for automation for rest-api
json-schema-validator from from io.rest-assured for
json-path from from io.rest-assured
commons-io from from commons-io for file input and output
java-hamcres from from org.hamcrest for validate to response
hamcrest-library from from org.hamcrest
given: all input details ->
(baseURI,Header/s,Authorization,Payload/Body,QueryParameters)
when: submit api requests->
HttpMethod(Endpoint/Resource)
then: validate
response -> (status code, Headers, responseTime, Payload/Body)
baseURI
https://qa.codefios.com/api /user/login
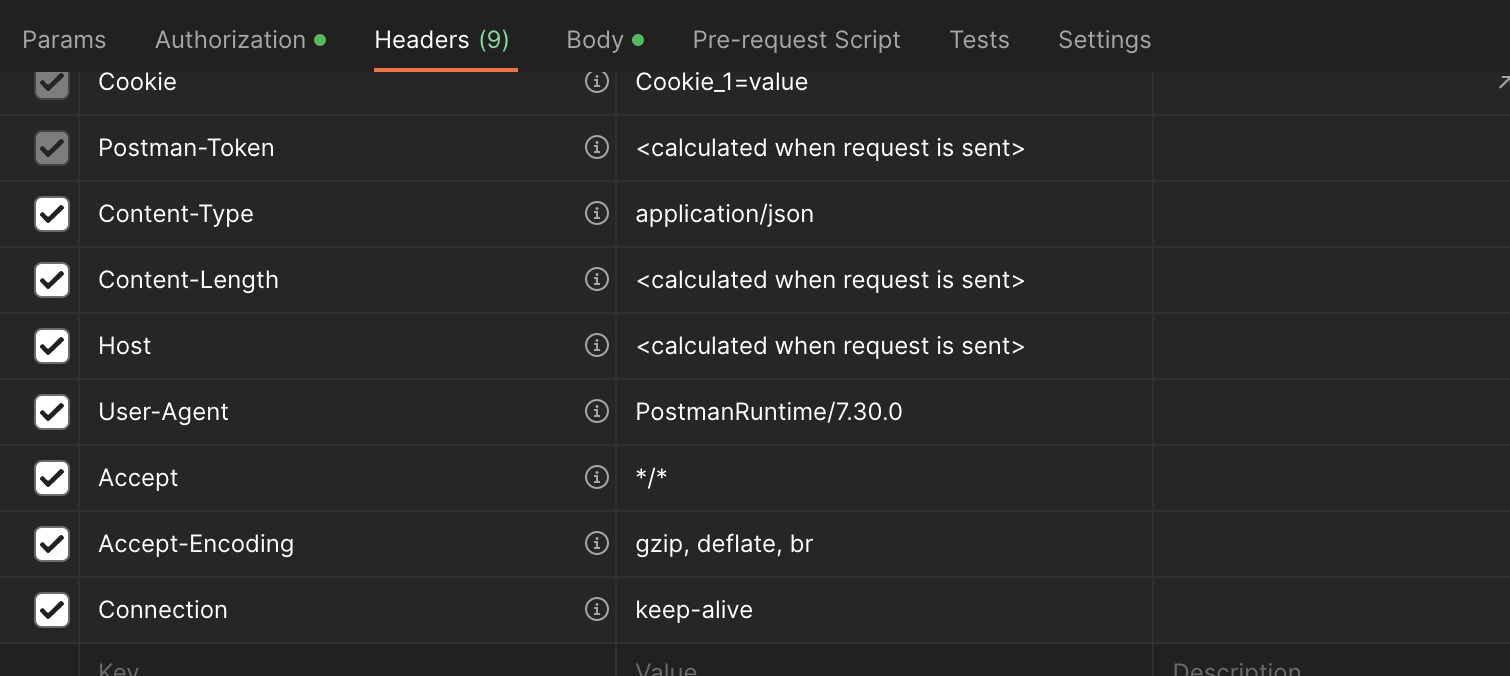
Headers:
"Content-Type" = "application/json"
“Authorization”=”eyJ0eXAiOiJKV1QiLCJhbGciOiJIUzI1NiJ9”
payload/body:
{
"username": "admin",
"password": "123456"
}
statusCode=201
response=
{
"access_token": "eyJ0eXAiNqV7cmNCahLYQWLZcQEa3asVMBU",
"status": true,
"message": "Login success!",
"token_expire_time": 86400
}
Response response =
given()
.baseUri(baseURI)
.header("Content-Type","application/json")
.body(new File(authBodyFilePath))
.log().all().
when()
.post(authEndPoint).
then()
.log().all()
.extract().response();
int statusCode = response.getStatusCode();
Assert.assertEquals(statusCode, 201, "Status codes are NOT matching!");
String responseHeaderContentType = response.getHeader("Content-Type");
Assert.assertEquals(responseHeaderContentType, "application/json", "Status Content-Types are NOT matching!");
long responseTimeInMilliSecs = response.getTimeIn(TimeUnit.MILLISECONDS);
if(responseTimeInMilliSecs <=2000) {
System.out.println("Response time is within range.");
}else {
System.out.println("Response time is out of range!");
}
String responseBody = response.getBody().asString();
JsonPath jp = new JsonPath(responseBody);
bearerToken = jp.getString("access_token");
System.out.println("Bearer Token:" + bearerToken);
}
// ………………..1st header method ……………..
.header("Content-Type","application/json")
.header("Accept-Encoding","gzip, deflate, br")
// ………………..2nd header method ……………..
Map<String, String >mapheaders = new HashMap<>();
headers.put("Content-Type", "application/json");
headers.put("Authorization", generateBeareToken);
.headers(mapheaders)
// ………………..3rd header method ……………..
Header head1 = new Header(Content-Type", "application/json");
Header head2 = new Header(Authorization", generateBeareToken);
.header(head1)
.header(head2)
Jan 20 2024
Class note
Retrurns; a string representation of the object
Returns: the body as string the
.header("Authorization", "Bearer "+GenerateBeareToken.bearerToken)
Json formatting ctrl+shift +m
Make a note for param
.auth().preemptive().basic("demo1@codefios.com ", "abc123")
Whate does it do preemptive() ?
Soft assertion vs hard assertion
JSON & XML Schema validations
We need to add 2 dependency for schema validations
Json-schema-validator
Json-path
or
Xml-schema-validator
xml -path
Using POJO class
User user =new User();
user.setName(“user1”)
user.setEmail(“email@gmail”)
Convert java object to → json object → deserialization
ObjectMaper objmaper = new ObjectMaper();
String jasonData = objmaper.writerWithDefualtPrettyPrinter().writeValueSaString(user)
Convert json data to → java object (pojo) → serialization

ObjectMaper objmaper = new ObjectMaper();
User userpojo=objmaper.readValue(jsondata, User.class) // json data(jsondata) to Java pojo class name (User)
String user = userpojo.getName()
String email= userpojo.getEmail()
Authorization
Authentication: user is valid or not
Authorization : permission/access (only Authentication user get authorization)
Authorization type
1. Basic
given ()
.auth().basic(“username”, “password”)
2. Digest
given ()
.auth().digest(“username”, “password”)
3. preemptive
given ()
.auth().preemptive().basic(“username”, “password”)
4. Bearer token
String bearerToken = “xnhdlfkekiboiij376rijdnkldjhhebsswy687447jdhddn”;
given ()
.headers(“authorization”, “Bearer ”+bearerToken)
5. Oauth 1.0
given ()
.auth().oauth(“consumerKey”, “consumerSecret”, “accessToken”, “tokenSecrate”)
6. Oauth 2.0
given ()
.auth().oauth2( “accessToken”)
6. API Key
given ()
.queryParm(“key”, “sd86sojs87s5s7u7dy5stsr4sfsr55figt5”)
Faker library to generate Fake data (userName, email,address)
Add dependency
<!--https://mvnrepository.com/artifact/io.rest-assured/rest-assured →
<dependency>
<groupId>io.rest-assured</groupId>
<artifactId>rest-assured</artifactId>
<version>5.3.0</version>
<scope>test</scope>
</dependency>
<!-- https://mvnrepository.com/artifact/io.rest-assured/json-path -->
<dependency>
<groupId>io.rest-assured</groupId>
<artifactId>json-path</artifactId>
<version>5.3.0</version>
<scope>test</scope>
</dependency>
<!--https://mvnrepository.com/artifact/io.rest-assured/json-schema-validator -->
<dependency>
<groupId>io.rest-assured</groupId> <artifactId>json-schema-validator</artifactId>
<version>5.3.2</version>
</dependency>
<!-- https://mvnrepository.com/artifact/org.json/json -->
<dependency>
<groupId>org.json</groupId>
<artifactId>json</artifactId>
<version>20231013</version>
</dependency>
<!-- https://mvnrepository.com/artifact/org.testng/testng -->
<dependency>
<groupId>org.testng</groupId>
<artifactId>testng</artifactId>
<version>7.8.0</version>
<scope>test</scope>
</dependency>
<!--https://mvnrepository.com/artifact/com.github.scribejava/scribejava-apis -->
<dependency>
<groupId>com.github.scribejava</groupId>
<artifactId>scribejava-apis</artifactId>
<version>8.3.1</version>
<scope>runtime</scope>
</dependency>
<!-- https://mvnrepository.com/artifact/com.github.javafaker/javafaker -->
<dependency>
<groupId>com.github.javafaker</groupId>
<artifactId>javafaker</artifactId>
<version>1.0.2</version>
</dependency>
<!-- https://mvnrepository.com/artifact/org.apache.poi/poi-ooxml -->
<dependency>
<groupId>org.apache.poi</groupId>
<artifactId>poi-ooxml</artifactId>
<version>5.2.3</version>
</dependency>
<!-- https://mvnrepository.com/artifact/org.apache.poi/poi -->
<dependency>
<groupId>org.apache.poi</groupId>
<artifactId>poi</artifactId>
<version>5.2.3</version>
</dependency>
<!-- https://mvnrepository.com/artifact/org.apache.logging.log4j/log4j-core -->
<dependency> <groupId>org.apache.logging.log4j</groupId>
<artifactId>log4j-core</artifactId>
<version>2.22.0</version>
</dependency>
<!--https://mvnrepository.com/artifact/com.aventstack/extentreports -->
<dependency>
<groupId>com.aventstack</groupId>
<artifactId>extentreports</artifactId>
<version>5.0.9</version>
</dependency>
<!-- for file input and output -->
<dependency>
<groupId>commons-io</groupId>
<artifactId>commons-io</artifactId>
<version>2.11.0</version>
</dependency>
<!-- validate to response -->
<dependency>
<groupId>org.hamcrest</groupId>
<artifactId>java-hamcrest</artifactId>
<version>2.0.0.0</version>
<scope>test</scope>
</dependency>
<dependency>
<groupId>org.hamcrest</groupId>
<artifactId>hamcrest-core</artifactId>
<version>2.1</version>
<scope>test</scope>
</dependency>
<dependency>
<groupId>org.hamcrest</groupId>
<artifactId>hamcrest-library</artifactId>
<version>2.1</version>
<scope>test</scope>
</dependency>
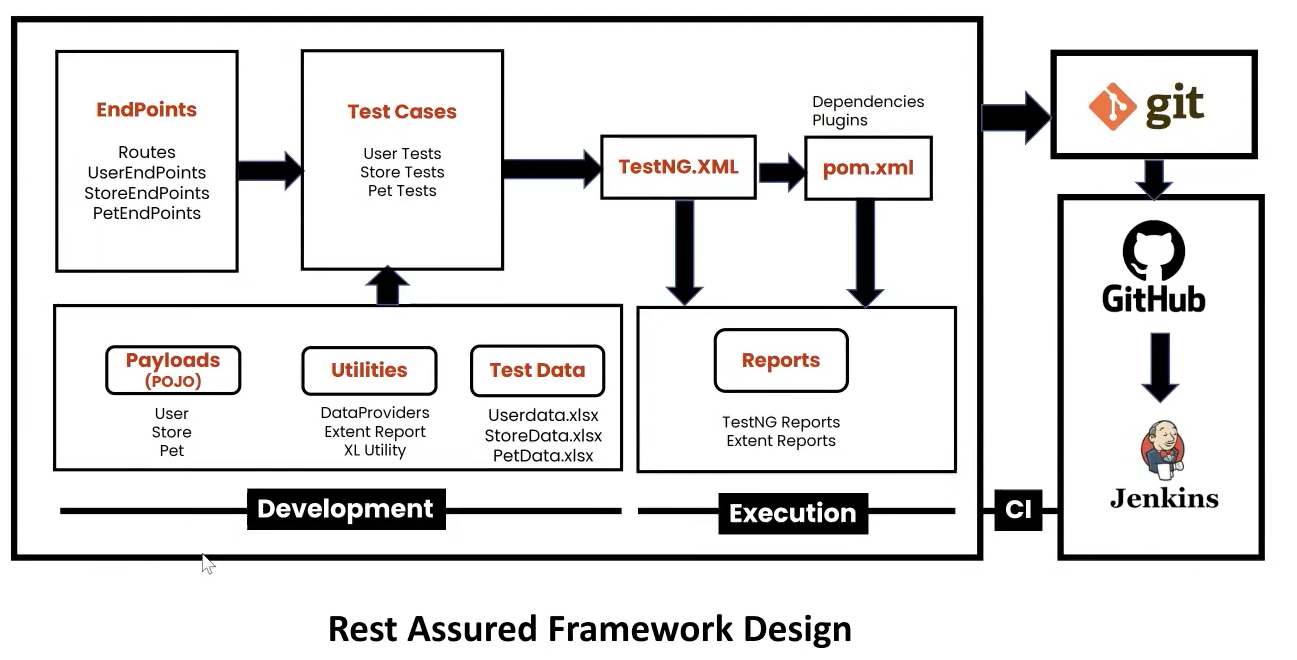
Framework Development
Framework : maintain all project related file
Objectives:
Re-usability
Maintainability
Readability
Hybrid driven
Phase
Understanding requirement
Functional specification(static)
Swagger
Choose automation tools and library- Rest Assured library
Design
Development
Execution and CI
Test case example
@ Test
Void test(){
given() : pre-re
wehne(): request type
then(): response
}
Note: we divided into to parts End points where is prerequisite and request type and Test case where we validate all response
Step 1: Create project
Step 2: Update pom.xml with required dependency
Step 3: create folder structure
Step 4: Create Routes.java → contains URLs
Step 3 Create userEndPoint.java → CURD methods implementation
RestAssured
Chaining :Response from one request becomes the basis for the next request
API chaining is a technique used in API testing to make multiple API requests in a sequence, where each request’s response becomes the basis for the next request. This can be achieved using libraries like Rest Assured in Java. API chaining is often used to test scenarios that involve multiple API endpoints or dependent operations. Below is an example of API chaining using Rest Assured:
API Chaining Scenario:
Let’s assume we have a simple scenario where we want to:
- Create a user →(auto created id)
- Retrieve the created user’s details. →(get id)
- Update the user’s information. →(use id)
- Verify the updated user’s details. →(use id)
TestNG
Create TestNG xml file
Step1: Right-click on the Project folder, go to New and select ‘File’ as shown in the below image.
Step 2: Add the file name as ‘testng.xml’ as shown in the below image and click on the Finish button.
Step 3: Now you can add the below XML code in your testng.xml file. You can choose your Test suite name and the Test name as per the requirements.
<?xml version="1.0" encoding="UTF-8"?>
<!DOCTYPE suite SYSTEM "http://testng.org/testng-1.0.dtd">
<suite name="Testing Google Apps">
<test name="Regression">
<classes>
<class name="Googletest.GmailTest"/>
<class name="Googletest.MapsTest"/>
<class name="Googletest.ImagesTest"/>
</classes>
</test> <!-- Test -->
</suite> <!-- Suite -->
Select file
Data jan 13 2024
C=Continuous
I=Integration
GitHub/GitLab/BitBucket/SVN -> Continuous integration tool
-> Version control(tool)
Remote repo
Code share
Tracking
Code maintenance
Version control(tool)
C=continuous
D=Deployment/Delivery
DevOps : Development Operation
https://www.jenkins.io/download/lts/macos/
And install on machine
MAVEN_HOME
/Applications/apache-maven-3.8.3
/Applications/apache-maven-3.8.3/bin
Continuous Integration
Continuous integration is a DevOps software development practice where developers regularly merge their code changes into a central repository, after which automated builds and tests are run.
CD: Continuous Delivery
What is the difference between continuous delivery and continuous integration?
Continuous Integration happens before you build as you are testing code. Delivery means you can release something to the staging environment or the pre-production environment. Continuous Delivery is when your code is always ready to be released but isn't pushed to production unless you make the decision to do so.
Janking
downloanload :https://www.jenkins.io/download/
https://www.youtube.com/watch?v=MlvNXFdPhB8
Find the java folder from pgm like:
C:\Program Files\Java\jdk1.8.0_321
Find the java folder from pgm like
C:\Program Files\Maven\apache-maven-3.6.1
Go to : System Variable AND add 2 variables
Go to New or edit
1.
variable name: JAVA_HOME
variable value: C:\Program Files\Java\jdk1.8.0_321
2.
variable name: MAVEN_HOME
variable value: C:\Program Files\Maven\apache-maven-3.6.1
after janking
got to :Manage Jankings
A. got to : Manage Plugins
Plugin Manager
1. serch Meven and install all except Red or update
B.Go to : Global Tool Configuration
go down and find jdk and maven
then click install and provied the Ja
and MAVEN_HOME Path
then save
Go to: new Item
: Enter the name of project
: select Maven Project
: press Ok
Go to : project configure
: dis of project
: check mark on
Source Code Management : select git (check mark on)
enter the Repository URL (project url from github)
Build Triggers
: selec : Build Whenever snapshot dependency is built (if avaiable)
Build periodically (Build periodically:Schedule)time mm hh (23 13 * * * )
see more https://stackoverflow.com/questions/12472645/how-do-i-schedule-jobs-in-jenkins
Build Environment
:select : Delete workspace before build starts
Build
: Root POM (pom.xml)
Post Steps
:Run regardless of build result
HOW TO SET JAVA_HOME ON MAC OS X
Trying to run a Java application on your Mac and need to set your JAVA_HOME? Follow the instructions below to quickly and easily do it:
Open Terminal
Confirm you have JDK by typing “which java”. It should show something like /usr/bin/java.
Check you have the needed version of Java, by typing “java -version”.
JAVA_HOME is essentially the full path of the directory that contains a sub-directory named bin which in turn contains the java.
For Mac OSX – it is /Library/Java/Home
Set JAVA_HOME using this command in Terminal: export JAVA_HOME=/Library/Java/Home
echo $JAVA_HOME on Terminal to confirm the path
You should now be able to run your application
Note that this sets JAVA_HOME only for this session. If you want it to persist, you will have to add the command to your ~/.profile file. Below are instructions on how to accomplish this instead:
Open up Terminal.app (Applications >> Utilities >> Terminal)
Type: emacs .profile
add this to the end of the .profile file:
JAVA_HOME=/Library/Java/Home
export JAVA_HOME;
Save and exit emacs (ctrl-x, ctrl-s; ctrl-x, ctrl-c)
Open a new Terminal window (cmd-n) and type: $JAVA_HOME/bin/java -version
If you see something like:
java version “1.5.0_16″
Java(TM) 2 Runtime Environment, Standard Edition (build 1.5.0_16-b06-284)
Java HotSpot(TM) Client VM (build 1.5.0_16-133, mixed mode, sharing)
Comments
Post a Comment