02 CORE JAVA
JAVA
What is JAVA
Java is the programming language and computing platform first released by Sun Microsystems in 1995. There are lost of applications and websites that will not work unless you have java installed, and more are created every day. Java is fast, secure, and reliable.
Java is used for:
Mobile applications (specially android apps)
Desktop applications
Web applications
Web servers and application servers
Games
Database connection
And much, much more
Why use java
Java works on different platforms(Windows, Mac, Linux, Raspberry Pi, etc.)
It is one of the most popular programming language in the world.
It is easy to learn and simple to use.
It is open source and free.
It sis secure, fast and powerful.
It has a huge community support (tens of millions of devlopers).
Java is an object oriented language which gives a clear structure to programs and allows code to be reused, lowering development cost.
As Java is close to C++ and c#, it makes it easy for programmers to switch to java or vice versa.
Java translation
Java Install
Some PCs might have java already installed.
To check if you have installed on a Windows PC,
Search in the start bar for java or type the flowing command prompt(cmd.exe).
Type java -version (C:\User\your name> java -version)
If java is installed, you will see something like this (depending on version) Java version “11.0.01” 2021-0-09
If you do not have Java installed on your computer, you can download if for free at oracal.com
it is possible to write Java in an Integrated Development Environment, such as IntelliJ IDEA, Netbeans or Eclipse, which are particularly useful when managing larger collections of Java files.
Download and installed jdk and eclips
Setup for Windows
To install Java on Windows:
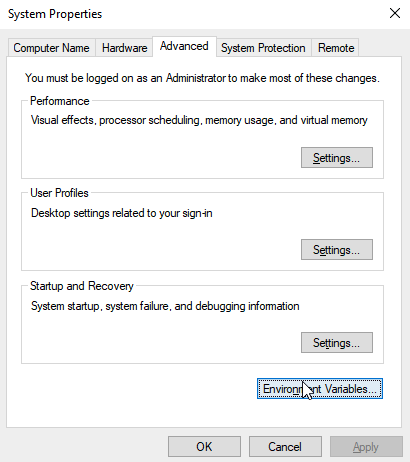
Go to "System Properties" (Can be found on Control Panel > System and Security > System > Advanced System Settings)
Click on the "Environment variables" button under the "Advanced" tab
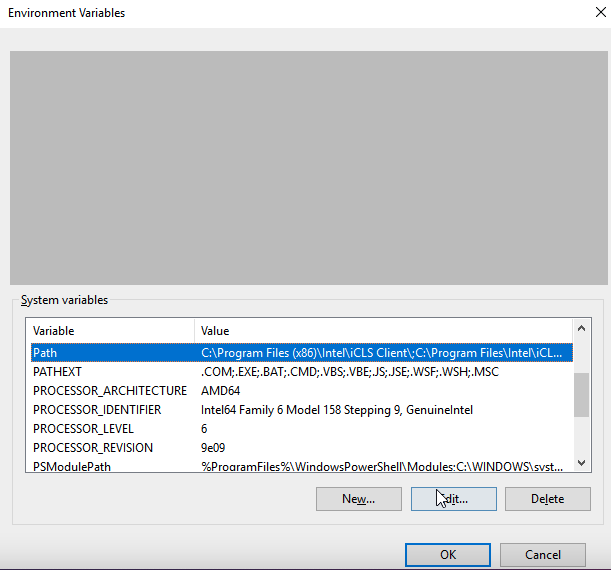
Then, select the "Path" variable in System variables and click on the "Edit" button
Click on the "New" button and add the path where Java is installed, followed by \bin. By default, Java is installed in C:\Program Files\Java\jdk-11.0.1 (If nothing else was specified when you installed it). In that case, You will have to add a new path with: C:\Program Files\Java\jdk-11.0.1\bin
Then, click "OK", and save the settingsAt last, open Command Prompt (cmd.exe) and type java -version to see if Java is running on your machine
Step 2 Step 3. Step 4

What is Java Plug-in software?
The Java Plug-in software is a component of the Java Runtime Environment(JRE). The JRE allows applets written in the Java programming language to run inside various browsers. The Java Plug-in software is not a standalone program and cannot be installed separately.
In Java, every application begins with a class name, and that class must math with file name.
Let’s create our first java file, call my.java, which can be done in any text editor.
This file should contain a “Hello world” massage, which written with the following code.
public class my {
public static void main (String[] args){
System.out.printLn(“Hello world”);
}
}
The curly braces {} marks the beginning and the end of a block of code.
Each code statement must end with a semicolon.
How to run the file using Command Prompt/terminal
Navigate to the directory where you saved your file (cd “folder location”)
Type javac my.java (to compile the file)
If no there are no errors in the code, the command prompt will take you to next line.
Type java my
The output should be display
Java Class and Object
Java classes/Objects
Java is an object-oriented programming language.
Everything in java is associate with classes and object, along with its attributes and method. For example : In real file, a car is an object. The car has attributes, such as weight and color, and methods, such as drive and brake.
Class should always start with an uppercase first letter, and that the name of the java file should match the class name
Create a class
My.java
public class my{
int x = 10;
}
Java Methods
A method is a block of code which only runs when it is called.
We can pass data, knows as parameters, into a method
Method are used to perform certain actions, and they are also known as funcions.
To reuse code: define the code once, and use it many times.
A method must be declared with a class. It is defined with the name of method, followed by parentheses(). Java provides some pre defined methods, such as system.out.println(), but we can create our own methods to perform certain actions;
Every java program has a class name which must match the filename, and that every program must contain the main() method.
The main method
main() method is required and we will see it in every java program
public static void main(Straing[]args){}
any code inside the main() method will be executed.
System.out.print() : this method used to print a line of text to the screen.
Static
static means that the method belongs to the main class and not an object of the main class. a static method that it can be accessed without creating object of the class.
void: void means that this method does not have a return value.
Void:
It is a keyword and used to specify that a method doesn't return anything. As main() method doesn't return anything, its return type is void. As soon as the main() method terminates, the java program terminates too.
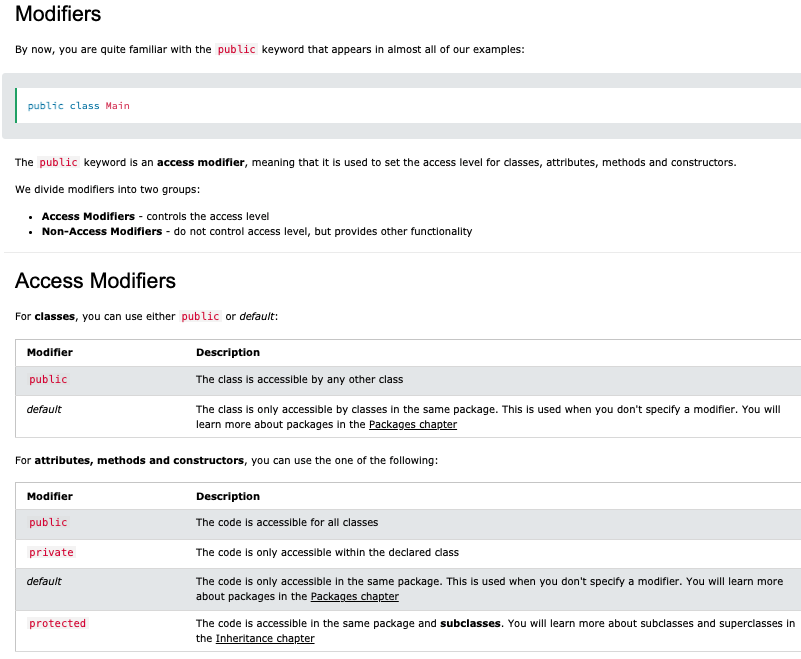
Java Modifiers
Access modifiers
Non-access modifiers
Access modifiers
For classes, you can use either pubic or default.
For attributes, methods and constructors,
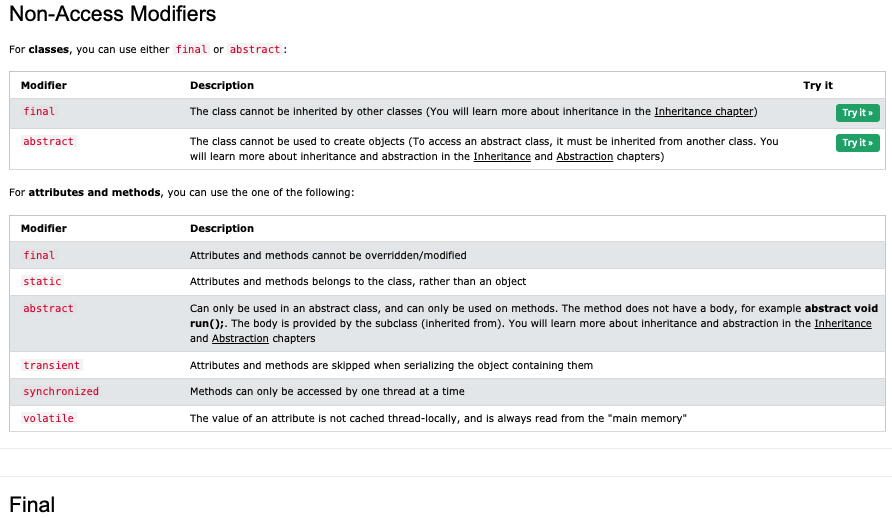
Non-Access Modifiers
For class, you can use either final or abstract
For attribute and method
Java Encapsulation
The meaning of encapsulation is to make sure that “sensitive” data is hidden from user. To achieve this, you must:
declare class variable/attributes as private.
provide public get and set method to access and update the value of a private variable
private variable can only be accessed with the same class (as outside class has no access to it). However, it is possible to access them if we provide public get and set method. The get method returns the variable value, and the set method sets the value.
Java comment
Comments can be used to explain java code, and to make it more readable. It can also be used to prevent execution when testing alternative code.
single line comment. Eg. // this is comment
multi-line comment start with /* and end with */
Java Variables
Variables are container for storing data values.
All java variables must be identified with unique names. These unique names are called identifiers.
In java, there are different type of variables
String : Stores text ( String values are surrounded by double quotes.)
int : stores integer (whole number)
double/float : stores floating point number, with decimals.
char: stores single characters (char value are surrounded by single quotes)
boolean: stores value with states true or false
Declaring/Creating variables
To create a variable, you must specify the type and assign it a value.
datatype variableName = value;
Declare many variables
To declare more than one variable of the same type, use a comma-separated list.
Data types
Data type are divided into two group:
Primitive data type- byte, short, int, long, float, double, boolean, and char
Non-primitive data type- String, Arrays, Classes.
Java type casting
Type casting is when you assign a value of one primitive data to another type.
In java, there is two types of casting
Widening casting (automatically) converting a smaller type to a large type
Byte->short->char->int->long->float-> double
Narrowing casting (manually) converting a large type to smaller size type
double>-float->long->int-> char-> short-> bytes
Java Operators
Operators are used to perform operations on variables and values.
Java divides the operators
Arithmetic operators
+ addition adds together two values
- subtraction subtracts one value from another
* multiplication multiplies two values
/ division divides one value by another
% modulus returns the division reminder
++ Increment increases the value of a variable by 1
-- decrement decreases the value of a variable by 1
Unary operators
Java unary operators are the types that need only one operand to perform any operation like increment, decrement, negation, etc. It consists of various arithmetic, logical and other operators that operate on a single operand. Let’s look at the various unary operators in detail and see how they operate.
Operator 1: Unary minus(-)
Operator 2: ‘NOT’ Operator(!)
Assignment operators
Simple Assignment Operator:
= aassignment assign the value to variable
Compound Assignment Operator:
+= addition assignment add a value to a variable
Operator Example
= x = 5 x = 5
+= x += 3 x = x + 3
-= x -= 3 x = x - 3
*= x *= 3 x = x * 3
/= x /= 3 x = x / 3
%= x %= 3 x = x % 3
&= x &= 3 x = x & 3
|= x |= 3 x = x | 3
^= x ^= 3 x = x ^ 3
>>= x >>= 3 x = x >> 3
<<= x <<= 3 x = x << 3
Relational/Comparison operators
== equal to
!= not equal
> greater than
< less than
>= greater than or equal to
<= less than or equal to
Logical operators
&& logical and returns true if both statements are true.
|| logical or returns true if one of the statements is true.
! logical not reverse the result, returns false if the result is true.
Bitwise operators
Bitwise Operators
Bitwise operators are used to performing the manipulation of individual bits of a number. They can be used with any integral type (char, short, int, etc.). They are used when performing update and query operations of the Binary indexed trees.
Now let’s look at each one of the bitwise operators in Java:
1. Bitwise OR (|)
This operator is a binary operator, denoted by ‘|’. It returns bit by bit OR of input values, i.e., if either of the bits is 1, it gives 1, else it shows 0.
Example:
a = 5 = 0101 (In Binary)
Bitwise OR Operation of 5 and 7
0101
| 0111
________
0111 = 7 (In decimal)
2. Bitwise AND (&)
This operator is a binary operator, denoted by ‘&.’ It returns bit by bit AND of input values, i.e., if both bits are 1, it gives 1, else it shows 0.
Example:
a = 5 = 0101 (In Binary)
b = 7 = 0111 (In Binary)
Bitwise AND Operation of 5 and 7
0101
& 0111
________
0101 = 5 (In decimal)
3. Bitwise XOR (^)
This operator is a binary operator, denoted by ‘^.’ It returns bit by bit XOR of input values, i.e., if corresponding bits are different, it gives 1, else it shows 0.
Example:
a = 5 = 0101 (In Binary)
b = 7 = 0111 (In Binary)
Bitwise XOR Operation of 5 and 7
0101
^ 0111
______
0010 = 2 (In decimal)
4. Bitwise Complement (~)
This operator is a unary operator, denoted by ‘~.’ It returns the one’s complement representation of the input value, i.e., with all bits inverted, which means it makes every 0 to 1, and every 1 to 0.
Example:
a = 5 = 0101 (In Binary)
Bitwise Complement Operation of 5
~ 0101
________
1010 = 10 (In decimal)
Note: Compiler will give 2’s complement of that number, i.e., 2’s complement of 10 will be -6.
Ternary operators
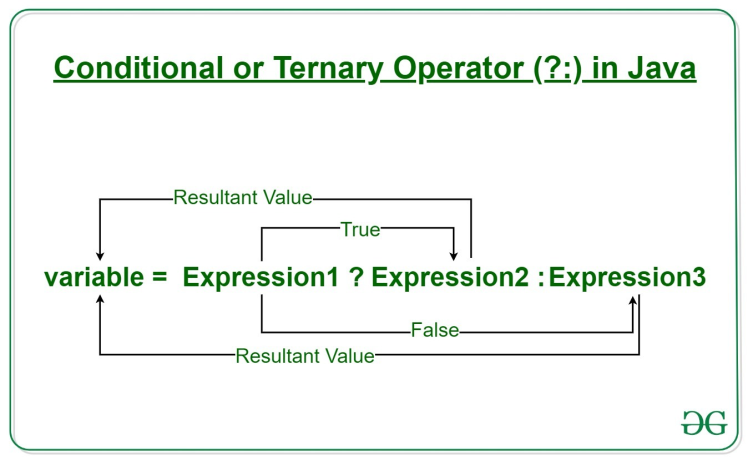
Java ternary operator is the only conditional operator that takes three operands. It’s a one-liner replacement for the if-then-else statement and is used a lot in Java programming. We can use the ternary operator in place of if-else conditions or even switch conditions using nested ternary operators. Although it follows the same algorithm as of if-else statement, the conditional operator takes less space and helps to write the if-else statements in the shortest way possible.
Syntax:
variable = Expression1 ? Expression2: Expression3
If operates similarly to that of the if-else statement as in Exression2 is executed if Expression1 is true else Expression3 is executed.
if(Expression1)
{
variable = Expression2;
}
else
{
variable = Expression3;
}
Shift Operator
By shifting the bits of its first operand right or left, a shift operator performs bit manipulation on data. The shift operators available in the Java programming language are listed below. The shift operator is a java operator that is used to shift bit patterns right or left.
Types of Shift Operators in Java:
Name of operator
Sign Description
Signed Left Shift << The left shift operator moves all bits by a given number of bits to the left.
Signed Right Shift >> The right shift operator moves all bits by a given number of bits to the right.
Unsigned Right Shift >>> It is the same as the signed right shift, but the vacant leftmost position is filled with 0 instead of the sign bit.
Java String
Strings are used for storing text.
A String variable contains a collection of characters surrounded by double quotes
String Method
A string in java is actually an object, which contain method that can perform certain operations on strings.
length() length of the string
charAt() retruns a char value at the given index number
concat() combines spacified string at the end of this string
contains() returns true if chars are found in the string
startsWith() checks if this string starts with given prefix
endWith checks if this string ends with given prefix
equials() compares the contents of two given strings
indexOf returns index of given character value or substring
isEmpty() checks if this string is empty
replace() returns a string replacing all the old char to new char
substrig() returns a part of the string
toCharArry converts this string into character array
toLowerCase return the string in lowercase letter
toUpperCase() return the sting in uppercase letter
trim() eliminates leading and trailing spaces
Java Math
The java math class has many method that allows you to perform mathematical task on numbers.
Math.max() method can be used to find the highest value of x and y
Math.min() method cab be used to find the lowest value of x and y
Math.sqrt() method returns the square root of x
Math.abs() method returns the absolute (positive) value of x
Math.random() returns a random number between 0.0(inclusive), and 1.1(exclusive)
Java Booleans
Very often, in programming, you will need a data type that can only have one of two values, like:
YES / NO
ON / OFF
TRUE / FALSE
For this, Java has a boolean data type, which can take the values true or false.
Java Conditions and If Statements
Java supports the usual logical conditions from mathematics:
Less than: a < b
Less than or equal to: a <= b
Greater than: a > b
Greater than or equal to: a >= b
Equal to a == b
Not Equal to: a != b
You can use these conditions to perform different actions for different decisions.
Java has the following conditional statements:
Use if to specify a block of code to be executed, if a specified condition is true
Use else to specify a block of code to be executed, if the same condition is false
Use else if to specify a new condition to test, if the first condition is false
Use switch to specify many alternative blocks of code to be executed
The if Statement
Use the if statement to specify a block of Java code to be executed if a condition is true.
Note that if is in lowercase letters. Uppercase letters (If or IF) will generate an error.
The else Statement
Use the else statement to specify a block of code to be executed if the condition is false.
The else if Statement
Use the else if statement to specify a new condition if the first condition is false.
Short Hand If...Else (Ternary Operator)
There is also a short-hand if else, which is known as the ternary operator because it consists of three operands. It can be used to replace multiple lines of code with a single line. It is often used to replace simple if else statements:
Eg. variable = (condition) ? expressionTrue : expressionFalse;
Java Switch Statements
Use the switch statement to select one of many code blocks to be executed
This is how it works:
The switch expression is evaluated once.
The value of the expression is compared with the values of each case.
If there is a match, the associated block of code is executed.
The break and default keywords are optional, and will be described later in this chapter
The break Keyword
When Java reaches a break keyword, it breaks out of the switch block.
This will stop the execution of more code and case testing inside the block.
When a match is found, and the job is done, it's time for a break. There is no need for more testing.
A break can save a lot of execution time because it "ignores" the execution of all the rest of the code in the switch block.
The default Keyword
The default keyword specifies some code to run if there is no case match:
Note that if the default statement is used as the last statement in a switch block, it does not need a break.
Note that if the default statement is used as the last statement in a switch block, it does not need a break.
Eg.
int day = 4;
switch (day) {
case 6:
System.out.println("Today is Saturday");
break;
case 7:
System.out.println("Today is Sunday");
break;
default:
System.out.println("Looking forward to the Weekend");
}
// Outputs "Looking forward to the Weekend"
Loops
Loops can execute a block of code as long as a specified condition is reached.
Loops are handy because they save time, reduce errors, and they make code more readable.
Java While Loop
The while loop loops through a block of code as long as a specified condition is true:
Syntax
while (condition) {
// code block to be executed
}
In the example below, the code in the loop will run, over and over again, as long as a variable (i) is less than 5:
Example
int i = 0;
while (i < 5) {
System.out.println(i);
i++;
}
The Do/While Loop
The do/while loop is a variant of the while loop. This loop will execute the code block once, before checking if the condition is true, then it will repeat the loop as long as the condition is true.
Syntax
do {
// code block to be executed
}
while (condition);
The example below uses a do/while loop. The loop will always be executed at least once, even if the condition is false, because the code block is executed before the condition is tested:
Example
int i = 0;
do {
System.out.println(i);
i++;
}
while (i < 5);
Do not forget to increase the variable used in the condition, otherwise the loop will never end!
Java For Loop
When you know exactly how many times you want to loop through a block of code, use the for loop instead of a while loop:
Syntax
for (statement 1; statement 2; statement 3) {
// code block to be executed
}
Statement 1 is executed (one time) before the execution of the code block.
Statement 2 defines the condition for executing the code block.
Statement 3 is executed (every time) after the code block has been executed.
The example below will print the numbers 0 to 4:
Example
for (int i = 0; i < 5; i++) {
System.out.println(i);
}
Example explained
Statement 1 sets a variable before the loop starts (int i = 0).
Statement 2 defines the condition for the loop to run (i must be less than 5). If the condition is true, the loop will start over again, if it is false, the loop will end.
Statement 3 increases a value (i++) each time the code block in the loop has been executed.
Another Example
This example will only print even values between 0 and 10:
Example
for (int i = 0; i <= 10; i = i + 2) {
System.out.println(i);
}
For-Each Loop
There is also a "for-each" loop, which is used exclusively to loop through elements in an array:
Syntax
for (type variableName : arrayName) {
// code block to be executed
}
The following example outputs all elements in the cars array, using a "for-each" loop:
Example
String[] cars = {"Volvo", "BMW", "Ford", "Mazda"};
for (String i : cars) {
System.out.println(i);
}
Note: Don't worry if you don't understand the example above. You will learn more about Arrays in the Java Arrays chapter.
Java Break
You have already seen the break statement used in an earlier chapter of this tutorial. It was used to "jump out" of a switch statement.
The break statement can also be used to jump out of a loop.
This example stops the loop when i is equal to 4:
Example
for (int i = 0; i < 10; i++) {
if (i == 4) {
break;
}
System.out.println(i);
}
Java Continue
The continue statement breaks one iteration (in the loop), if a specified condition occurs, and continues with the next iteration in the loop.
This example skips the value of 4:
Example
for (int i = 0; i < 10; i++) {
if (i == 4) {
continue;
}
System.out.println(i);
}
Break and Continue in While Loop
You can also use break and continue in while loops:
Break Example
int i = 0;
while (i < 10) {
System.out.println(i);
i++;
if (i == 4) {
break;
}
}
Continue Example
int i = 0;
while (i < 10) {
if (i == 4) {
i++;
continue;
}
System.out.println(i);
i++;
}
Java Arrays
Arrays are used to store multiple values in a single variable, instead of declaring separate variables for each value.
To declare an array, define the variable type with square brackets:
String[] cars;
Access the Elements of an Array
You access an array element by referring to the index number.
This statement accesses the value of the first element in cars:
String[] cars = {"Volvo", "BMW", "Ford", "Mazda"};
System.out.println(cars[0]);
// Outputs Volvo
Note: Array indexes start with 0: [0] is the first element. [1] is the second element, etc.
Change an Array Element
To change the value of a specific element, refer to the index number:
Array Length
To find out how many elements an array has, use the length property:
Loop Through an Array
You can loop through the array elements with the for loop, and use the length property to specify how many times the loop should run.
The following example outputs all elements in the cars array:
String[] cars = {"Volvo", "BMW", "Ford", "Mazda"};
for (int i = 0; i < cars.length; i++) {
System.out.println(cars[i]);
}
Loop Through an Array with For-Each
There is also a "for-each" loop, which is used exclusively to loop through elements in arrays:
for (type variable : arrayname) {
...
}
String[] cars = {"Volvo", "BMW", "Ford", "Mazda"};
for (String i : cars) {
System.out.println(i);
}
The example above can be read like this: for each String element (called i - as in index) in cars, print out the value of i.
If you compare the for loop and for-each loop, you will see that the for-each method is easier to write, it does not require a counter (using the length property), and it is more readable.
Multidimensional Arrays
A multidimensional array is an array of arrays.
To create a two-dimensional array, add each array within its own set of curly braces:
int[][] myNumbers = { {1, 2, 3, 4}, {5, 6, 7} };
myNumbers is now an array with two arrays as its elements.
To access the elements of the myNumbers array, specify two indexes: one for the array, and one for the element inside that array. This example accesses the third element (2) in the second array (1) of myNumbers:
We can also use a for loop inside another for loop to get the elements of a two-dimensional array (we still have to point to the two indexes):
public class Main {
public static void main(String[] args) {
int[][] myNumbers = { {1, 2, 3, 4}, {5, 6, 7} };
for (int i = 0; i < myNumbers.length; ++i) {
for(int j = 0; j < myNumbers[i].length; ++j) {
System.out.println(myNumbers[i][j]);
}
}
}
}
All String Methods
The String class has a set of built-in methods that you can use on strings.
Method Description Return Type
charAt() Returns the character at the specified index (position) char
codePointAt() Returns the Unicode of the character at the specified index int
codePointBefore() Returns the Unicode of the character before the specified index int
codePointCount() Returns the Unicode in the specified text range of this String int
compareTo() Compares two strings lexicographically int
compareToIgnoreCase() Compares two strings lexicographically, ignoring case differences int
concat() Appends a string to the end of another string String
contains() Checks whether a string contains a sequence of characters boolean
contentEquals() Checks whether a string contains the exact same sequence of characters of the specified CharSequence or StringBuffer boolean
copyValueOf() Returns a String that represents the characters of the character array String
endsWith() Checks whether a string ends with the specified character(s) boolean
equals() Compares two strings. Returns true if the strings are equal, and false if not boolean
equalsIgnoreCase() Compares two strings, ignoring case considerations boolean
format() Returns a formatted string using the specified locale, format string, and arguments String
getBytes() Encodes this String into a sequence of bytes using the named charset, storing the result into a new byte array byte[]
getChars() Copies characters from a string to an array of chars void
hashCode() Returns the hash code of a string int
indexOf() Returns the position of the first found occurrence of specified characters in a string int
intern() Returns the canonical representation for the string object String
isEmpty() Checks whether a string is empty or not boolean
lastIndexOf() Returns the position of the last found occurrence of specified characters in a string int
length() Returns the length of a specified string int
matches() Searches a string for a match against a regular expression, and returns the matches boolean
offsetByCodePoints() Returns the index within this String that is offset from the given index by codePointOffset code points int
regionMatches() Tests if two string regions are equal boolean
replace() Searches a string for a specified value, and returns a new string where the specified values are replaced String
replaceFirst() Replaces the first occurrence of a substring that matches the given regular expression with the given replacement String
replaceAll() Replaces each substring of this string that matches the given regular expression with the given replacement String
split() Splits a string into an array of substrings String[]
startsWith() Checks whether a string starts with specified characters boolean
subSequence() Returns a new character sequence that is a subsequence of this sequence CharSequence
substring() Returns a new string which is the substring of a specified string String
toCharArray() Converts this string to a new character array char[]
toLowerCase() Converts a string to lower case letters String
toString() Returns the value of a String object String
toUpperCase() Converts a string to upper case letters String
trim() Removes whitespace from both ends of a string String
valueOf() Returns the string representation of the specified value String
A list of all Math methods can be found in the table below:
Method Description Return Type
abs(x) Returns the absolute value of x double|float|int|long
acos(x) Returns the arccosine of x, in radians double
asin(x) Returns the arcsine of x, in radians double
atan(x) Returns the arctangent of x as a numeric value between -PI/2 and PI/2 radians double
atan2(y,x) Returns the angle theta from the conversion of rectangular coordinates (x, y) to polar coordinates (r, theta). double
cbrt(x) Returns the cube root of x double
ceil(x) Returns the value of x rounded up to its nearest integer double
copySign(x, y) Returns the first floating point x with the sign of the second floating point y double
cos(x) Returns the cosine of x (x is in radians) double
cosh(x) Returns the hyperbolic cosine of a double value double
exp(x) Returns the value of Ex double
expm1(x) Returns ex -1 double
floor(x) Returns the value of x rounded down to its nearest integer double
getExponent(x) Returns the unbiased exponent used in x int
hypot(x, y) Returns sqrt(x2 +y2) without intermediate overflow or underflow double
IEEEremainder(x, y) Computes the remainder operation on x and y as prescribed by the IEEE 754 standard double
log(x) Returns the natural logarithm (base E) of x double
log10(x) Returns the base 10 logarithm of x double
log1p(x) Returns the natural logarithm (base E) of the sum of x and 1 double
max(x, y) Returns the number with the highest value double|float|int|long
min(x, y) Returns the number with the lowest value double|float|int|long
nextAfter(x, y) Returns the floating point number adjacent to x in the direction of y double|float
nextUp(x) Returns the floating point value adjacent to x in the direction of positive infinity double|float
pow(x, y) Returns the value of x to the power of y double
random() Returns a random number between 0 and 1 double
round(x) Returns the value of x rounded to its nearest integer int
rint() Returns the double value that is closest to x and equal to a mathematical integer double
signum(x) Returns the sign of x double
sin(x) Returns the sine of x (x is in radians) double
sinh(x) Returns the hyperbolic sine of a double value double
sqrt(x) Returns the square root of x double
tan(x) Returns the tangent of an angle double
tanh(x) Returns the hyperbolic tangent of a double value double
toDegrees(x) Converts an angle measured in radians to an approx. equivalent angle measured in degrees double
toRadians(x) Converts an angle measured in degrees to an approx. angle measured in radians double
ulp(x) Returns the size of the unit of least precision (ulp) of x double|float
Note: All Math methods are static.
Note
Normal Array
String [] students = new String [5];
Students[0] = “ram";
Students[1] = “Shyam";
Students[5] = “hari";
Calling array : system.out.printLn(student[1])
Note: Length of array is pre-decided if we try to change the length of array it would drop the old array and create new array
Collection
DataType are always going to be the object type
Interger for int, Character for char, Double, String etc we can add
Java Collection
list: ArrayLIst, LInkedList
Set
Map
Formula
CollectionType<objectDataType> varibleName = new SubCollectionTyep <objectDataType>();
OR
SubCollectionType<ObjectDataType> VariableName = new SubCollectionType <ObjectDataType>();
Example:
List<String> students = new ArrayList<String>();
Or
ArrayList<String> students = new ArrayList<String>();
List<String> students = new ArrayList<String>();
Students.add(“ram");
Students.add(“Shyam");
Students.add(“hari");
Calling array: Students.get(0);
.size(), .get(0). .remove(0)
if any item deleted from Array List index change but LinkedList index never change,
List<String> students = new ArrayList<String>();
students.add("ram");
students.add("ram");
students.add("hari");
System.out.println(students.get(0));
for(String item:students) {
System.out.println(item);
}
Set: HashSet, LinkedHasSet, TreeSet
HashSet
print random
no duplication
remove the value only
in set there in no method get
convert to toArray() to get() method
LinkedHasSet
item in order of creation
no duplication
TreeSet
ascending order
no duplication
Set<Interger> variableName = new HashSet<Interger>
Map
Formula
CollectionType<ObjectKeyDataType, ObjectValueDataType> varibleName = new SubCollectionTyep < ObjectKeyDataType, ObjectValueDataType>();
OR
SubCollectionType< ObjectKeyDataType, ObjectValueDataType > VariableName = new SubCollectionType < ObjectKeyDataType, ObjectValueDataType >();
HashMap, LinkedHasMap, TreeMap
// Put()is the method to add on array
Map<Integer, String> grade = new TreeMap<Integer, String>();
grade.put(100, "A");
grade.put(60, "B");
grade.put(80, "C");
grade.put(33, "D");
grade.put(80, "f");
grade.put(33, "g");
grade.put(0, "E");
System.out.println(grade.keySet());
System.out.println(grade.values());
for(Entry<Integer, String> item : grade.entrySet()) {
System.out.println(item);
}
In Java Exceptions: checked(throws) -unchecked
Try catch and throws
Exception handle
Loop : for loop ,
foreach loop
Parameter and Arguments
Information can be passed to method as parameter. Parameter act as variable inside the method.
Parameter are specified after the method name, inside the parentheses. We ca add as many parameters as we wand, just separate them with a comma.
When a parameter is passed to the method, it is called an argument.
Method Overloading
With method overloading, multiple methods can have the same name with different parameters:
int myMethod(int x)
float myMethod(float x)
double myMethod(double x, double y)
Consider the following example, which have two methods that add numbers of different type:
static int plusMethodInt(int x, int y) {
return x + y;
}
static double plusMethodDouble(double x, double y) {
return x + y;
}
public static void main(String[] args) {
int myNum1 = plusMethodInt(8, 5);
double myNum2 = plusMethodDouble(4.3, 6.26);
System.out.println("int: " + myNum1);
System.out.println("double: " + myNum2);
}
Instead of defining two methods that should do the same thing, it is better to overload one.
In the example below, we overload the plusMethod method to work for both int and double:
Note: Multiple methods can have the same name as long as the number and/or type of parameters are different.
Java Scope
In Java, variables are only accessible inside the region they are created. This is called scope.
Method Scope
Variables declared directly inside a method are available anywhere in the method following the line of code in which they were declared:
public class Main {
public static void main(String[] args) {
// Code here CANNOT use x
int x = 100;
// Code here can use x
System.out.println(x);
}
}
Block Scope
A block of code refers to all of the code between curly braces {}. Variables declared inside blocks of code are only accessible by the code between the curly braces, which follows the line in which the variable was declared:
Example
public class Main {
public static void main(String[] args) {
// Code here CANNOT use x
{ // This is a block
// Code here CANNOT use x
int x = 100;
// Code here CAN use x
System.out.println(x);
} // The block ends here
// Code here CANNOT use x
}
}
A block of code may exist on its own or it can belong to an if, while or for statement. In the case of for statements, variables declared in the statement itself are also available inside the block's scope.
Java Recursion
Recursion is the technique of making a function call itself. This technique provides a way to break complicated problems down into simple problems which are easier to solve.
Recursion may be a bit difficult to understand. The best way to figure out how it works is to experiment with it.
Recursion Example
Adding two numbers together is easy to do, but adding a range of numbers is more complicated. In the following example, recursion is used to add a range of numbers together by breaking it down into the simple task of adding two numbers:
Example
Use recursion to add all of the numbers up to 10.
public class Main {
public static void main(String[] args) {
int result = sum(10);
System.out.println(result);
}
public static int sum(int k) {
if (k > 0) {
return k + sum(k - 1);
} else {
return 0;
}
}
}
Example Explained
When the sum() function is called, it adds parameter k to the sum of all numbers smaller than k and returns the result. When k becomes 0, the function just returns 0. When running, the program follows these steps:
10 + sum(9)
10 + ( 9 + sum(8) )
10 + ( 9 + ( 8 + sum(7) ) )
...
10 + 9 + 8 + 7 + 6 + 5 + 4 + 3 + 2 + 1 + sum(0)
10 + 9 + 8 + 7 + 6 + 5 + 4 + 3 + 2 + 1 + 0
Since the function does not call itself when k is 0, the program stops there and returns the result.
Halting Condition
Just as loops can run into the problem of infinite looping, recursive functions can run into the problem of infinite recursion. Infinite recursion is when the function never stops calling itself. Every recursive function should have a halting condition, which is the condition where the function stops calling itself. In the previous example, the halting condition is when the parameter k becomes 0.
It is helpful to see a variety of different examples to better understand the concept. In this example, the function adds a range of numbers between a start and an end. The halting condition for this recursive function is when end is not greater than start:
Example
Use recursion to add all of the numbers between 5 to 10.
public class Main {
public static void main(String[] args) {
int result = sum(5, 10);
System.out.println(result);
}
public static int sum(int start, int end) {
if (end > start) {
return end + sum(start, end - 1);
} else {
return end;
}
}
}
Java - What is OOP?
OOP stands for Object-Oriented Programming.
Procedural programming is about writing procedures or methods that perform operations on the data, while object-oriented programming is about creating objects that contain both data and methods.
Object-oriented programming has several advantages over procedural programming:
OOP is faster and easier to execute
OOP provides a clear structure for the programs
OOP helps to keep the Java code DRY "Don't Repeat Yourself", and makes the code easier to maintain, modify and debug
OOP makes it possible to create full reusable applications with less code and shorter development time
Tip: The "Don't Repeat Yourself" (DRY) principle is about reducing the repetition of code. You should extract out the codes that are common for the application, and place them at a single place and reuse them instead of repeating it.
Java - What are Classes and Objects?
Classes and objects are the two main aspects of object-oriented programming.
Look at the following illustration to see the difference between class and objects:
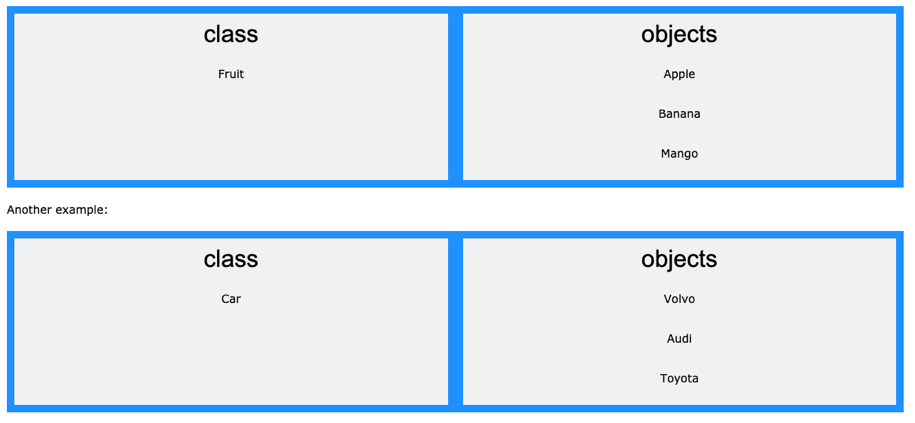
So, a class is a template for objects, and an object is an instance of a class.
When the individual objects are created, they inherit all the variables and methods from the class.
You will learn much more about classes and objects in the next chapter.
Java Classes/Objects
Java is an object-oriented programming language.
Everything in Java is associated with classes and objects, along with its attributes and methods. For example: in real life, a car is an object. The car has attributes, such as weight and color, and methods, such as drive and brake.
A Class is like an object constructor, or a "blueprint" for creating objects.
Create a Class
To create a class, use the keyword class:
Main.java
Create a class named "Main" with a variable x:
public class Main {
int x = 5;
}
Remember from the Java Syntax chapter that a class should always start with an uppercase first letter, and that the name of the java file should match the class name.
Create an Object
In Java, an object is created from a class. We have already created the class named Main, so now we can use this to create objects.
To create an object of Main, specify the class name, followed by the object name, and use the keyword new:
Example
Create an object called "myObj" and print the value of x:
public class Main {
int x = 5;
public static void main(String[] args) {
Main myObj = new Main();
System.out.println(myObj.x);
}
}
Multiple Objects
You can create multiple objects of one class:
Example
Create two objects of Main:
public class Main {
int x = 5;
public static void main(String[] args) {
Main myObj1 = new Main(); // Object 1
Main myObj2 = new Main(); // Object 2
System.out.println(myObj1.x);
System.out.println(myObj2.x);
}
}
Using Multiple Classes
You can also create an object of a class and access it in another class. This is often used for better organization of classes (one class has all the attributes and methods, while the other class holds the main() method (code to be executed)).
Remember that the name of the java file should match the class name. In this example, we have created two files in the same directory/folder:
Main.java
Second.java
Main.java
public class Main {
int x = 5;
}
Second.java
class Second {
public static void main(String[] args) {
Main myObj = new Main();
System.out.println(myObj.x);
}
}
When both files have been compiled:
C:\Users\Your Name>javac Main.java
C:\Users\Your Name>javac Second.java
Run the Second.java file:
C:\Users\Your Name>java Second
And the output will be:
5
You will learn much more about classes and objects in the next chapters.
Java Class Attributes
In the previous chapter, we used the term "variable" for x in the example (as shown below). It is actually an attribute of the class. Or you could say that class attributes are variables within a class:
Example
Create a class called "Main" with two attributes: x and y:
public class Main {
int x = 5;
int y = 3;
}
Another term for class attributes is fields.
Accessing Attributes
You can access attributes by creating an object of the class, and by using the dot syntax (.):
The following example will create an object of the Main class, with the name myObj. We use the x attribute on the object to print its value:
Example
Create an object called "myObj" and print the value of x:
public class Main {
int x = 5;
public static void main(String[] args) {
Main myObj = new Main();
System.out.println(myObj.x);
}
}
Modify Attributes
You can also modify attribute values:
Example
Set the value of x to 40:
public class Main {
int x;
public static void main(String[] args) {
Main myObj = new Main();
myObj.x = 40;
System.out.println(myObj.x);
}
}
Or override existing values:
Example
Change the value of x to 25:
public class Main {
int x = 10;
public static void main(String[] args) {
Main myObj = new Main();
myObj.x = 25; // x is now 25
System.out.println(myObj.x);
}
}
If you don't want the ability to override existing values, declare the attribute as final:
Example
public class Main {
final int x = 10;
public static void main(String[] args) {
Main myObj = new Main();
myObj.x = 25; // will generate an error: cannot assign a value to a final variable
System.out.println(myObj.x);
}
}
The final keyword is useful when you want a variable to always store the same value, like PI (3.14159...).
The final keyword is called a "modifier". You will learn more about these in the Java Modifiers Chapter.
Multiple Objects
If you create multiple objects of one class, you can change the attribute values in one object, without affecting the attribute values in the other:
Example
Change the value of x to 25 in myObj2, and leave x in myObj1 unchanged:
public class Main {
int x = 5;
public static void main(String[] args) {
Main myObj1 = new Main(); // Object 1
Main myObj2 = new Main(); // Object 2
myObj2.x = 25;
System.out.println(myObj1.x); // Outputs 5
System.out.println(myObj2.x); // Outputs 25
}
}
Multiple Attributes
You can specify as many attributes as you want:
Example
public class Main {
String fname = "John";
String lname = "Doe";
int age = 24;
public static void main(String[] args) {
Main myObj = new Main();
System.out.println("Name: " + myObj.fname + " " + myObj.lname);
System.out.println("Age: " + myObj.age);
}
}
The next chapter will teach you how to create class methods and how to access them with objects.
Java Class Methods
You learned from the Java Methods chapter that methods are declared within a class, and that they are used to perform certain actions:
Example
Create a method named myMethod() in Main:
public class Main {
static void myMethod() {
System.out.println("Hello World!");
}
}
myMethod() prints a text (the action), when it is called. To call a method, write the method's name followed by two parentheses () and a semicolon;
Example
Inside main, call myMethod():
public class Main {
static void myMethod() {
System.out.println("Hello World!");
}
public static void main(String[] args) {
myMethod();
}
}
// Outputs "Hello World!"
Static vs. Non-Static
You will often see Java programs that have either static or public attributes and methods.
In the example above, we created a static method, which means that it can be accessed without creating an object of the class, unlike public, which can only be accessed by objects:
Example
An example to demonstrate the differences between static and public methods:
public class Main {
// Static method
static void myStaticMethod() {
System.out.println("Static methods can be called without creating objects");
}
// Public method
public void myPublicMethod() {
System.out.println("Public methods must be called by creating objects");
}
// Main method
public static void main(String[] args) {
myStaticMethod(); // Call the static method
// myPublicMethod(); This would compile an error
Main myObj = new Main(); // Create an object of Main
myObj.myPublicMethod(); // Call the public method on the object
}
}
Note: You will learn more about these keywords (called modifiers) in the Java Modifiers chapter.
Access Methods With an Object
Example
Create a Car object named myCar. Call the fullThrottle() and speed() methods on the myCar object, and run the program:
// Create a Main class
public class Main {
// Create a fullThrottle() method
public void fullThrottle() {
System.out.println("The car is going as fast as it can!");
}
// Create a speed() method and add a parameter
public void speed(int maxSpeed) {
System.out.println("Max speed is: " + maxSpeed);
}
// Inside main, call the methods on the myCar object
public static void main(String[] args) {
Main myCar = new Main(); // Create a myCar object
myCar.fullThrottle(); // Call the fullThrottle() method
myCar.speed(200); // Call the speed() method
}
}
// The car is going as fast as it can!
// Max speed is: 200
Example explained
1) We created a custom Main class with the class keyword.
2) We created the fullThrottle() and speed() methods in the Main class.
3) The fullThrottle() method and the speed() method will print out some text, when they are called.
4) The speed() method accepts an int parameter called maxSpeed - we will use this in 8).
5) In order to use the Main class and its methods, we need to create an object of the Main Class.
6) Then, go to the main() method, which you know by now is a built-in Java method that runs your program (any code inside main is executed).
7) By using the new keyword we created an object with the name myCar.
8) Then, we call the fullThrottle() and speed() methods on the myCar object, and run the program using the name of the object (myCar), followed by a dot (.), followed by the name of the method (fullThrottle(); and speed(200);). Notice that we add an int parameter of 200 inside the speed() method.
Remember that..
The dot (.) is used to access the object's attributes and methods.
To call a method in Java, write the method name followed by a set of parentheses (), followed by a semicolon (;).
A class must have a matching filename (Main and Main.java).
Using Multiple Classes
Like we specified in the Classes chapter, it is a good practice to create an object of a class and access it in another class.
Remember that the name of the java file should match the class name. In this example, we have created two files in the same directory:
Main.java
Second.java
Main.java
public class Main {
public void fullThrottle() {
System.out.println("The car is going as fast as it can!");
}
public void speed(int maxSpeed) {
System.out.println("Max speed is: " + maxSpeed);
}
}
Second.java
class Second {
public static void main(String[] args) {
Main myCar = new Main(); // Create a myCar object
myCar.fullThrottle(); // Call the fullThrottle() method
myCar.speed(200); // Call the speed() method
}
}
When both files have been compiled:
C:\Users\Your Name>javac Main.java
C:\Users\Your Name>javac Second.java
Run the Second.java file:
C:\Users\Your Name>java Second
And the output will be:
The car is going as fast as it can!
Max speed is: 200
Java Constructors
A constructor in Java is a special method that is used to initialize objects. The constructor is called when an object of a class is created. It can be used to set initial values for object attributes:
Example
Create a constructor:
// Create a Main class
public class Main {
int x; // Create a class attribute
// Create a class constructor for the Main class
public Main() {
x = 5; // Set the initial value for the class attribute x
}
public static void main(String[] args) {
Main myObj = new Main(); // Create an object of class Main (This will call the constructor)
System.out.println(myObj.x); // Print the value of x
}
}
// Outputs 5
Note that the constructor name must match the class name, and it cannot have a return type (like void).
Also note that the constructor is called when the object is created.
All classes have constructors by default: if you do not create a class constructor yourself, Java creates one for you. However, then you are not able to set initial values for object attributes.
Constructor Parameters
Constructors can also take parameters, which is used to initialize attributes.
The following example adds an int y parameter to the constructor. Inside the constructor we set x to y (x=y). When we call the constructor, we pass a parameter to the constructor (5), which will set the value of x to 5:
Example
public class Main {
int x;
public Main(int y) {
x = y;
}
public static void main(String[] args) {
Main myObj = new Main(5);
System.out.println(myObj.x);
}
}
// Outputs 5
You can have as many parameters as you want:
Example
public class Main {
int modelYear;
String modelName;
public Main(int year, String name) {
modelYear = year;
modelName = name;
}
public static void main(String[] args) {
Main myCar = new Main(1969, "Mustang");
System.out.println(myCar.modelYear + " " + myCar.modelName);
}
}
// Outputs 1969 Mustang
Final
If you don't want the ability to override existing attribute values, declare attributes as final:
Example : public class Main {
final int x = 10;
final double PI = 3.14;
public static void main(String[] args) {
Main myObj = new Main();
myObj.x = 50; // will generate an error: cannot assign a value to a final variable
myObj.PI = 25; // will generate an error: cannot assign a value to a final variable
System.out.println(myObj.x);
}
}
Static
A static method means that it can be accessed without creating an object of the class, unlike public:
Example
An example to demonstrate the differences between static and public methods:
public class Main {
// Static method
static void myStaticMethod() {
System.out.println("Static methods can be called without creating objects");
}
// Public method
public void myPublicMethod() {
System.out.println("Public methods must be called by creating objects");
}
// Main method
public static void main(String[ ] args) {
myStaticMethod(); // Call the static method
// myPublicMethod(); This would output an error
Main myObj = new Main(); // Create an object of Main
myObj.myPublicMethod(); // Call the public method
}
}
Abstract
An abstract method belongs to an abstract class, and it does not have a body. The body is provided by the subclass:
Example
// Code from filename: Main.java
// abstract class
abstract class Main {
public String fname = "John";
public int age = 24;
public abstract void study(); // abstract method
}
// Subclass (inherit from Main)
class Student extends Main {
public int graduationYear = 2018;
public void study() { // the body of the abstract method is provided here
System.out.println("Studying all day long");
}
}
// End code from filename: Main.java
// Code from filename: Second.java
class Second {
public static void main(String[] args) {
// create an object of the Student class (which inherits attributes and methods from Main)
Student myObj = new Student();
System.out.println("Name: " + myObj.fname);
System.out.println("Age: " + myObj.age);
System.out.println("Graduation Year: " + myObj.graduationYear);
myObj.study(); // call abstract method
}
}
Encapsulation
The meaning of Encapsulation, is to make sure that "sensitive" data is hidden from users. To achieve this, you must:
declare class variables/attributes as private
provide public get and set methods to access and update the value of a private variable
Get and Set
You learned from the previous chapter that private variables can only be accessed within the same class (an outside class has no access to it). However, it is possible to access them if we provide public get and set methods.
The get method returns the variable value, and the set method sets the value.
Syntax for both is that they start with either get or set, followed by the name of the variable, with the first letter in upper case:
Example
public class Person {
private String name; // private = restricted access
// Getter
public String getName() {
return name;
}
// Setter
public void setName(String newName) {
this.name = newName;
}
}
Example explained
The get method returns the value of the variable name.
The set method takes a parameter (newName) and assigns it to the name variable. The this keyword is used to refer to the current object.
However, as the name variable is declared as private, we cannot access it from outside this class:
Example
public class Main {
public static void main(String[] args) {
Person myObj = new Person();
myObj.name = "John"; // error
System.out.println(myObj.name); // error
}
}
If the variable was declared as public, we would expect the following output:
John
However, as we try to access a private variable, we get an error:
MyClass.java:4: error: name has private access in Person
myObj.name = "John";
^
MyClass.java:5: error: name has private access in Person
System.out.println(myObj.name);
^
2 errors
Instead, we use the getName() and setName() methods to access and update the variable:
Example
public class Main {
public static void main(String[] args) {
Person myObj = new Person();
myObj.setName("John"); // Set the value of the name variable to "John"
System.out.println(myObj.getName());
}
}
// Outputs "John"
Why Encapsulation?
Better control of class attributes and methods
Class attributes can be made read-only (if you only use the get method), or write-only (if you only use the set method)
Flexible: the programmer can change one part of the code without affecting other parts
Increased security of data
Java Packages & API
A package in Java is used to group related classes. Think of it as a folder in a file directory. We use packages to avoid name conflicts, and to write a better maintainable code. Packages are divided into two categories:
Built-in Packages (packages from the Java API)
User-defined Packages (create your own packages)
Built-in Packages
The Java API is a library of prewritten classes, that are free to use, included in the Java Development Environment.
The library contains components for managing input, database programming, and much much more. The complete list can be found at Oracles website: https://docs.oracle.com/javase/8/docs/api/.
The library is divided into packages and classes. Meaning you can either import a single class (along with its methods and attributes), or a whole package that contain all the classes that belong to the specified package.
To use a class or a package from the library, you need to use the import keyword:
Syntax
Import package.name.Class; // Import a single class
import package.name.*; // Import the whole package
Import a Class
If you find a class you want to use, for example, the Scanner class, which is used to get user input, write the following code:
Example
import java.util.Scanner;
In the example above, java.util is a package, while Scanner is a class of the java.util package.
To use the Scanner class, create an object of the class and use any of the available methods found in the Scanner class documentation. In our example, we will use the nextLine() method, which is used to read a complete line:
Example
Using the Scanner class to get user input:
import java.util.Scanner;
class MyClass {
public static void main(String[] args) {
Scanner myObj = new Scanner(System.in);
System.out.println("Enter username");
String userName = myObj.nextLine();
System.out.println("Username is: " + userName);
}
}
Import a Package
There are many packages to choose from. In the previous example, we used the Scanner class from the java.util package. This package also contains date and time facilities, random-number generator and other utility classes.
To import a whole package, end the sentence with an asterisk sign (*). The following example will import ALL the classes in the java.util package:
Example
import java.util.*;
User-defined Packages
To create your own package, you need to understand that Java uses a file system directory to store them. Just like folders on your computer:
Example
└── root
└── mypack
└── MyPackageClass.java
To create a package, use the package keyword:
MyPackageClass.java
package mypack;
class MyPackageClass {
public static void main(String[] args) {
System.out.println("This is my package!");
}
}
Save the file as MyPackageClass.java, and compile it:
C:\Users\Your Name>javac MyPackageClass.java
Then compile the package:
C:\Users\Your Name>javac -d . MyPackageClass.java
This forces the compiler to create the "mypack" package.
The -d keyword specifies the destination for where to save the class file. You can use any directory name, like c:/user (windows), or, if you want to keep the package within the same directory, you can use the dot sign ".", like in the example above.
Note: The package name should be written in lower case to avoid conflict with class names.
When we compiled the package in the example above, a new folder was created, called "mypack".
To run the MyPackageClass.java file, write the following:
C:\Users\Your Name>java mypack.MyPackageClass
The output will be:
This is my package!
Extra note:
Method/Constructor/Overload Rules
Method/constructor overloading is within the same class.
In the method/constructor overloading nmber of parameters must different or data type must be different or at least sequence of parameters must be different.
Method overloading can not be performed by only changing return type of the method return type can be same or different in method overloading.
Example
Public void sum(int a){}
Public int sum (int a){
Constructor: Except this method name is name as the class name
It has no return type
It is not static
Abstraction:
We can’t make a object of abstract class
We can have a abstract method
We can have a abstract method but it don’t have body and return type is abstract
You can create abstract method but class must be abstract class
You can inheritance abstract class but have to impalement the abstract method
Java Polymorphism
Polymorphism means “many form”, and it accrue when we have many class that are related to each other by inheritance.
Like we specified in provides chapter inheritance lets us inheritance attributes and method from another class polymorphism use those method to perform different tasks.
This allows us to perform a single action in different ways.
Java Inheritance( Subclass and supper class)
In java, It is possible to inherit attribute and methods from one class to another. We group the inheritance concept in to two categories.
Subclass(child) the class that inherits from another class
Supper class (parent) the class being inherited from
To inherit from class use the extends keyword
Why and when to use inheritance
It is useful for code reusability: reuse attribute and methods of on existing class when you create a new class.
Abstract class and methods
Data abstraction is the process of hiding certain details and showing and essential information to user.
Abstraction can be archived with either abstract classes or interface (which you will learn more about in the next chapter)
The abstract keyword is a non-access modifier, used for class and method
Abstract method: Can only be used in a abstract class and it dose not have a body the body is provided by the sub class (inherited from)
An abstract call can have both a abstract and regular method.
Why and when focused abstract class and method
To achieve security – hide certain details and any show the important details of an object
Comments
Post a Comment